Stratus Guides - Backup Strategies
Backup to Amazon S3 Bucket
The AWS CLI comes preinstalled on Stratus. Run aws configure and follow the prompts entering the appropriate region and access key for your AWS account.
Example:
$ aws configure
AWS Access Key ID [None]: ABCDEFGHIJKLMNOPQRSTUVWXYZ
AWS Secret Access Key [None]: FaK3S3Cr3tAcc3SSK3yF0rFun
Default region name [None]: us-east-1
Default output format [None]: text
Run aws s3 ls to show your existing buckets and manage other AWS resources.
For example, a new backup called my-magento-backup can be created with:
$ aws s3 mb s3://my-magento-backup
make_bucket: my-magento-backup
$ aws s3 ls
2019-03-19 13:23:50 my-magento-backup
You can created backups in Magento 2 with the built-in backup system.
To create a database dump and a tar of the web root:
$n98-magerun2 db:dump s3_backup.sql
$tar -zcvf s3_backup_3_19_2019.tar.gz /srv/public_html/
Archiving a Magento store can take a long time.
To upload the backup to AWS:
$ aws s3 ls
2019-03-19 13:23:50 my-magento-backup
$ aws s3 cp s3_backup_3_19_2019.tar.gz s3://my-magento-backup
upload: ./s3_backup_3_19_2019.tar.gz to s3://my-magento-backup/s3_backup_3_19_2019.tar.gz
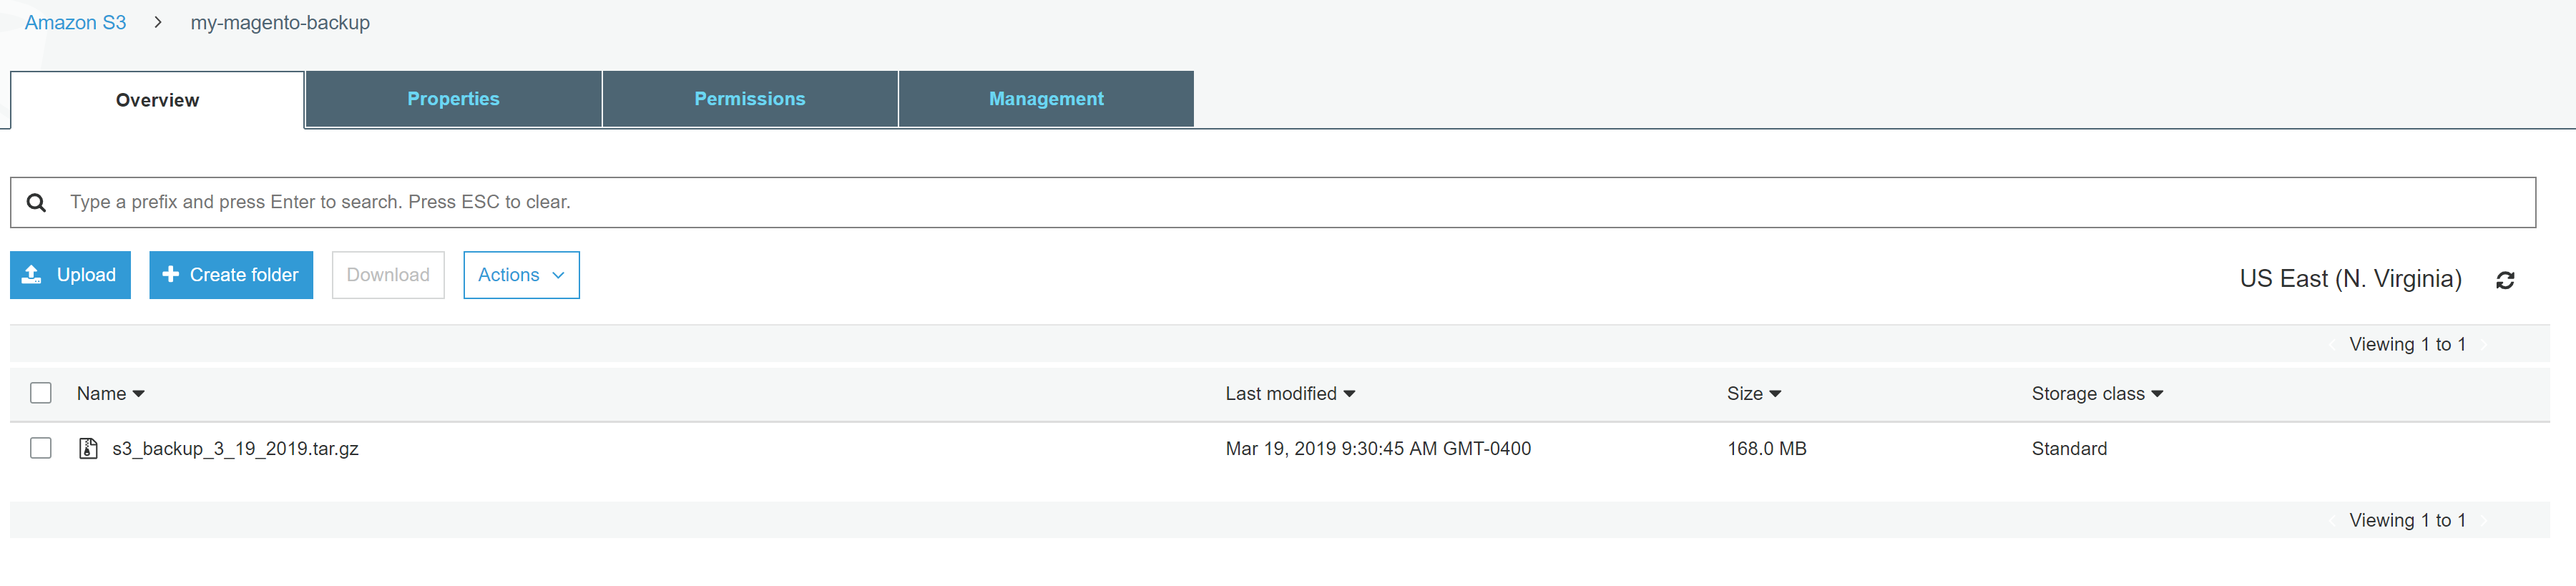
The file will upload with progress details.Once uploaded, the archive can be seen within the bucket in the AWS Console or web interface.
Learn more about S3 commands from Amazon.
A script can be set to create a backup and upload to S3. Then a cron can be set to automatically run the script.
#!/bin/bash
#S3 Backup Example

date="$(date "+%m-%d-%Y")"
bucket_name="my-magento-backup"
magento_root="/srv/public_html"

#create databasedump
echo "Creating database dump..."
/usr/local/bin/n98-magerun2 --root-dir=$magento_root db:dump db-backup-$date.sql

#create archive of webroot, excluding var
echo "Creating tar archive of files and database dump..."
tar --exclude=/srv/public_html/var/* -zcf $date-backup.tar.gz /srv/public_html/

#upload to s3
echo "Uploading to S3..."
aws s3 cp $date-backup.tar.gz s3://my-magento-backup

#clean up
echo "Removing local files and cleaning up..."
rm $date-backup.tar.gz
rm $magento_root/db-backup-$date.sql

echo "Done!"
The above would output:
$ ./backup.sh
Creating database dump...

  Dump MySQL Database

Start dumping database db_cded1u2ypqu to file db-backup-03-19-2019.sql
Finished
Creating tar archive of files and database dump...
tar: Removing leading `/' from member names
Uploading to S3...
upload: ./03-19-2019-backup.tar.gz to s3://my-magento-backup/03-19-2019-backup.tar.gz
Removing local files and cleaning up...
Done!
Dropbox backups
The official Dropbox CLI utility from Dropbox is not currently supported on Webscale STRATUS. A [3rd party script][9] may be used to push files to a Dropbox folder with the proper access tokens.
Backup to Google Cloud
To backup a Webscale STRATUS environment to Google Cloud, an account must be created. Next, create a project from the Google Cloud Console. As an example: my-backups-256118.
gsutil is used for this tutorial. gsutil is a Python application that accesses Google Cloud Storage from the command line.
-
Begin by downloading the files from Google. Extract them locally.
$ wget https://storage.googleapis.com/pub/gsutil.tar.gz $ tar -zxvf gsutil.tar.gz -
Next, configure gsutil to connect to Google.
$ ./gsutil/gsutil config This command will create a boto config file at /srv/.boto containing your credentials, based on your responses to the following questions. Please navigate your browser to the following URL: https://accounts.google.com/o/oauth2/auth?scope=https%3A%2F%2Fwww.googleapis.com%2Fauth%2Fcloud-platform+https%3A%2F%2Fwww.googleapis.com%2Fauth%2Faccounts.reauth&redirect_uri=urn%3Aietf%3Awg%3Aoauth%3A2.0%3Aoob&response_type=code&client_id=909320924072.apps.googleusercontent.com&access_type=offline In your browser you should see a page that requests you to authorize access to Google Cloud Platform APIs and Services on your behalf. After you approve, an authorization code will be displayed. Enter the authorization code: [Authorization Code] Please navigate your browser to https://cloud.google.com/console#/project, then find the project you will use, and copy the Project ID string from the second column. Older projects do not have Project ID strings. For such projects, click the project and then copy the Project Number listed under that project. What is your project-id? [Project ID] gsutil developers rely on user feedback to make improvements to the tool. Would you like to send anonymous usage statistics to help improve gsutil? [y/N] y Boto config file "/srv/.boto" created. If you need to use a proxy to access the Internet please see the instructions in that file. -
Next, create a bucket. Buckets need to be a unique name as they share a global naming scheme at Google. Standard storage is used in this example. Google has different storage types.
$ ./gsutil/gsutil mb -c standard -l US -p my-backups-256118 gs://mark-stratus-backups Creating gs://[bucket-name]... -
Create a manual backup by switching to the document root, dumping a copy of the database, and then creating an archive;
$ cd public_html/ ~/public_html$ n98-magerun2 db:dump backup.sql ~/public_html$ tar -zcvf backup_10_16_2019.tar.gz /srv/public_html/ -
Once archived, copy to Google:
 $ ./gsutil/gsutil cp /srv/public_html/backup_10_16_2019.tar.gz gs://[bucket-name]
 Copying file:///srv/public_html/[backup-name].tar.gz [Content-Type=application/x-tar]...
 \ [1 files][126.1 MiB/126.1 MiB]
 Operation completed over 1 objects/126.1 MiB.
 ~$ ./gsutil/gsutil ls -l gs://[bucket-name]
  132217623  2019-10-16T18:52:52Z  gs://[bucket-name]/[backup-name].tar.gz
 TOTAL: 1 objects, 132217623 bytes (126.09 MiB)
A script can be set that creates a backup and uploads it to Google. Then a cron can be set to automatically run the script.
#!/bin/bash
#Google Cloud Backup Example

date="$(date "+%m-%d-%Y")"
bucket_name="mark-stratus-backups"
magento_root="/srv/public_html"

#create database dump
echo "Creating database dump..."
/usr/local/bin/n98-magerun2 --root-dir=$magento_root db:dump db-backup-$date.sql

#create archive of webroot, excluding var
echo "Creating tar archive of files and database dump..."
tar --exclude=/srv/public_html/var/* -zcf $date-backup.tar.gz /srv/public_html/

#upload to Google
echo "Uploading to Google..."
./gsutil/gsutil cp $date-backup.tar.gz gs://$bucket_name

#clean up
echo "Removing local files and cleaning up..."
rm $date-backup.tar.gz
rm $magento_root/db-backup-$date.sql

echo "Done!"
Backup to Backblaze
Backing up Webscale STRATUS to Backblaze B2 can be performed using a tool called Restic.
-
Create a Backblaze account.
-
Create a new bucket. Note the Bucket Unique Name for later:

-
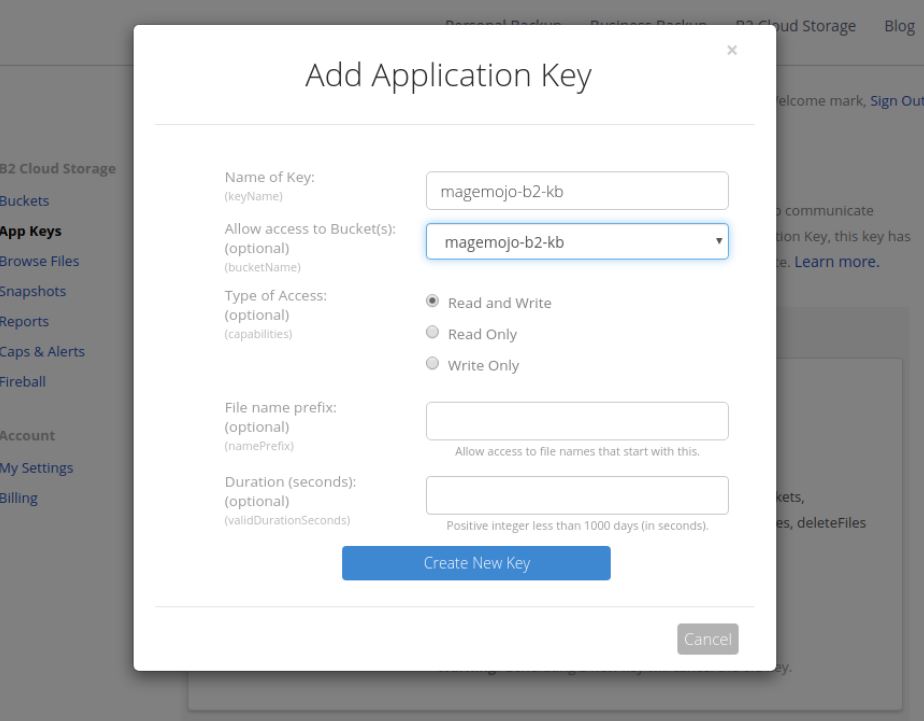
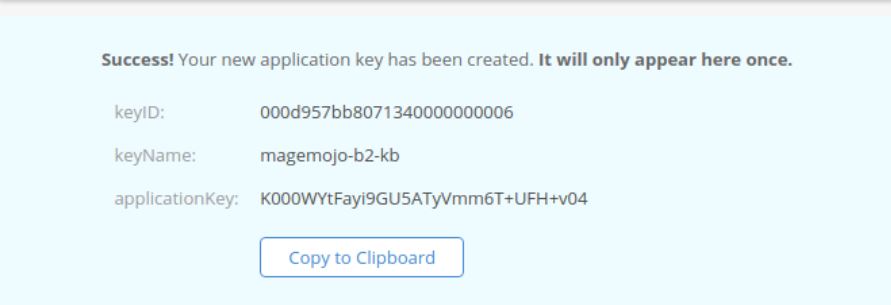
Go to the App Keys section and add a new key. The key can be created with access to any bucket or can be optionally restricted to access to a specific bucket. Noe the keyID and applicationKey for later use.
-
Go to Github to get the latest pre-compiled binary for Restic.
-
Download and extract the code into
/srv. -
Rename the program to “restic”.
-
Grant the file execution permission.
  $ wget https://github.com/restic/restic/releases/download/v0.9.6/restic_0.9.6_linux_amd64.bz2
  $ bzip2 -d restic_0.9.6_linux_amd64.bz2
  $ mv restic_0.9.6_linux_amd64 restic
  $ chmod u+x restic
-
-
Create a file called restic-pw.txt which will store a random string.
$ export B2_ACCOUNT_ID="[keyID]" $ export B2_ACCOUNT_KEY="[applicationKey]" $ export RESTIC_REPOSITORY="b2:magemojo-b2-kb" $ export RESTIC_PASSWORD_FILE="restic-pw.txt" -
Initialize the new bucket:
$ ./restic -r b2:magemojo-b2-kb init created restic repository b44062684d at b2:magemojo-b2-kb Please note that knowledge of your password is required to access the repository. Losing your password means that your data is irrecoverably lost. -
Perform a backup. On a clean Magento 2 installation, this takes about 2 minutes to perform.
 $ ./restic -r b2:magemojo-b2-kb backup public_html/
 repository b4406268 opened successfully, password is correct
 created new cache in /srv/.cache/restic

 Files:       74683 new,     0 changed,     0 unmodified
 Dirs:            0 new,     0 changed,     0 unmodified
 Added to the repo: 402.722 MiB

 processed 74683 files, 507.124 MiB in 1:40
 snapshot f0263a11 saved
If the same command is run again, Restic will create another snapshot of the data. Restic uses de-duplication, thus the next backups will always be faster as only files that are new or have been modified since the last snapshot are sent to B2.
All snapshots can be ween with the following command:
$ ./restic -r b2:magemojo-b2-kb snapshots
repository b4406268 opened successfully, password is correct
ID        Time                 Host                     Tags        Paths
------------------------------------------------------------------------------------
f0263a11  2019-12-18 19:00:06  hostname                /srv/public_html
------------------------------------------------------------------------------------
1 snapshots
To a the specific snapshot use the -t flag to specify a restore location;
$ ./restic -r b2:magemojo-b2-kb restore f0263a11 -t /tmp/restore
repository b4406268 opened successfully, password is correct
restoring <Snapshot f0263a11 of [/srv/public_html] at 2019-12-18 19:00:06.135398979 +0000 UTC by username> to /tmp/restore
Next, a script can be set for a backup cron job.
#!/bin/bash
#Backblaze B2 Backup Example

magento_root="/srv/public_html"

export B2_ACCOUNT_ID="[keyID]"
export B2_ACCOUNT_KEY="[applicationKey]"
export RESTIC_REPOSITORY="b2:magemojo-b2-kb"
export RESTIC_PASSWORD_FILE="restic-pw.txt"

#create database dump
echo "Creating database dump..."
/usr/local/bin/n98-magerun2 --root-dir=$magento_root db:dump db-backup.sql

#upload to Backblaze
echo "Uploading to Backblaze B2..."
./restic -r $RESTIC_REPOSITORY backup $magento_root

#clean up
echo "Removing local db backup..."
rm $magento_root/db-backup.sql

echo "Done!"
Feedback
Was this page helpful?
Glad to hear it! Have any more feedback? Please share it here.
Sorry to hear that. Have any more feedback? Please share it here.