Configuring and Flushing the Site Cache
If you have enabled the Dynamic Site Cache feature, Webscale caches static web pages and resources, such as media assets, scripts, and API responses, according to rules that define how and when your application servers cache content. If the Site Cache contains the content, Webscale directly delivers cached pages and resources to site users, bypassing your web servers.
You can configure Site Cache rules so Webscale only caches content that can be served to any site user and the resources have a low Time-to-Live (TTL) value. Webscale automatically removes cookies from responses that it sends from the cache.
When Webscale CDN is not enabled, Webscale passes incoming requests to your application servers. If the Site Cache contains the requested content, it returns a response to the browser. If the Site Cache does not contain the content, it forwards the request to your web servers to fulfill. When the web servers send a response, the content is cached on your application servers if the content matches a Site Cache rule. Webscale then forwards it to the site user browser.
When Webscale CDN is enabled, Webscale CDN receives the requests first. If the Webscale CDN cache does not contain the content for a request, Webscale forwards the request to the proxies. For more information on CDN caching, see Configuring CloudEDGE CDN Caching Policies.
If you have not created a Site Cache rule, Site Cache is disabled and Webscale will not cache any content.
Work with Site Cache rules
You can create, edit, delete, and change the execution order of Site Cache rules.
Site Cache rule settings
Site Cache rules consist of the following settings. The cache key properties define the cache key, which enables finding out if the requested content already exists in the Site Cache.
- Condition: Determines if Webscale caches pages and resources. As with Web Controls, you must specify at least one condition for a Site Cache rule to execute.
- TTL (Time-To-Live): Specifies how long a cached page or resource is available for site users. The length of time that Webscale caches a page or resource depends on the TTL value. A high number corresponds to a longer amount of time.
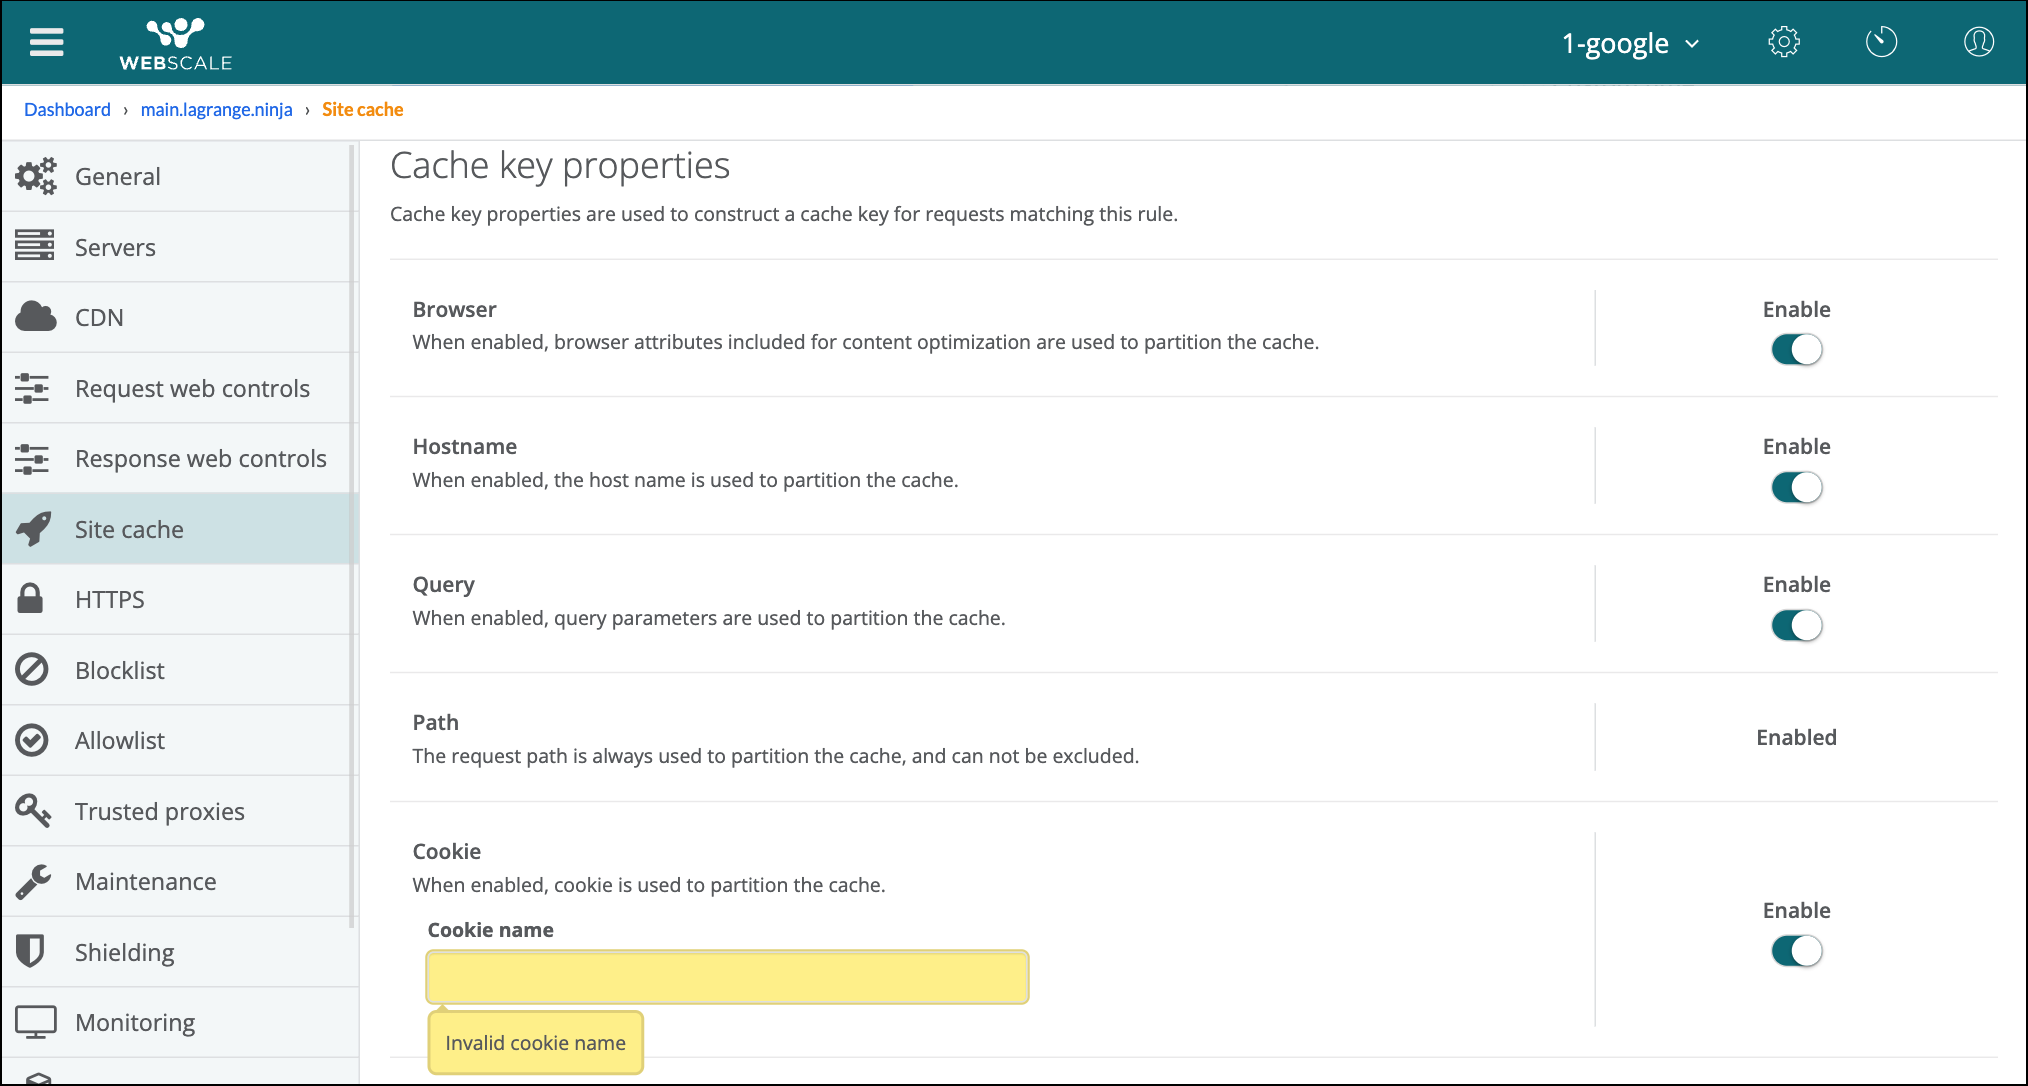
- Cache key properties: Used to construct a cache key for requests matching the rule. The following settings define the cache key.
- Browser: Browser attributes for content optimization that are used to partition the cache, if enabled
- Hostname: Hostname used to partition the cache, if enabled
- Query: Query parameters used to partition the cache, if enabled
- Path: Request path used to partition the cache, which cannot be disabled
Access the Site cache page
You can create Site Cache rules through the Site cache page.
To access the Site cache page
-
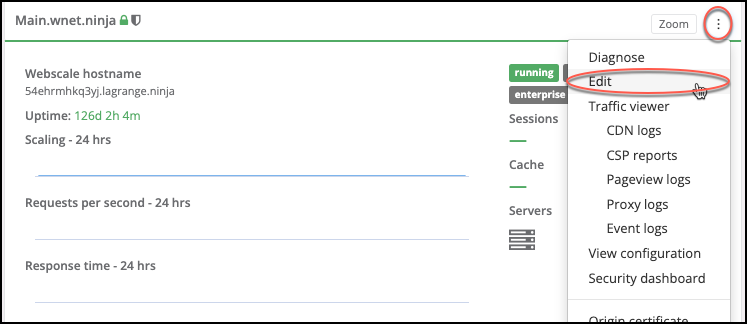
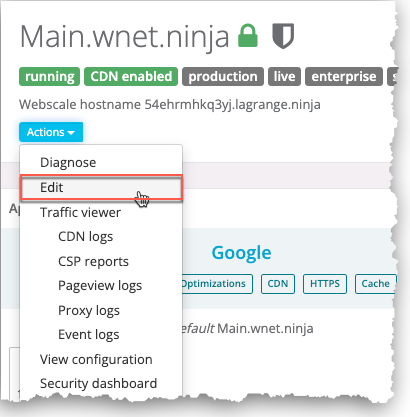
Click the three vertical dots menu icon on the upper-right corner of the application box and select Edit.
-or-
On your application page, click the Actions menu icon and select Edit.
-
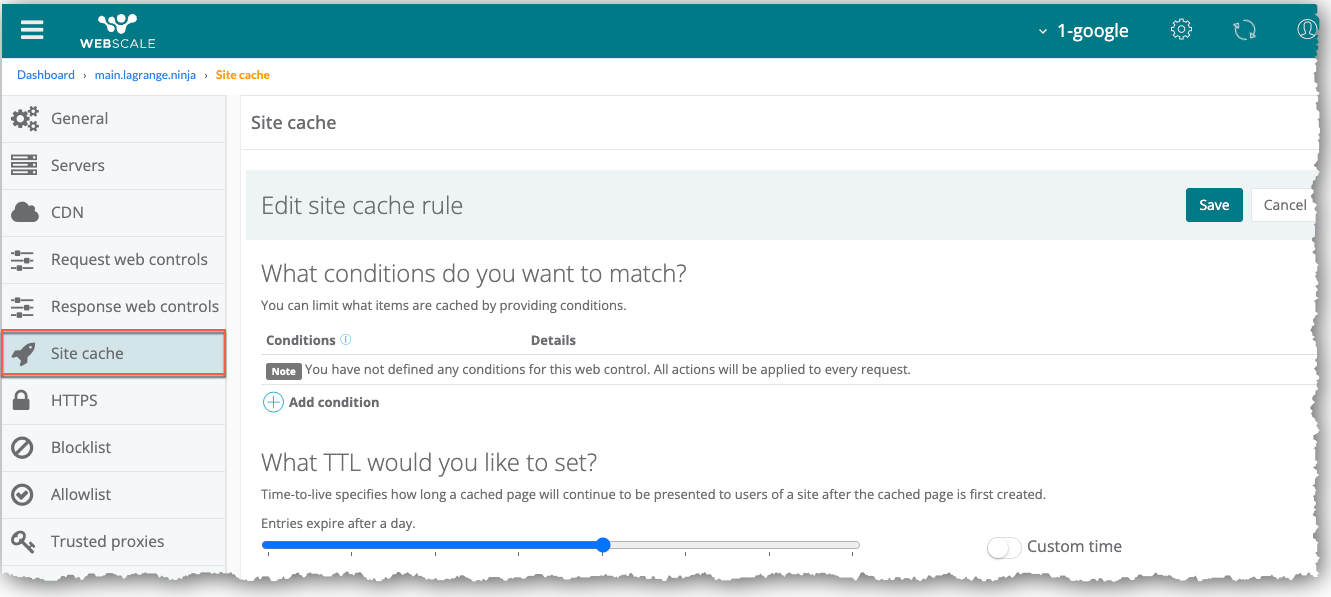
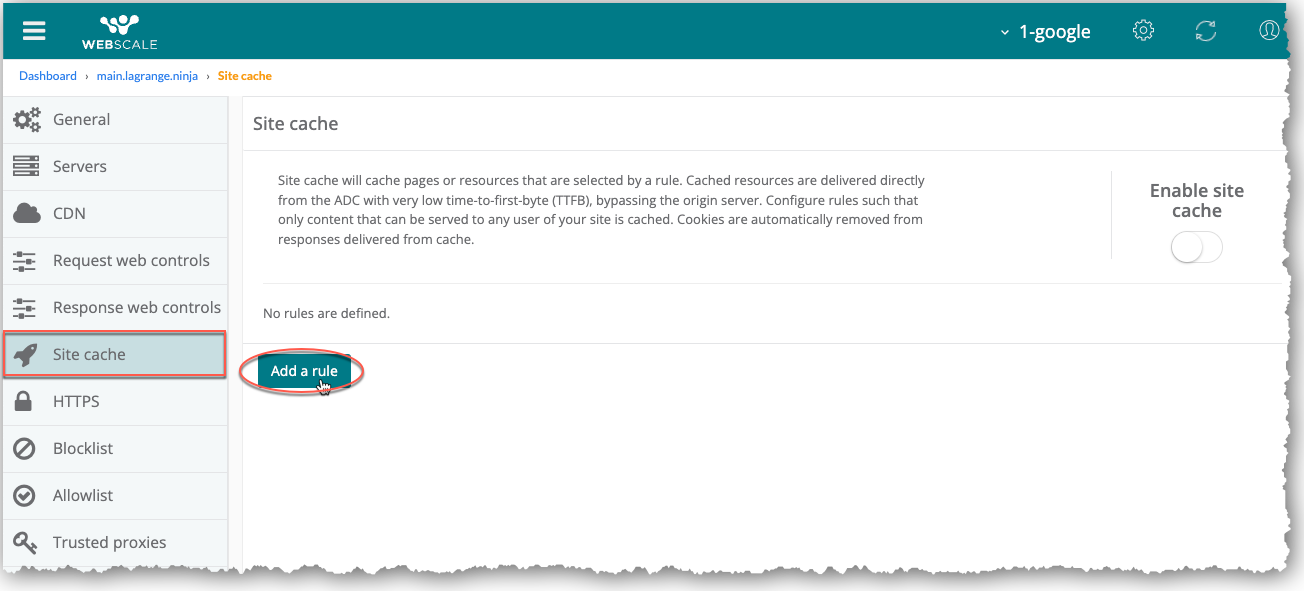
On the sidebar menu, click Site Cache.
The Site cache page displays.
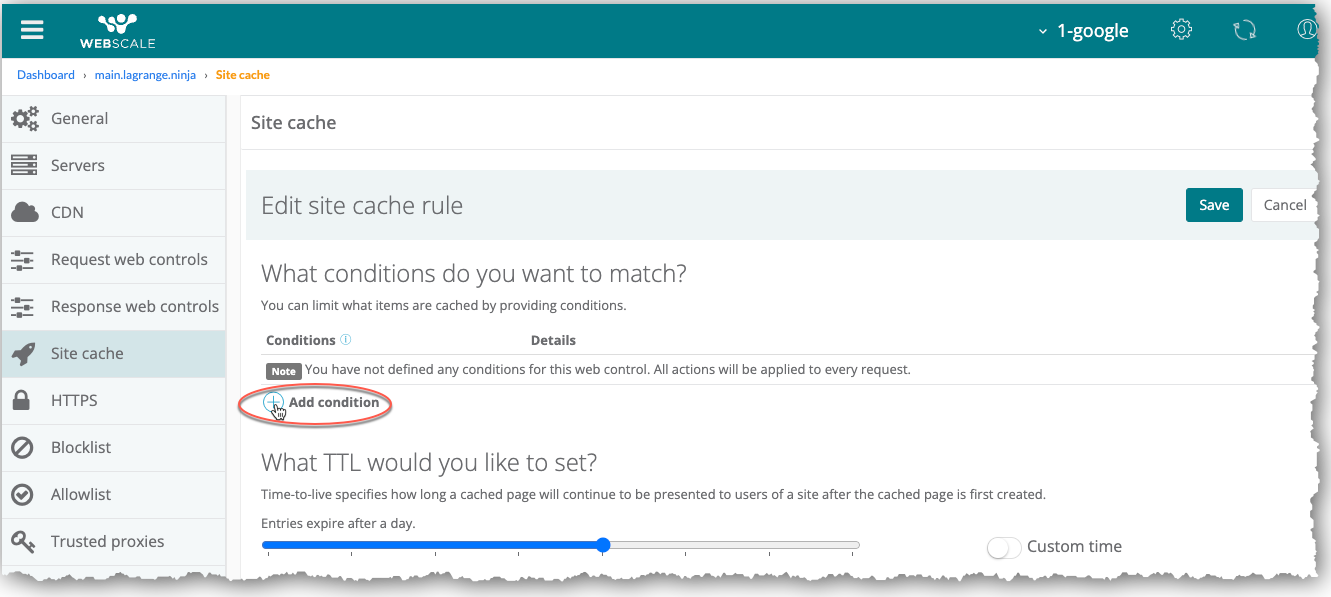
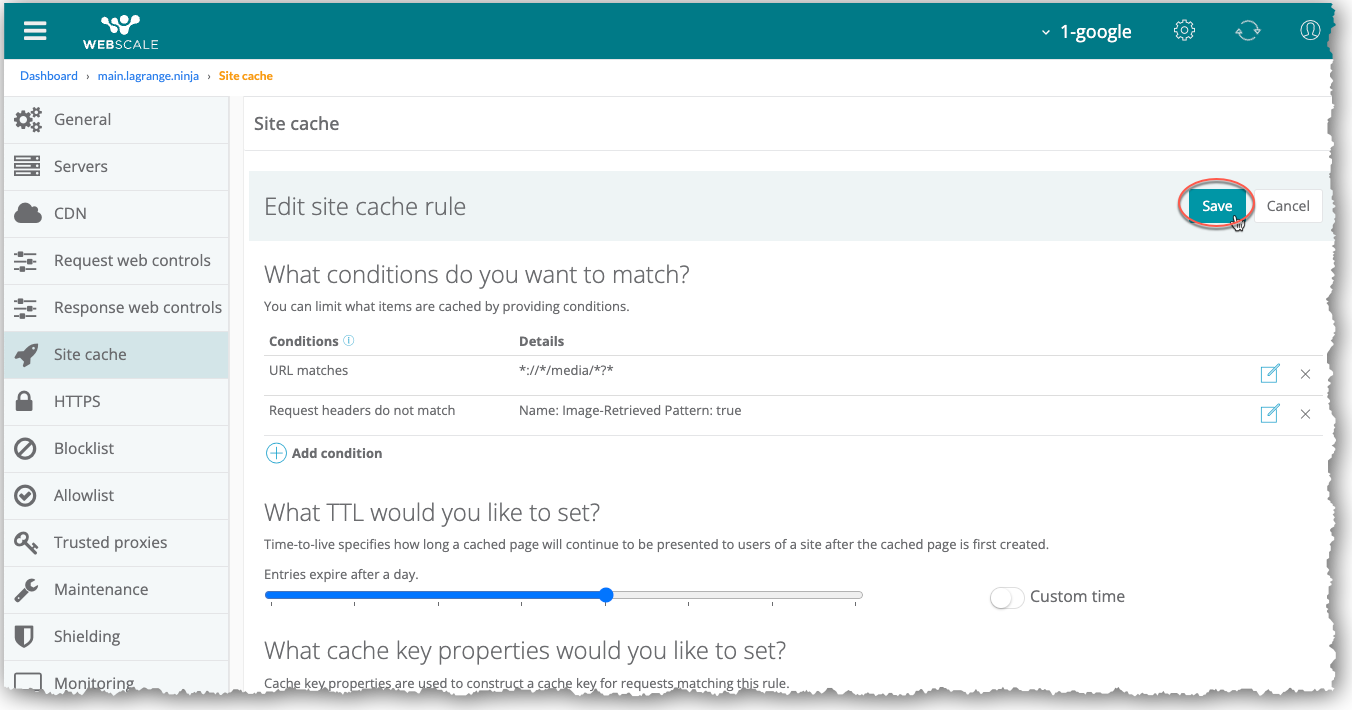
Create Site Cache rules
You can create multiple conditions for each rule. You can also create more than one rule. After you save the first rule, you can enable the Site Cache feature.
To create a Site Cache rule
-
In the Site cache page, click Add a rule.
-
Click Add a condition.
-
In the condition drop-down menu of the Create condition dialog box, select a condition.
-
Specify relevant condition settings.
-
Click Add, then Done.
-
To add more conditions, follow the above procedure for adding a condition.
-
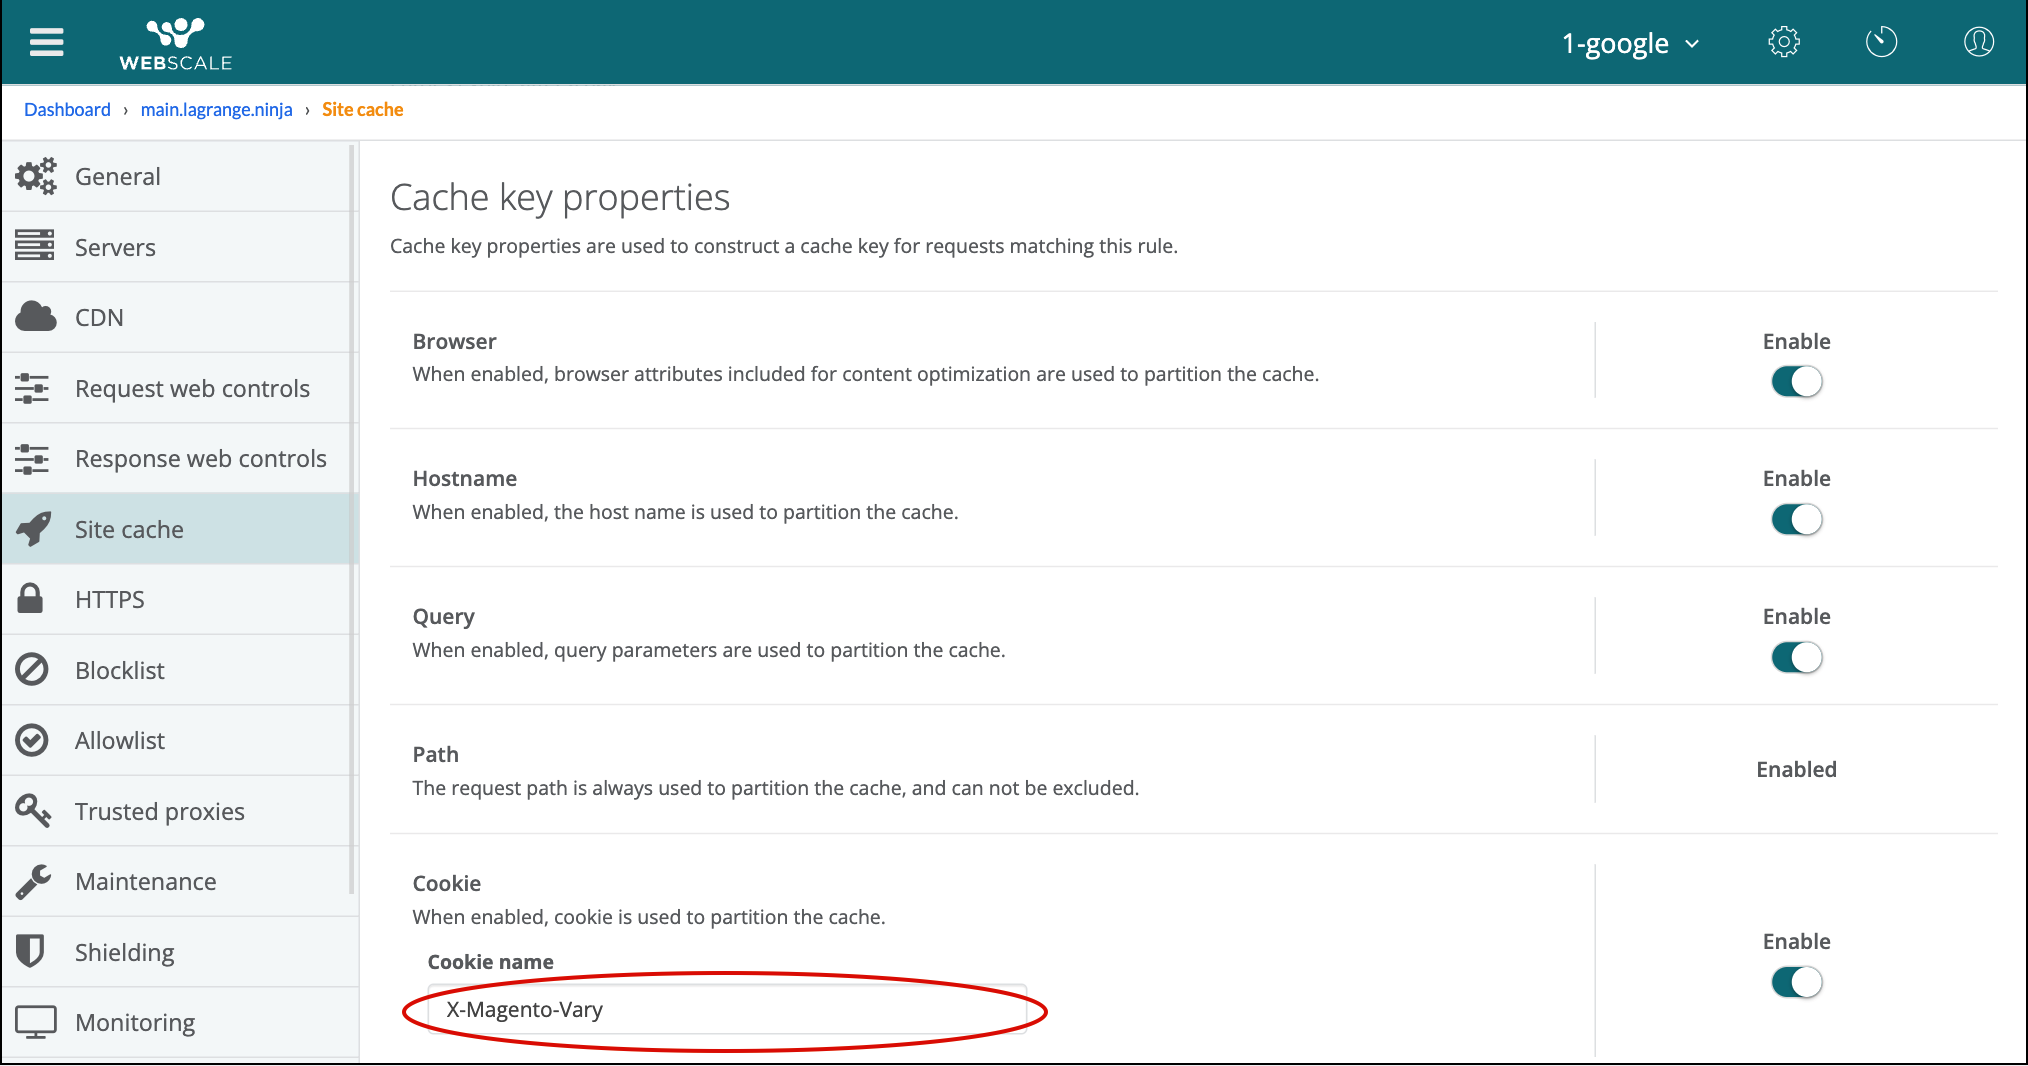
Make sure that all cache key properties are enabled.
-
Provide a valid cookie name if the property is enabled.
-
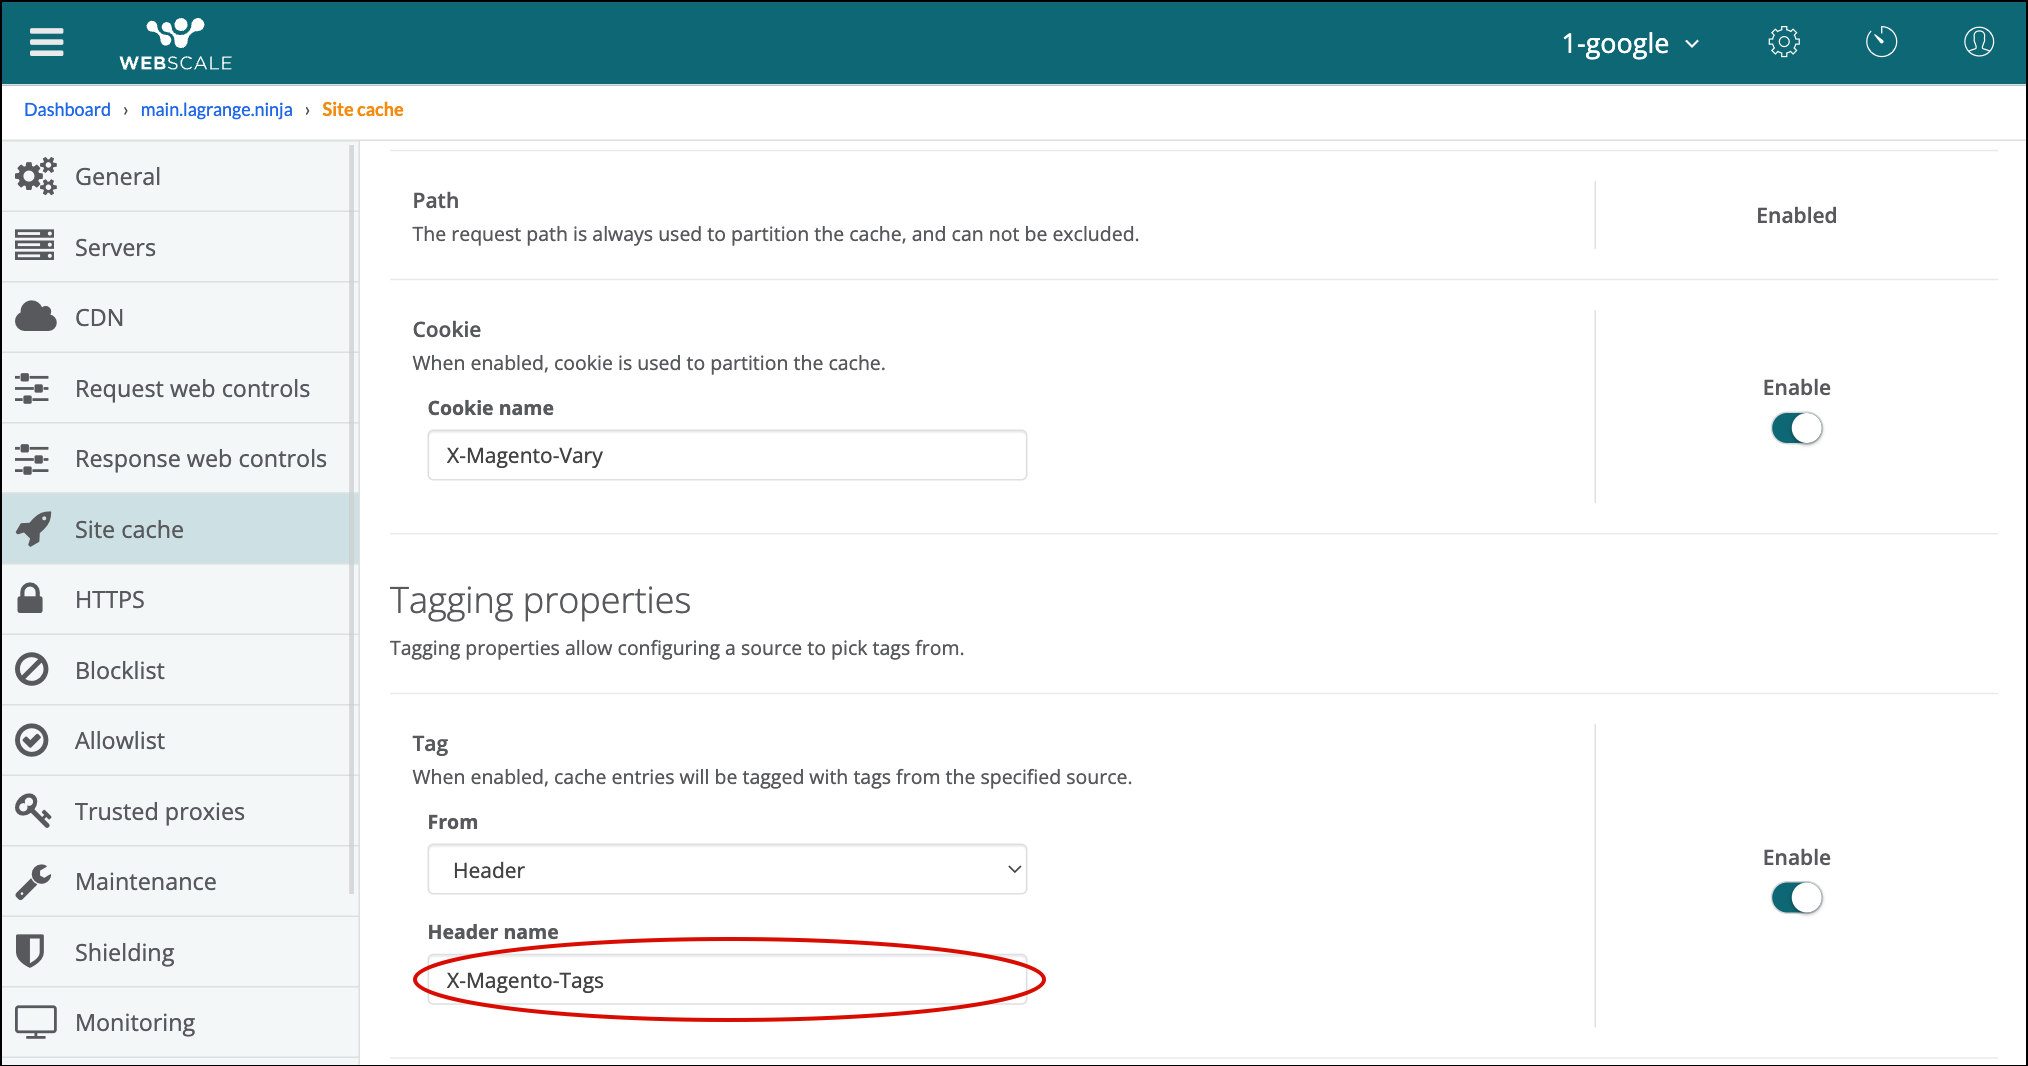
The tagging properties allow tagging site cache entries with a tag that can be used to invalidate the cache. If enabled, ensure that a valid header name is provided.
-
Optionally, modify the TTL setting: Drag the slider to choose from a preset TTL value. -or- Click the Custom Time toggle, then enter the desired TTL (in seconds).
-
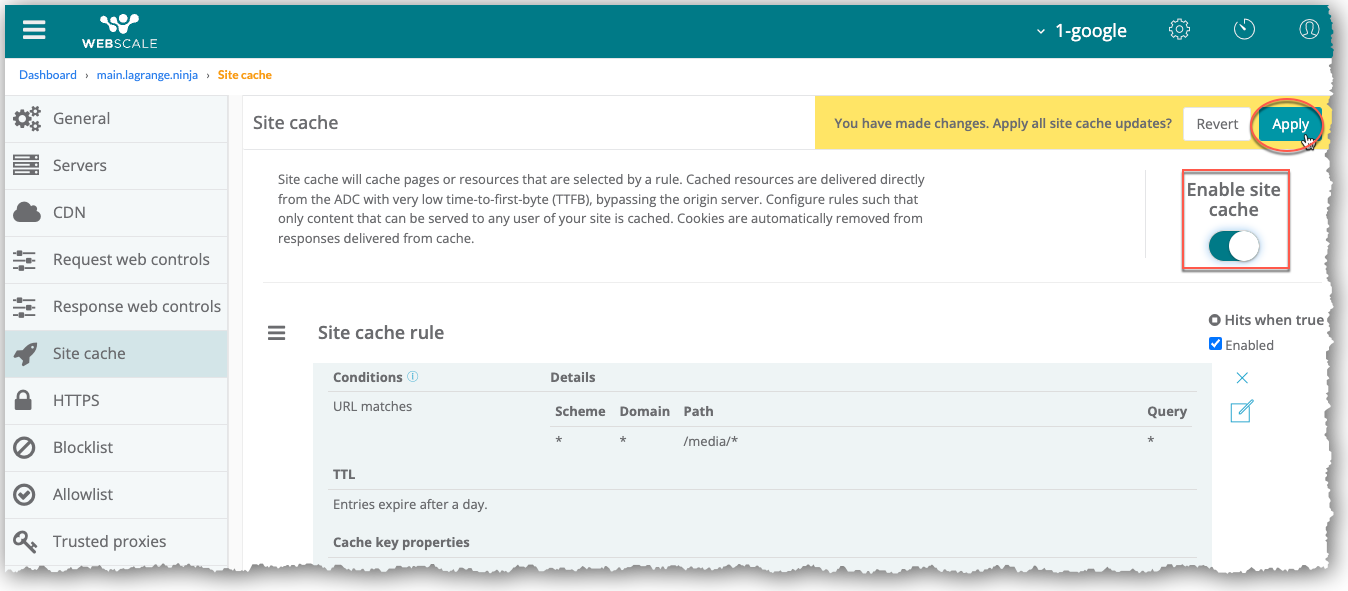
In the Cache site page, click Save.
-
If you have not already enabled Site Cache, click the Enable site cache toggle to enable it.
-
Click Apply.
Flush the Site Cache
Webscale proxies will cache web content that is served from the backend application servers based on rules defined in the Site Cache rule settings. File types that are cached can include images, javascript files, CSS files, HTML files and API responses. The images, javascript, and CSS files can also be optionally optimized by Pagespeed.
There may be times you will want to flush the contents of the site and Pagespeed caches, for instance if a major update was made to the application or site. You can flush the entire cache or specific items in the cache from both the Webscale control panel or the API.
Invalidate Site Cache items
Note:
To follow these instructions, log into Webscale Control Panel and click the three vertical dots menu of the application box.
On the menu that appears, click Invalidate Cache…
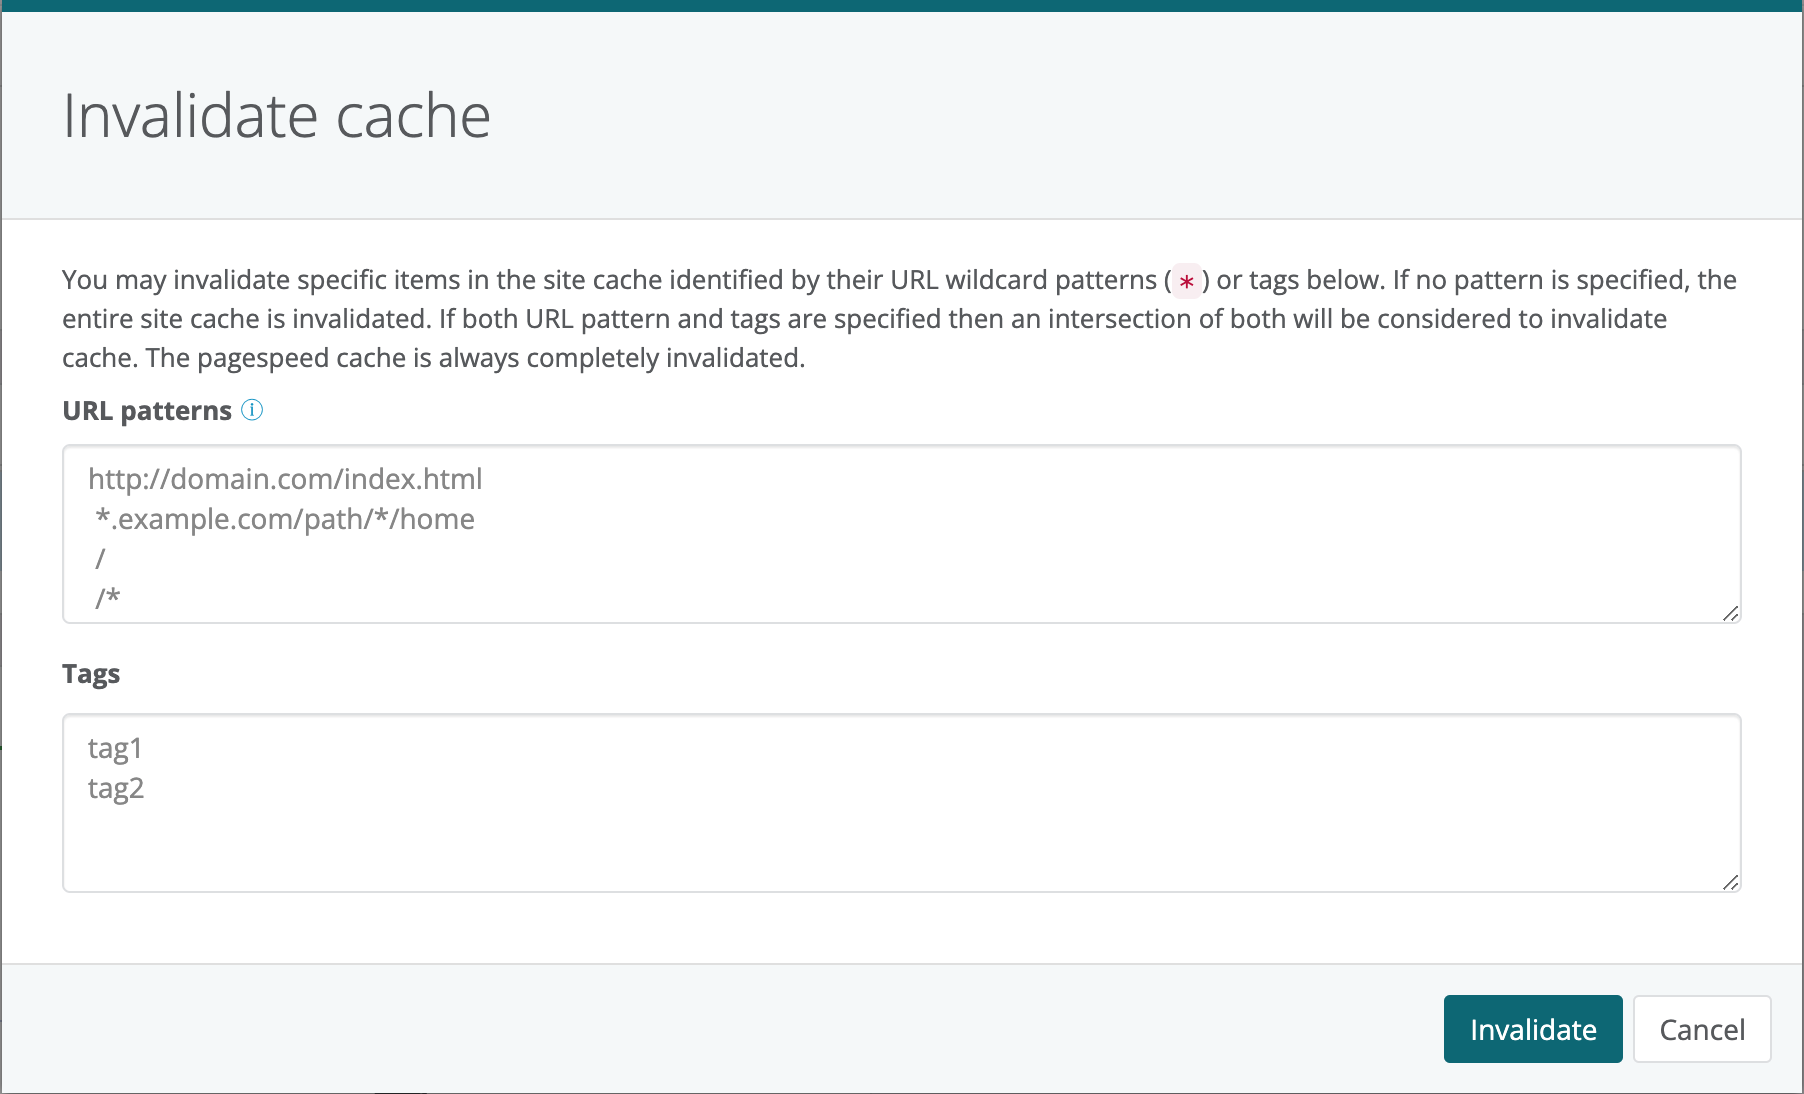
From here, you can invalidate specific items in the Site Cache, or all items in the Site Cache. Specify the items to be invalidated using the URLs of the items or the tags with which the items are cached. Use a wildcard (*) to invalidate all items at a specific path. If no path is specified then the entire Site Cache is invalidated. Provide the header names in the tags field with which the entries are cached and need to be invalidated. If the tags are specified along with URLs then an intersection of both will be invalidated. Click Invalidate to proceed, or Cancel if you no longer need to invalidate the cached items.
Using the Webscale API
You can use the Webscale API to purge specific items from the cache rather than the entire cache. On the API page, enter your API key in the Enter your api_key field. Under Webscale APIs locate tasks and click on List Operations. Once here, click POST to expand the POST type action. Now add the following information in the text area under the Parameters section.
{
  "type": "invalidate-cache",
  "target": "/v2/applications/<app_id>",
  "parameters":
   {
      "urls": ["*://example.com/example.html","https://example.com.b/*.jpg"],
      "tags": ["tag1", "tag2"]
   }
}
Make sure to replace the placeholder <app_id> with your actual Application ID, and replace the example URLs with the actual URLs and example tags with the actual tags of the items to purge from the cache. You can also use the wildcard character (*) to have the action apply to multiple URLs. This is particularly useful when you want to clear certain parameters from the cache, such as all images, all web pages, and so forth.
Note:
The URLs used here must provide the scheme, host and path. For instance, you can use*:// to cover both the schemes http,https, you can provide * as host to target all hosts and you can provide an empty path with / or /* to cover all the paths present under the host. The tags used here must be valid header names.
If the action is successful, the API will respond with a 200 status code and will list all the URLs that have been purged from the cache.
Further Reading
- CloudEDGE CDN Overview
- Configuring CloudEDGE CDN Caching Policies
- Logs on Webscale
- How to Enforce a Content Security Policy
- Security How-Tos
Have questions not answered here? Please Contact Support to get more help.
Feedback
Was this page helpful?
Glad to hear it! Have any more feedback? Please share it here.
Sorry to hear that. Have any more feedback? Please share it here.