Enforcing a Content Security Policy
Web Controls enable you to use pre-defined security and performance rule sets. Rule sets minimize the need to discover, define, and maintain a large number of individual rules. Instead, you can create rule sets that match individual request or response conditions and execute a set of actions predefined in the Webscale Control Panel. Based on the conditions, Web Controls automatically execute a set of pre-defined actions after all conditions are met. Through Web Controls, you can create complex sequences of actions.
A powerful Web Control action you can use is the Content Security Policy action.
Note:
This is an optional feature. If you’d like to enable this feature, please contact support.Configure a Content Security Policy
To follow these instructions, log into Webscale Control Panel and click the three vertical dots menu of the application box.
On the menu that appears, click Edit.
Prerequisite
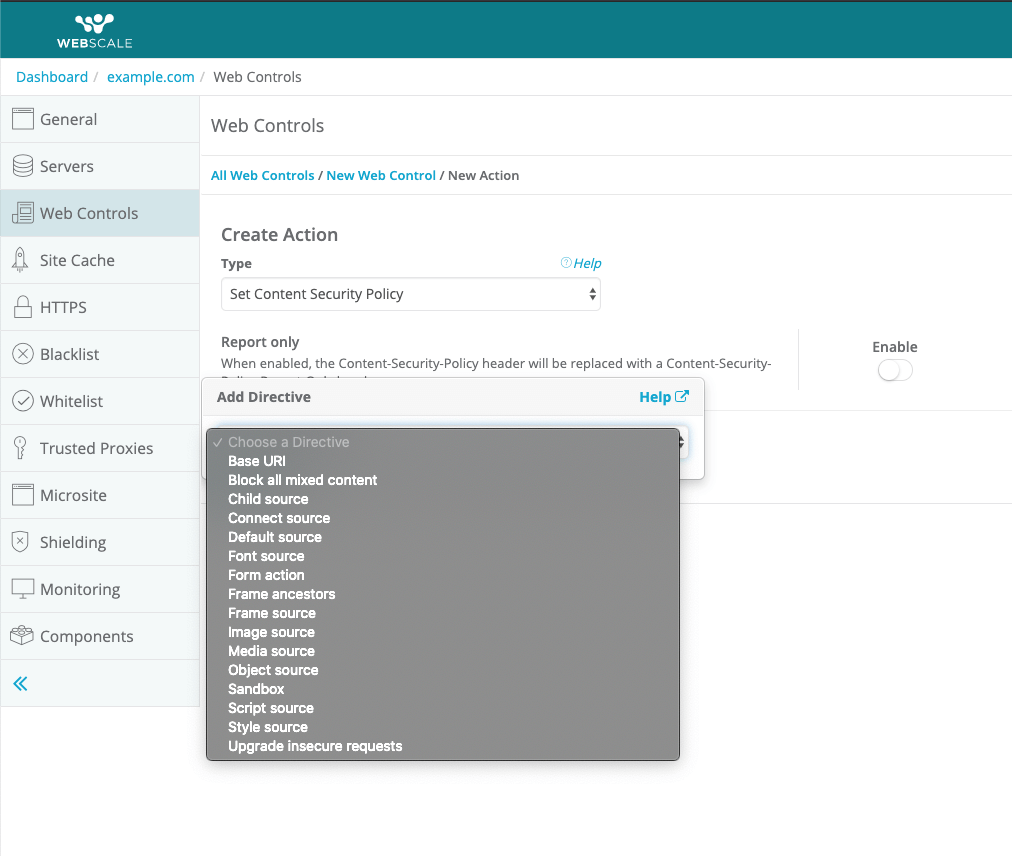
Since you’re setting a Web Control, we recommend reading How to Create Web Controls before following these steps.Click + Add Action to open the Create Action dialog. Click the Select an action.. dropdown to open it and choose Content Security Policy from the list. Then, click Add Directive.. to see the list of available Content Security Policy directives, and choose one from the list.
Note:
When you click the Enable toggle to enable the Report only setting, theContent-Security-Policy header will be replaced with a Content-Security-Policy-Report-Only header.
Depending on the directive chosen, you may have to add the specific source or value that applies to the directive. When finished, click the Done button to return to the Edit Web Control screen. You can add more than one action. Note that all actions specified are run, but there is no implied order.
When a condition is met, then all specified actions are applied to the request. You can only choose one final action. Final actions run last; the order of execution of other actions is unspecified and not necessarily in the order displayed.
See Content Security Policy Directives for a list of directives and sources you can choose from.
Content Security Policy Logs
When a content security policy is violated, a log entry is created that contains information about the violation.
Violation report parameters
| Parameter | Explanation |
|---|---|
arrival |
Timestamp of when the report was received by the Webscale proxy |
blocked_uri |
URI of the resource that was blocked from loading by the Content Security Policy. If the blocked URI is from a different origin than the document-uri, then the blocked URI is truncated to contain just the scheme, host, and port. |
country |
Two-letter country code (ISO 3166-2) for the origin of a request |
disposition |
“enforce” if the Content-Security-Policy response header was used. “report” if the Content-Security-Policy-Report-Only response header was used. |
document_uri |
URI of the document in which the violation occurred |
effective_directive |
Directive the enforcement of which caused the violation |
host |
URL of the application that was requested |
original_policy |
Original policy as specified by the Content-Security-Policy response header |
peer_address |
IP address of the proxy that received the report |
referrer |
Referrer of the document in which the violation occurred |
request_address |
Remote IP address of the user agent that made the request |
script_sample |
First 40 characters of the inline script, event handler, or style that caused the violation |
session_id |
ID of the Webscale session that attempted to load the resource |
status_code |
Response status code that indicates the response to a specific request |
useragent |
User agent used in the request |
violated_directive |
Name of the violated policy section |
More information about the violation report syntax can be found on the Firefox MDN web docs.
Viewing the Content Security Policy logs
To follow these instructions, log into Webscale Control Panel and click the three vertical dots menu of the application box.
On the menu that appears, click CSP reports to view the content security policy logs.
On the Traffic Viewer page for CSP reports, you can use filter queries to drill down through the reports. The filter uses CSP report attributes, which are the same as the violation parameters. For more information on CSP report attributes, including aliases that you can use in filters, see CSP Report Logs
For example, the following filter query will show you all instances of blocked_uri that contain the string admin:
blocked_uri ~ *admin*
The filter accepts wildcard characters (*).
Alerting on Content Security Policy violations
You can monitor the Content Security Policy logs and configure a monitor to notify you if a specific Content Security Policy you’ve set is violated.
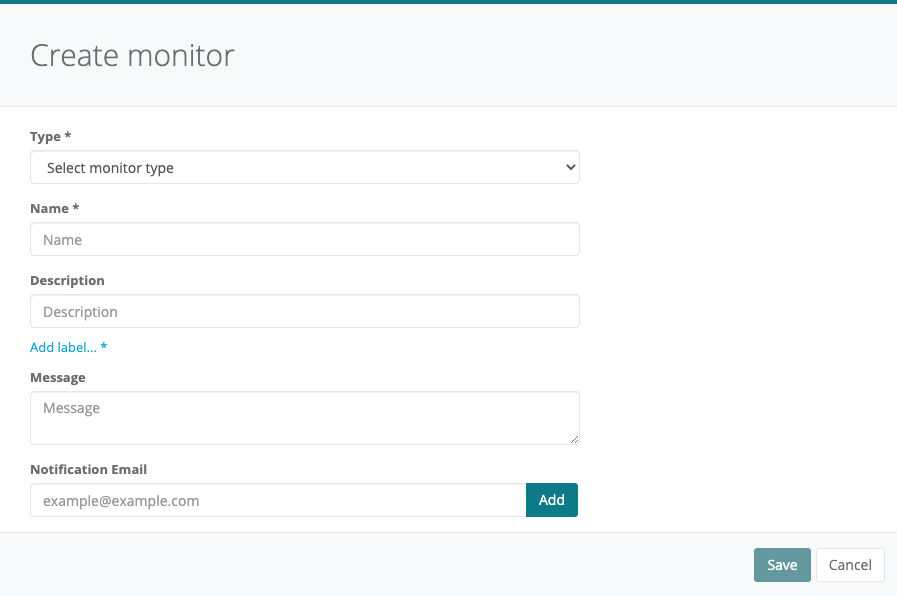
When logged into the Webscale Control Panel, click the (gear) icon on the upper right, and select Account Settings from the menu. Then click the Monitors tab, which takes you to the Monitors page. Click the Create monitor button to display the following:
Choose the following options:
- Type: Choose
logs. - Name: A name to identify the monitor with.
- Description: A short description of the monitor or it’s purpose.
- Add Label: Click here to add an existing label that is already applied to a related system resource.
- Message: The message sent in the notification. This field accepts liquid templates that render to markdown. This markdown is then rendered to HTML in the message sent. The templates differ depending on the monitor context (specified by the label) chosen.
- Notify: Where to send the notification. This field currently only accepts email addresses, but Webhooks are coming soon.
logs from the first Type field.
- Log Type: Choose
csp-reportshere. - Duration: Set a duration over which to monitor violations, in seconds.
- Group By: Divides the violations into groups on values of the attribute chosen here. Webscale then evaluates the condition for each group to determine if there are any groups that should cause a notification.
- Condition: Choose the condition, which must be in
outlier(<int>, <float>)form. - Filter: Similar to the Traffic Viewer’s filter, but the parameters can only be Content Security Policy violation parameters.
Once configured, you will receive notifications for Content Security Policy log entries that match the above settings.
Further Reading
- Content Security Policy (Firefox MDN web docs)
- Web Controls
- How to Block Countries from Accessing Your Site
- Content Security Policy Directives
- Logs on Webscale
Have questions not answered here? Please Contact Support to get more help.
Feedback
Was this page helpful?
Glad to hear it! Have any more feedback? Please share it here.
Sorry to hear that. Have any more feedback? Please share it here.

