Configuring CloudEDGE CDN Caching Policies
After you enable CloudEDGE CDN (also known as Webscale CDN) for your application, you can use the Webscale Control Panel to configure caching policies through CDN controls. These policies define how Webscale CDN processes requests and responses, including what happens when Webscale CDN forwards requests to your application.
CDN controls allow you to run custom JavaScript at key points of the traffic pipeline via the CloudEDGE Workers feature, including as traffic transits to your application and after your application generates a response. This allows for easy extension to the capability of your application without changing your deployed code. For more information about the CloudEDGE Workers feature, see CloudEDGE Workers Overview.
Note:
CloudEDGE Workers are only available for Amazon CDN providers.Topics
- Webscale CDN caching
- CDN controls basics
- Specify optional settings
- Change order of CDN controls
- CloudEDGE Workers
- Work with CDN controls
Webscale CDN caching
Webscale CDN uses your CDN provider to cache static resources from your applications. All HTTP requests and responses pass through the Webscale CDN cache even if they are not cachable.
You can use CDN controls to configure caching policies for Webscale CDN. Each CDN control defines how Webscale CDN responds to a particular incoming request. When you create CDN controls, you define policies that determine how and what Webscale CDN caches.
Caching with CDN controls
With CDN controls, Webscale CDN checks the path of the request path along with its cache key to determine if the resource exists in its cache. If the CDN cache contains it with the matching cache key, Webscale CDN serves the response. (A cache key is a combination of select headers, cookies and query string values from the request.)
If the Webscale CDN cache does not contain the resource, Webscale CDN forwards the request to your application to retrieve the resource. If Site Cache does not have the resource, it forwards the request to your web servers. After Site Cache or your web servers locates the resource and serves it, Webscale serves it to the user browser. Also, Webscale caches the resource and its cache key.
Caching without CDN controls
By default, there are no CDN controls for Webscale CDN. Without CDN controls, Webscale CDN does not cache assets and forwards all HTTP requests to your application. If you have enabled the Webscale Dynamic Site Cache feature for your proxies, Site Cache caches resources according to its own caching policies. It determines if the resource exists in its cache by converting the request into a cache key. If Site Cache contains the resource, Webscale serves the response from there. If Site Cache does not have the resource, Webscale forwards the request to your web servers.
CDN controls basics
The configuration of each CDN control must include a request path. When Webscale CDN receives a request, it compares the request path to the CDN control paths. It selects the first CDN control that matches according to the order in which they are configured in the Webscale Control Panel.
If Webscale CDN finds a match, it uses the cache key configuration of that CDN control to generate a cache key. Webscale CDN then uses this key, along with the full path to the resource, to search in its cache.
- If Webscale CDN finds the resource and it has not expired, a cache “hit” occurs and it returns the resource.
- If Webscale CDN does not find the resource or it has expired, a cache “miss” occurs and it forwards the request to your application or, if applicable, to your web servers. The forwarded request only includes the headers, cookies, and query parameters that the CDN control configuration included. These may be different than the headers, cookies and query parameters used to create the cache key.
Optionally, you can specify the following configuration settings.
- Duration of time that a resource can be cached before it expires
- How Webscale CDN generates the cache key for a request
- Headers, cookies, and query parameters that Webscale CDN includes on the application request
Specify optional settings
Webscale CDN uses the cache key to access the cache. It then determines if the cache contains the appropriate resource for the request. If the cache has the resource and it has not expired, Webscale CDN serves the cached resource.
CDN control settings can also determine the HTTP headers, cookies, and query parameters that Webscale CDN includes on requests that it sends to your application servers after cache misses.
If the path of a request does not match the path of any CDN control, the default policy runs. It sends the request with all of its HTTP headers, cookies, and query parameters to origin.
Change the order of CDN controls
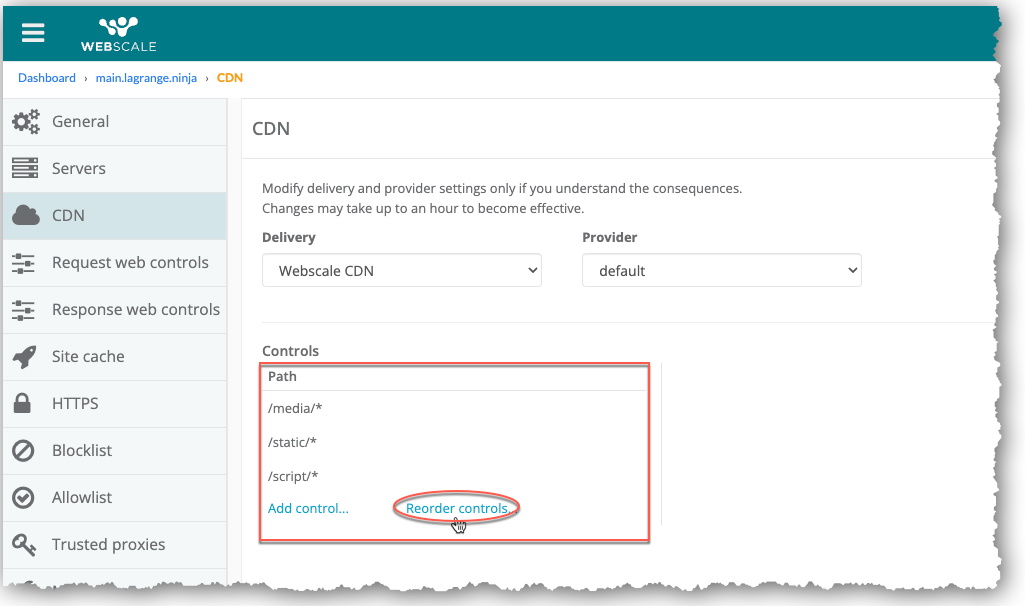
If a user creates multiple CDN controls, they display in a list in the Controls section of the CDN page by creation date (oldest to newest with the oldest at the top of the list) unless you have reordered the CDN controls in the list.
When the user selects a control in the list, the control’s configuration is displayed in the right pane. The configuration includes the control’s path pattern; how the cache key is generated for matching requests; headers, cookies and query parameters to pass through after cache misses; and any associated CloudEDGE workers
Webscale CDN compares requests to CDN controls based on their order in the list. It searches from top to bottom to find a match.
CloudEDGE Workers
Through the CloudEDGE Workers feature, CDN controls optionally allow you to augment a request that Webscale CDN forwards to origin after a cache miss or a response that origin returns to Webscale CDN.
Custom JavaScript enables you to extend your application’s functionality without changing your application code. The JavaScript source files include functions, each of which can process requests or responses but not both. The file that includes your JavaScript source files is known as a handler file. A handler incorporates the handler file.
When configuring a CDN control, you can associate up to two handlers with the control (one for requests and the other for responses). Associating handlers with a control creates a worker that runs the JavaScript function.
You can use the Webscale Image Manager feature with Webscale CDN. It automatically optimizes and processes images while maintaining image quality. Image Manager also helps embed images in your website and mobile applications to drive user engagement.
Work with CDN Controls
You can create, modify, and delete CDN controls through the Controls section of the CDN page for your application. The Controls section only displays after you enable Webscale CDN. For more information on how to enable Webscale CDN, see Introduction to Configuring Webscale CDN and Completing Webscale CDN Configuration.
Access CDN controls
The CDN page for your application enables you to access CDN controls.
To access CDN controls settings
-
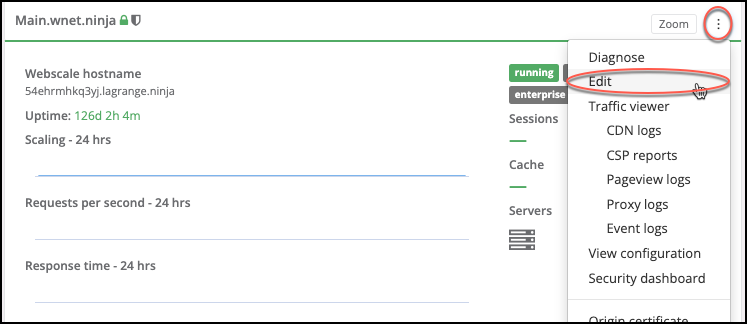
Click the three vertical dots menu icon on the upper-right corner of the application box and select Edit.
-or-
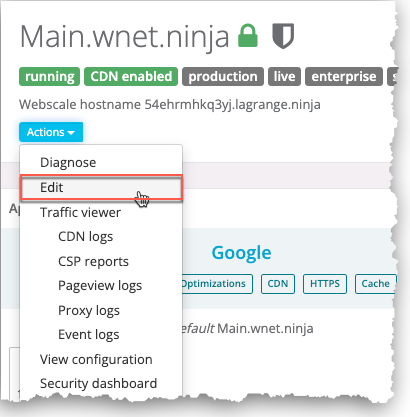
On your application page, click the Actions menu icon and select Edit.
-
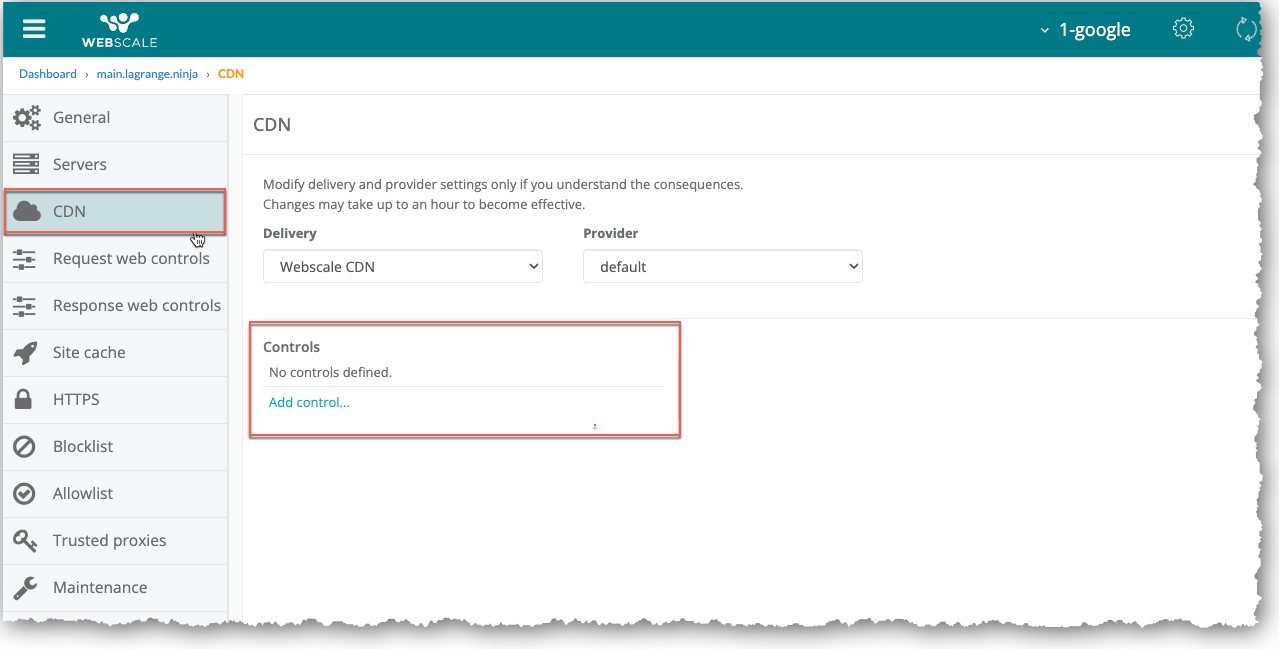
On the sidebar menu, click CDN.
When you have enabled Webscale CDN, the Controls section displays in the CDN page.
Create CDN controls
For CDN controls, enter a path for caching assets. All other settings are optional.
When you create a CDN control, you can optionally associate the CDN control with CloudEDGE request and response handlers. Doing so creates a CloudEDGE worker.
For more information on CloudEDGE workers, see Workers overview in Working with CloudEDGE Handlers and Workers.
To create a CDN control
-
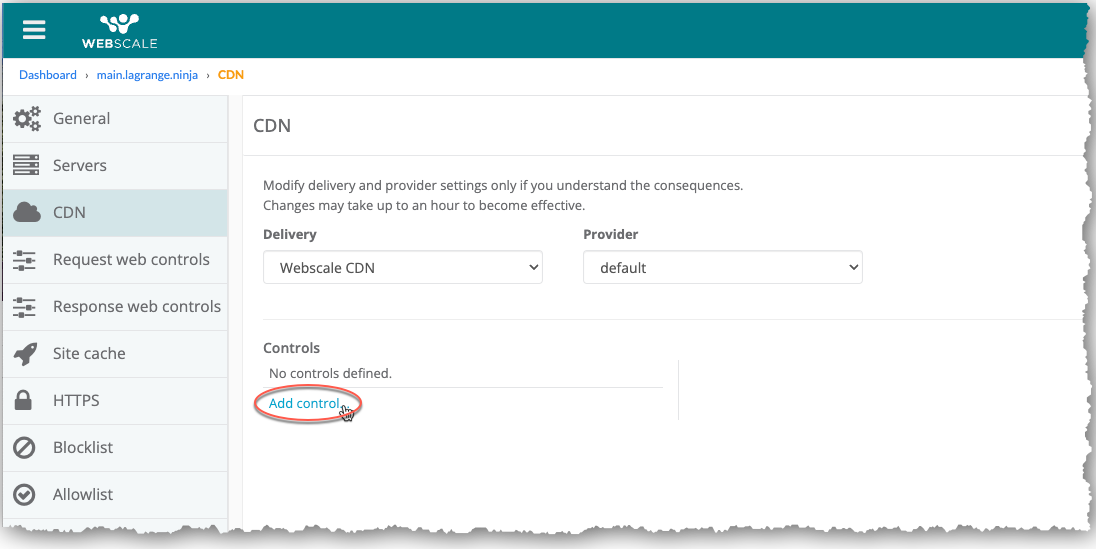
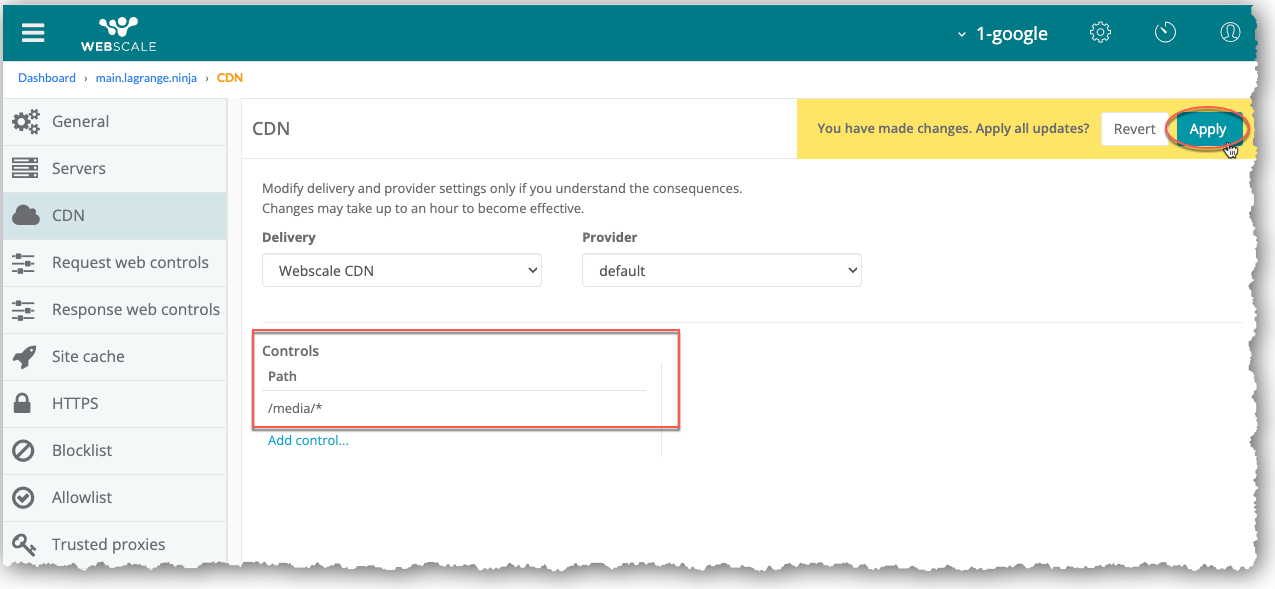
On the CDN page, click the Add control link in the Controls section.
-
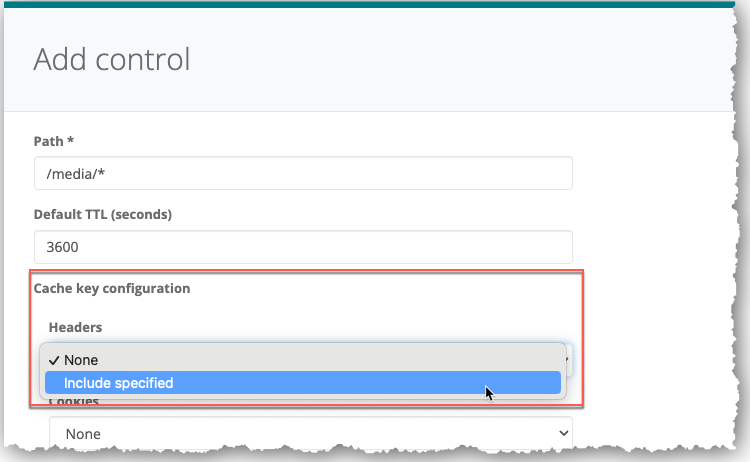
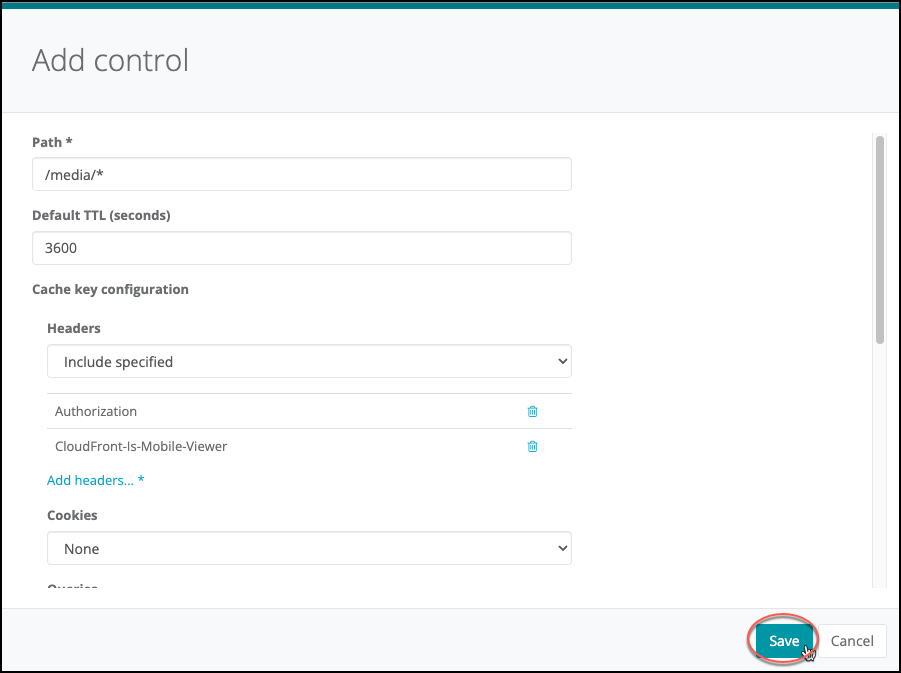
In the Add control dialog box, enter the path for caching assets in the Path field. For example, to create a CDN control for media assets, enter /media/*.
-
To specify the amount of time that a resource can be cached, enter a Time-to-Live (TTL) value in the Default TTL (seconds) field.
-
To specify cache key headers, in the Headers drop-down menu of the Cache key configuration section: a. Select Include specified for an option other than the default setting of not having any headers.
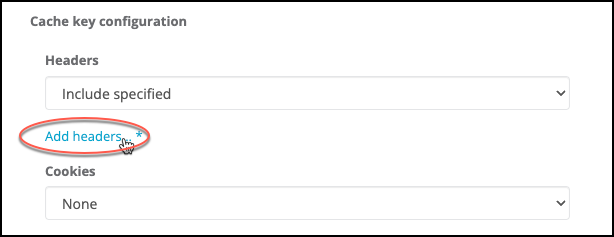
b. Click the Add headers link.
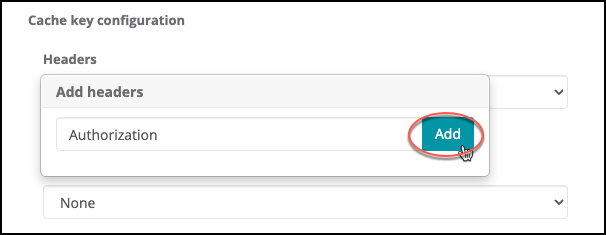
c. Click in the Add Headers field to open the drop-down menu: Select a header from the drop-down list. -or- Enter a header. d. Click Add.
e. To add more headers, repeat one of these procedures for each header.
-
To specify cache key cookies, in the Cookies drop-down menu of the Cache key configuration section: a. Select Include specified or Exclude specified for an option other than having all or no cookies. b. Click the Add cookies link. c. In the Add cookies field, enter a cookie. d. Click Add. e. To add more cookies, repeat this procedure for each cookie.
-
To specify cache key queries, in the Queries drop-down menu of the Cache key configuration section: a. Select Include specified or Exclude specified for an option other than having all or no queries. b. Click the Add queries link. c. In the Queries field, enter a query. d. Click Add. e. To add more queries, repeat this procedure for each query.
-
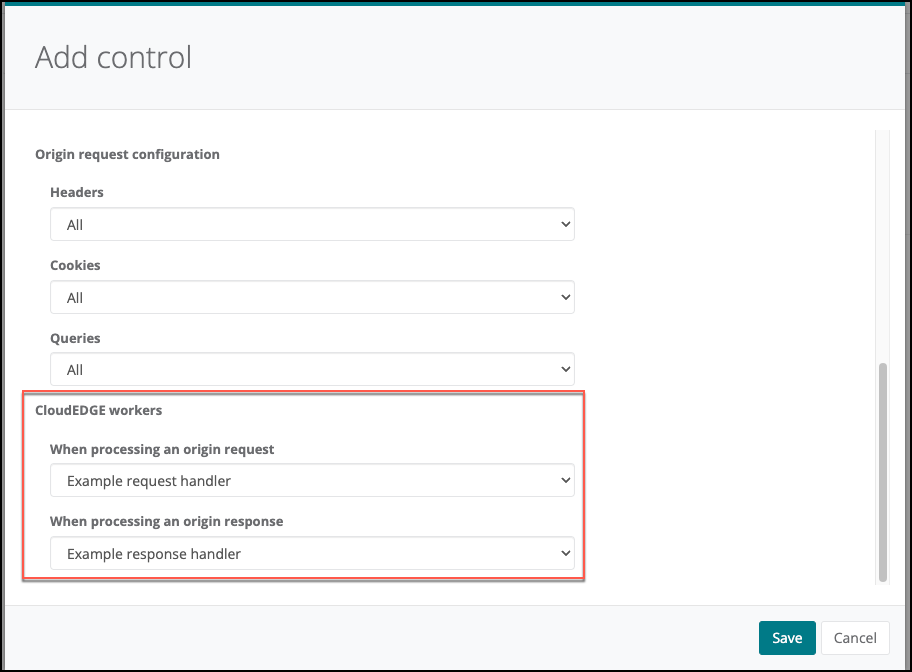
To specify origin request headers, in the Headers drop-down menu of the Origin request configuration section: a. Select Include specified for an option other than the default setting of having no headers. b. Click the Add headers link. c. Click in the Add headers field to open the drop-down menu: Select a header from the drop-down list. -or- Enter a header. d. Click Add. e. To add more headers, repeat this procedure for each header.
-
To specify origin request cookies, in the Cookies drop-down menu of the Origin request configuration section: a. Select Include specified for an option other than having all or no cookies. b. Click the Add cookies link. c. In the Add cookies field, enter a cookie. d. Click Add. e. To add more cookies, repeat this procedure for each cookie.
-
To specify origin request queries, in the Queries drop-down menu of the Origin request configuration section: a. Select Include specified for an option other than having all or no queries. b. Click the Add queries link. c. In the Queries field, enter a query. d. Click Add. e. To add more queries, repeat this procedure for each query.
-
To associate the CDN control with a request handler, select the handler in the When processing an origin request drop-down menu in the CloudEDGE Workers section.

Note:
CloudEDGE Workers are only available for Amazon CDN providers.-
To associate the CDN control with a response handler, select the handler in the When processing an origin response drop-down menu in the CloudEDGE Workers section.
-
Click Save.
-
In the CDN page, click Apply.
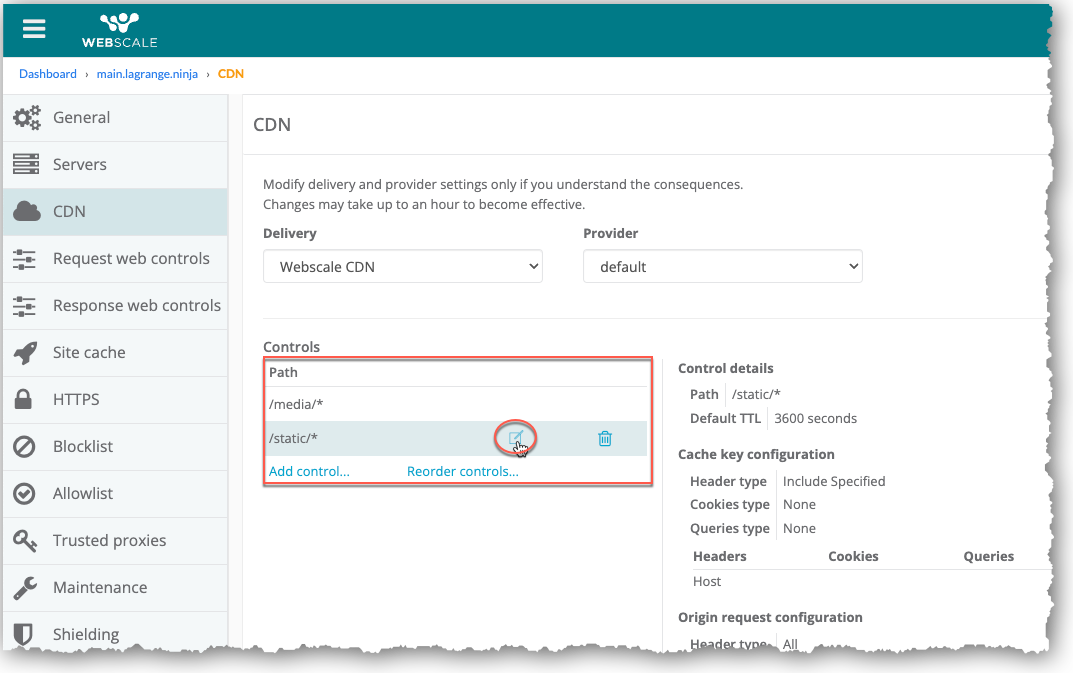
Modify CDN controls
You can modify a caching policy by specifying different settings for the associated CDN control. While you can change all settings, there must be a valid path for caching assets in the Path field.
To modify a CDN control
-
In the CDN page, select a CDN control in the Path panel of the Controls section. The settings for the CDN control display in the Control details pane.
-
Click the Edit control icon for the CDN control.
-
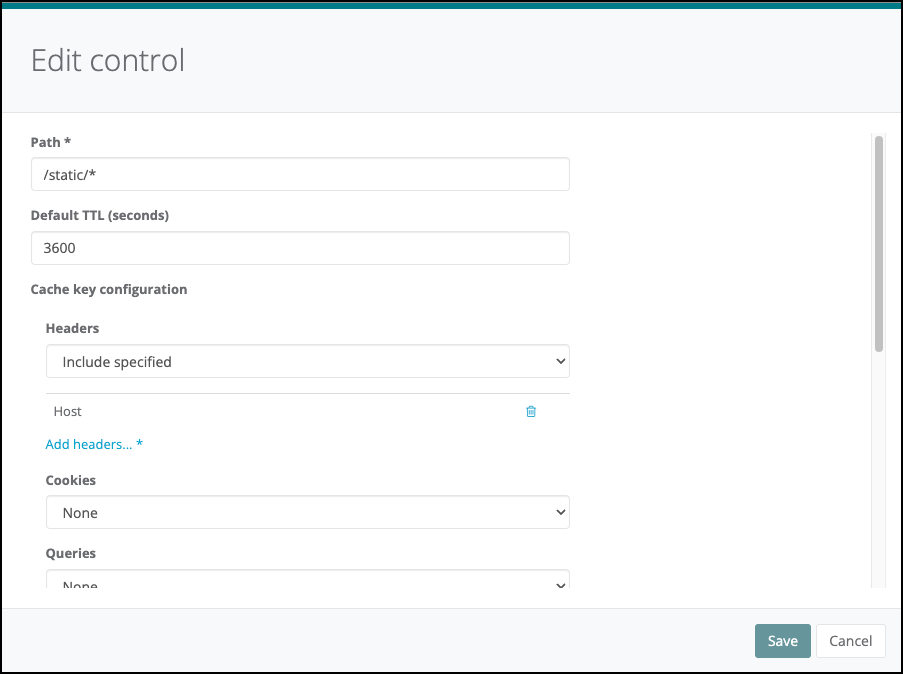
In the Edit control dialog box, modify settings.
-
Click Save.
-
In the CDN page, click Apply.
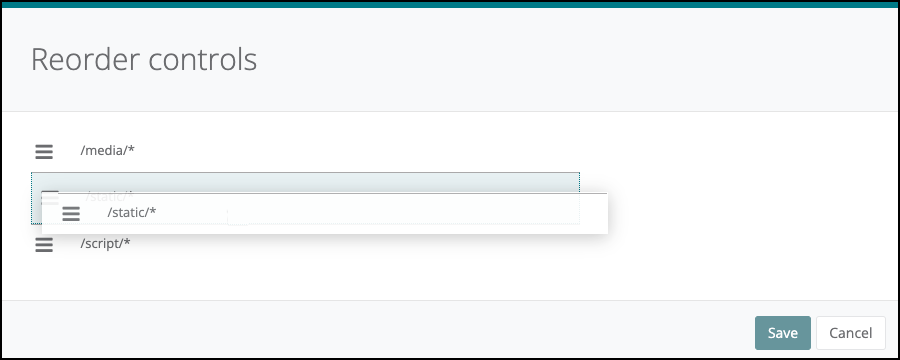
Reorder CDN controls
The order of the CDN controls in the Path pane determines when Webscale compares requests to the CDN control. It searches from the top CDN control to the bottom to find a match.
To reorder CDN controls
-
In the Path pane of the Controls section, click the Reorder controls link.
-
In the Reorder controls dialog box, drag-and-drop CDN controls in the list to to change the order in which Webscale runs through them.
-
Click Save.
-
In the CDN page, click Apply.
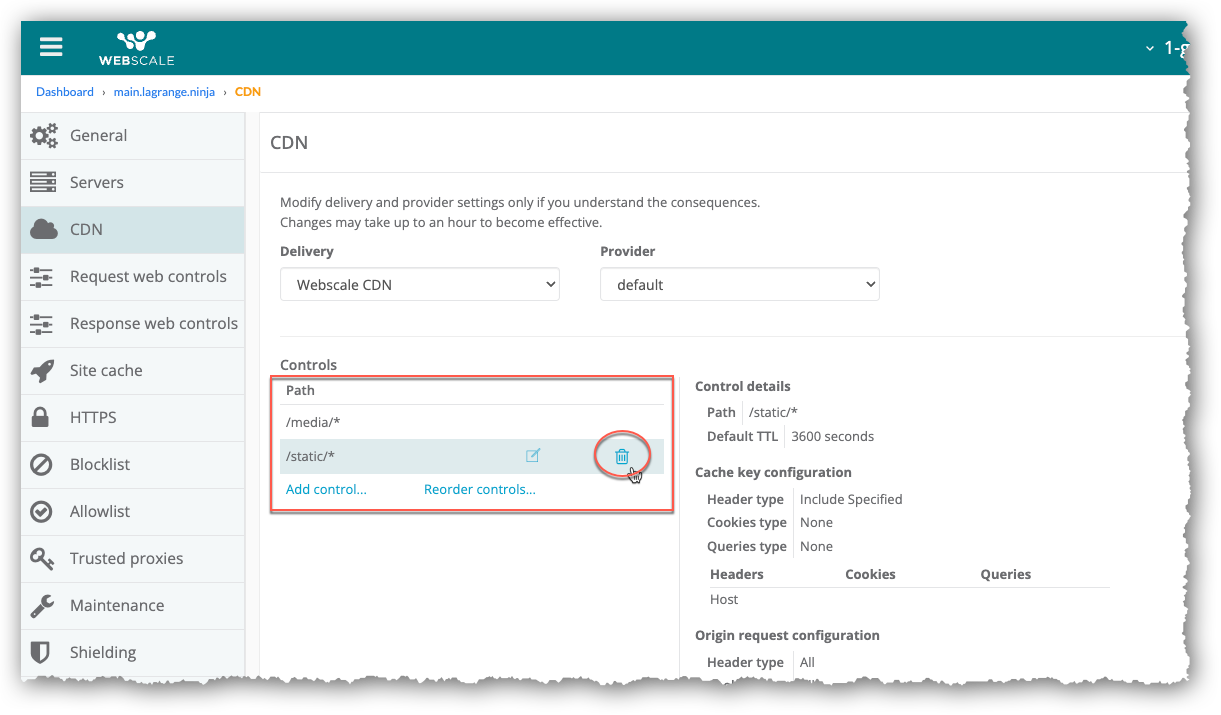
Delete CDN controls
After you delete a CDN control, it no longer displays in the list of CDN controls in the Path pane of the Controls section.
To delete a CDN control
-
In the CDN page, select a CDN control in the Path panel of the Controls section. The settings for the CDN control display in the Control details panel.
-
Click the Delete control icon for the CDN control.
-
In the CDN page, click Apply.
Further reading
- HTTP Headers and Status Codes
- CloudEDGE CDN Overview
- Introduction to Configuring Webscale CDN
- Pre-requisites for Configuring CloudEDGE CDN
- Enable Webscale CDN
- CloudEDGE Workers Overview
- Working with CloudEDGE Handlers and Workers
Have questions not answered here? Please Contact Support to get more help.
Feedback
Was this page helpful?
Glad to hear it! Have any more feedback? Please share it here.
Sorry to hear that. Have any more feedback? Please share it here.