Pre-requisites for Configuring CloudEDGE CDN
Before enabling CloudEDGE CDN (also known as Webscale CDN) ensure that you meet the following pre-requisites in the order presented below.
- Set up DNS
- Set up TSL
- Consider disabling pagespeed
- Create an admin subdomain
- Provider setup
- Pre-requisite validation
Note:
While the Webscale Provisioning team has most likely already handled some of these tasks, verify that your system meets the pre-requisites.Set up DNS
- Create aliases for all domains under the application. For information on how to view, add, and delete application aliases, see Application aliases in Configuring General Application Settings.
Note:
For aliases that you would like to include in your CloudFront CDN installation, select the corresponding CDN checkbox for each alias. For aliases exclusive to Webscale, make sure the corresponding checkboxes are cleared.- Ensure that all domains under the application point toward Webscale, including top-level domains.
- Verify that the DNS entries are correct.
- Use the proxy hostname to create a CNAME for it.
Set up TLS
Then, either provide your own certificate, or set up TLS (Transport Layer Security) by enabling the Auto HTTPS feature for your application through the HTTPS page. When Auto HTTPS is enabled, Webscale automatically obtains and installs Let’s Encrypt SSL certificate for the application.
For information on how to enable Auto HTTPS, see Enable the Auto HTTPS feature in Installing SSL.
Note:
If Let’s Encrypt does not automatically obtain your certificate within a few hours, contact support.Consider disabling PageSpeed
PageSpeed may interfere with desired CDN caching. Consider diabling pagespeed to avoid a disconnection between PageSpeed enabled paths, and CDN control paths. When PageSpeed is enabled for the same path as a CDN cachable path, PageSpeed will take priority and bypass the CDN Cache.
To disable PageSpeed for your application, navigate to the PageSpeed tab and toggle the feature off. Otherwise, you can disable the PageSpeed feature conditionally using Web Controls.
Web Controls enable you to configure and disable specific PageSpeed features. If you do not already have a Web Control to configure PageSpeed, create a Web Control to disable it. For information on how to create a Web Control, see Creating Web Controls.
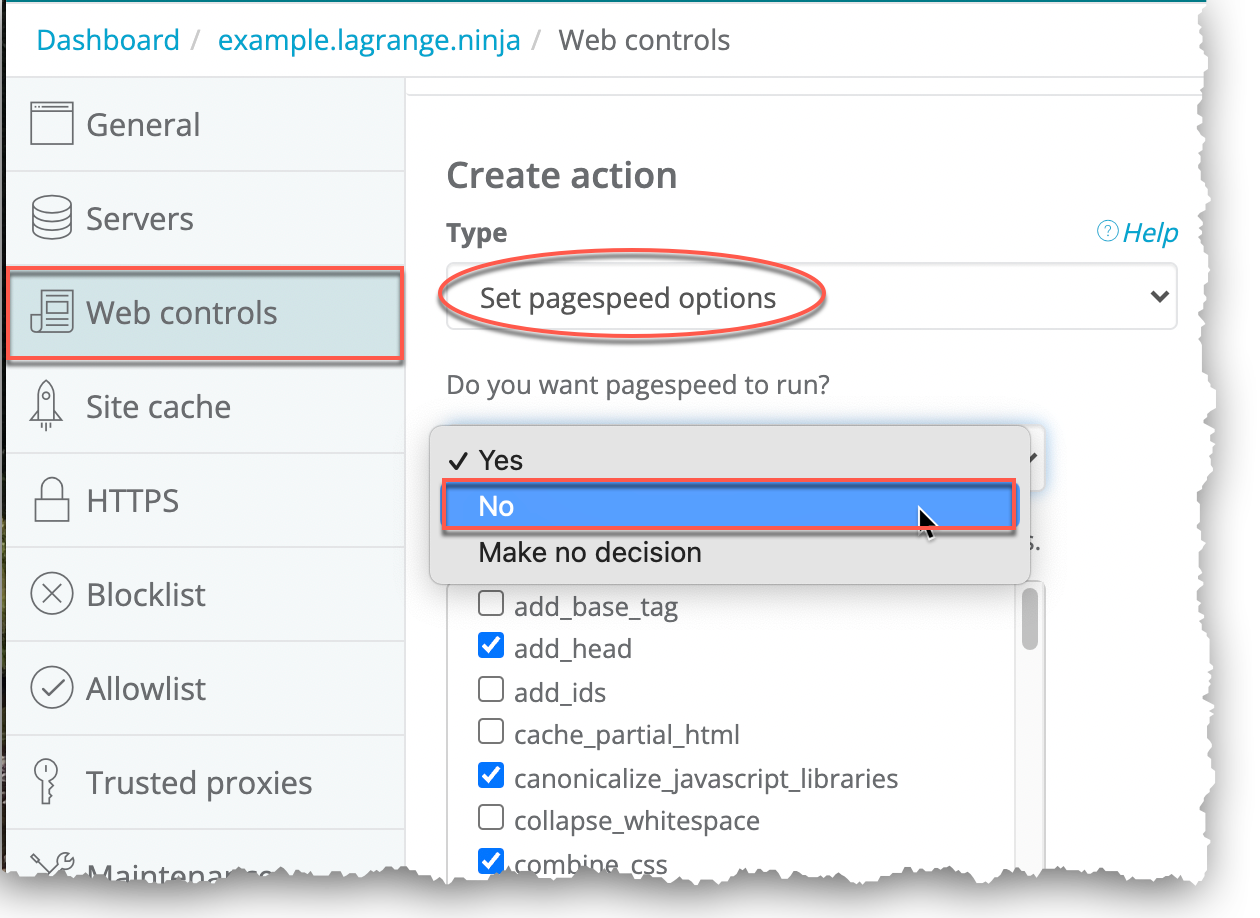
When creating or modifying a Web Control to disable PageSpeed, add or make sure that your Web Control has an action with the Set pagespeed options action type. In the Do you want pagespeed to run? drop-down menu, select No.
Note:
Make sure that the Web Control to disable PageSpeed is above all other Web Controls with final actions to ensure PageSpeed is disabled for every request.Create an admin subdomain
If requests take longer than 180 seconds to execute, they will time out. This is a CloudFront limitation. The workaround is to bypass the admin domain from CloudFront. The first step is to separate the admin domain by creating an admin subdomain.
After you enable Webscale CDN, you may point the admin subdomain to an origin- prefixed domain origin-xyz.cloudmaestro.net where xyz.cloudmaestro.net is the cname of the application.
For example, if the application is www.webscale.com and the cname is abc.cloudmaestro.net, the admin subdomain will point to origin-abc.cloudmaestro.net.
Contact support to find out if this procedure applies to you.
Note:
If you are accessing the admin page using a subdomain, you can use that subdomain for enabling Webscale CDN instead of creating an admin subdomain.Note:
Ensure you verify the correct admin domain is configured in any Web Controls that enhance security of the admin subdomain.Provider setup
To setup a Section CDN provider
Use a shared Section CDN provider. When enabling Webscale CDN, one will be available in the CDN provider dropdown.
If a shared Section CDN provider is unavailable, see Section in Creating providers.
To setup an Amazon Cloudfront CDN provider
When you are using Webscale CDN with CloudFront for an application, your account must have a Webscale provider with the Amazon cloud provider type. To set up the provider so it will support Webscale CDN, perform the following procedure.
- Create a S3 bucket through AWS
- Create a Webscale provider for your account with the Amazon EC2 cloud provider type
The S3 bucket will contain your Webscale CDN logs. When you create the provider, make sure that the provider can use Webscale CDN by selecting the Use for CDN checkbox in the Add a new provider dialog box. After you select the checkbox, you must also enter the S3 bucket name.
For information on how to add a provider, see Create providers in Working with Providers.
For information about Amazon cloud provider type settings, see Amazon in Provider settings.
For information on how to add an AWS S3 bucket, see Creating a Bucket.
Pre-requisite validation
After you have finished working on the pre-requisites, validate that you have followed all of the instructions correctly and fulfilled all of the pre-requisites.
Note:
One important validation step is to make sure that your SSL certificate covers all aliases before enabling Webscale CDN, particularly if you have added new aliases after enabling Auto HTTPS. (Let’s Encrypt should automatically update the certificate with any new aliases. Make sure that it does.)
There is one exception. Do not create an alias for the admin sub-domain until after you have enabled Webscale CDN.
After Webscale CDN is enabled, HTTP challenges will fail for any new aliases added to the list, so only DNS challenges will work for those challenges.
Further reading
- Introduction to Configuring Webscale CDN
- Completing Webscale CDN Configuration
- Configuring Trusted Proxies
- Introducing HTTPS Headers and Status Codes
- Installing SSL Certificates
- Web Controls How-To Guides
- Working with Providers
Have questions not answered here? Please Contact Support to get more help.
Feedback
Was this page helpful?
Glad to hear it! Have any more feedback? Please share it here.
Sorry to hear that. Have any more feedback? Please share it here.