Testing Your Application
Through the optional application testing feature, you can perform load tests for your application. The test results can help you find possible problems like performance bottlenecks. You can use this feature to test your application after making changes to it.
The application testing feature provides the means to run load tests. Webscale or your developer will create customized tests to meet your needs. The test design specifies the application test paths, what to test, and test methodology.
For example, you could request load tests to measure cache, full-functionality, and checkout performance. Before holding a big sale, you might run a cache test designed to understand if your CDN and site cache will serve cached content instead of sending requests to origin.
While load tests can target different system components, they all measure performance using the same categories, such as request and response counts and average throughput. For more information about the types of information that load tests capture, see Test results .
You can view test results reports through the test results page. You can access this page though the Application testing and Reports pages. For more information on viewing application test results through the Reports page, see Viewing Reports .
Topics
- Getting started
- Access the Application testing page
- Upload tests
- Work with uploaded tests
- Run tests
- Test results
Getting started
After you have purchased this feature, you or Webscale must complete the following tasks before you can run tests.
Your developer or Webscale creates tests, according to your specifications.
On the Webscale Control Panel page, access the Application testing page.
You or Webscale uploads the files for the tests.
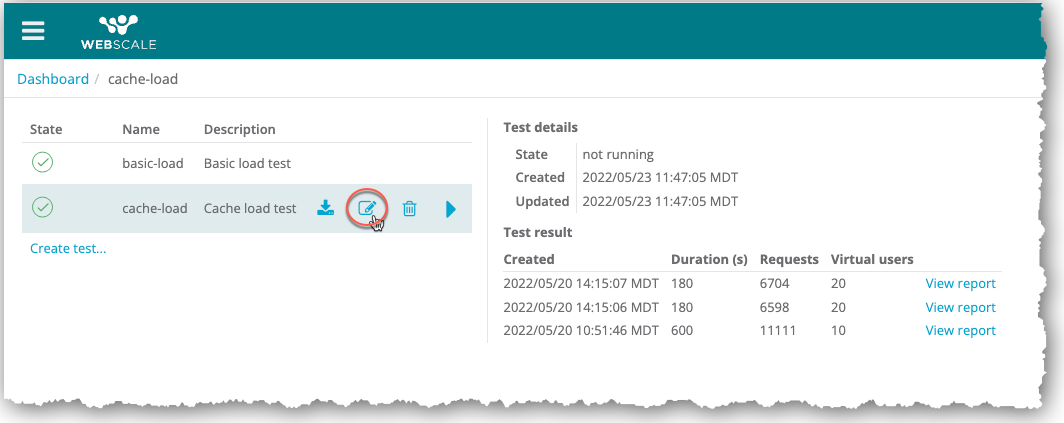
When you select the uploaded files, an icon panel that enables you to download, edit details, delete, and run tests displays for each test when you select it.
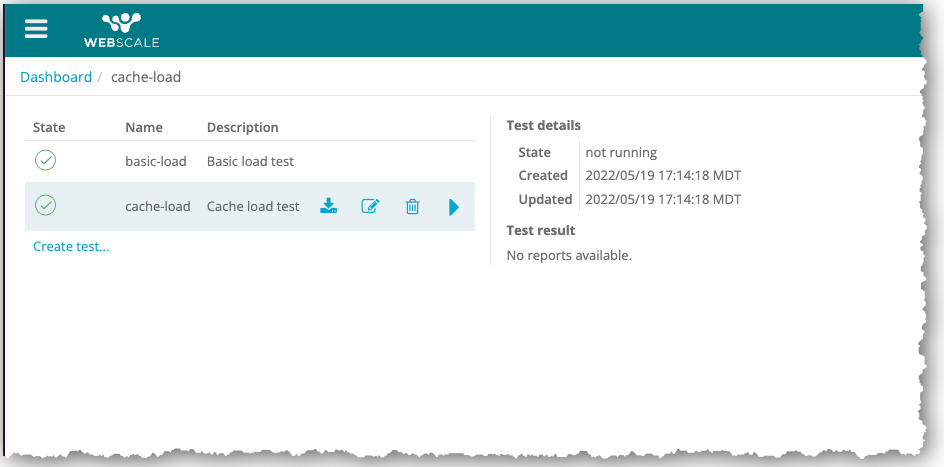
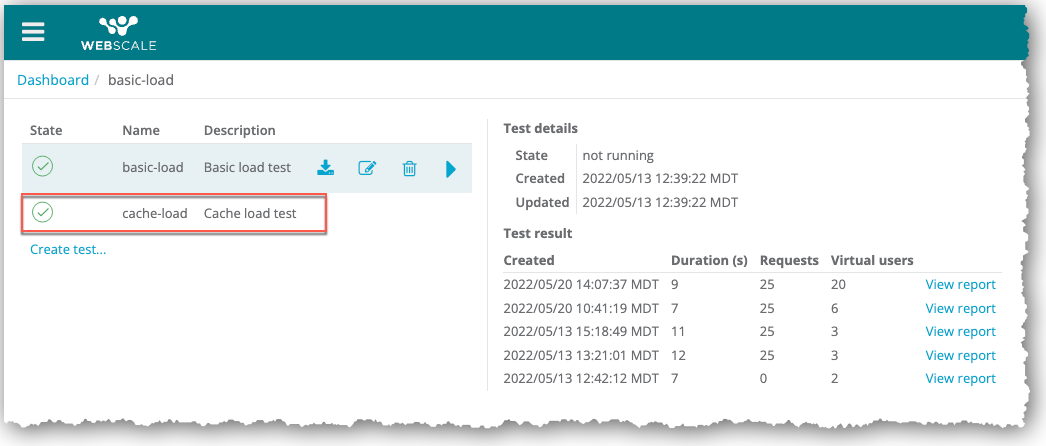
Access the Application testing page
After Webscale has enabled the application testing feature, the Application testing sidebar menu option displays.
The Application testing page enables you to upload and run load tests. The tests are listed in the left panel.
When you select a test, details for the test display in the Test details section of the right panel. You can access the test results through the Test result section of the right pane.
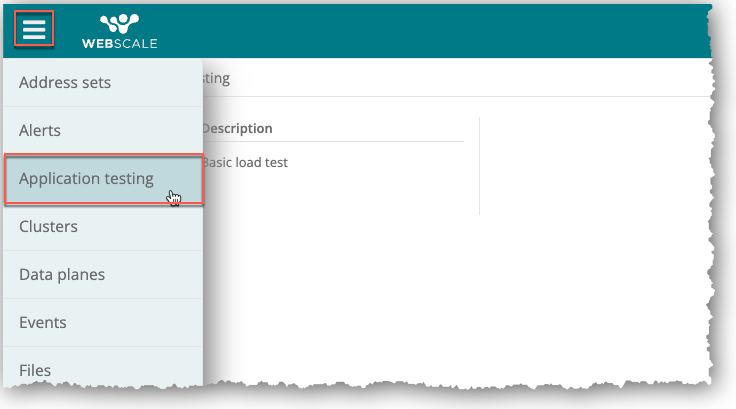
To access the Application testing page
On the Webscale Control Panel page, click the menu icon on the upper left of the screen.
On the sidebar menu, select Application testing.
The Application testing page displays.
Upload tests
Test files must be in the .zip, .tar, or .tar.gz file format. If Webscale is creating the tests, it might also upload them.
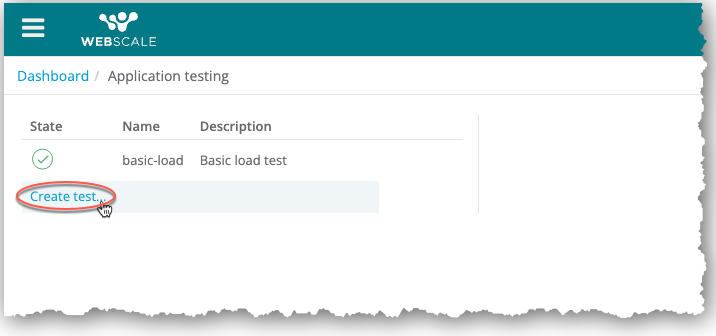
To upload a test
In the left panel of the Application testing page, click the Create test link.
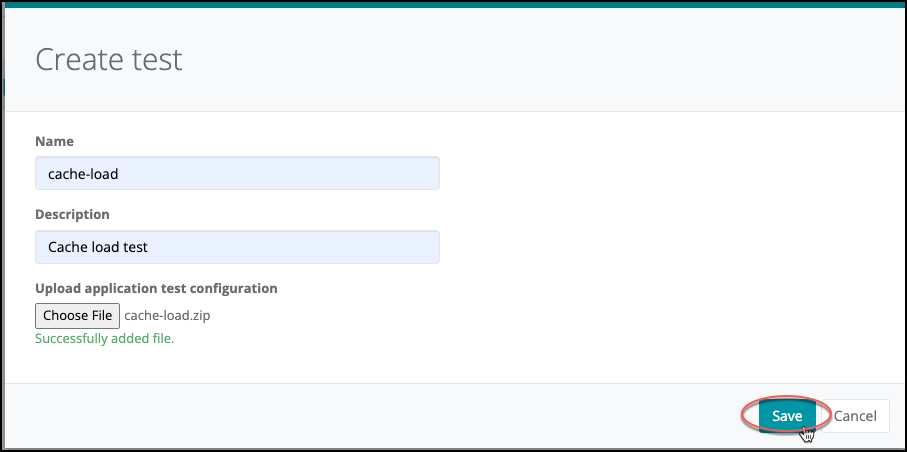
In the Create test dialog box, enter a test name and, optionally, a description.
Click Choose File.
Select a file on your computer and click Open, or drag-and-drop it to the File box.
Click Save.
The new test entry displays in the left panel of the Application testing page.
If another test was selected when you clicked the Create test link, it remains selected and the test information for it displays in the right panel.
Work with uploaded tests
For uploaded test files, you can perform the following operations.
For information about running tests, see Run tests .
Download test
To download a file
Select the file and click the Download test icon for it.
Edit test
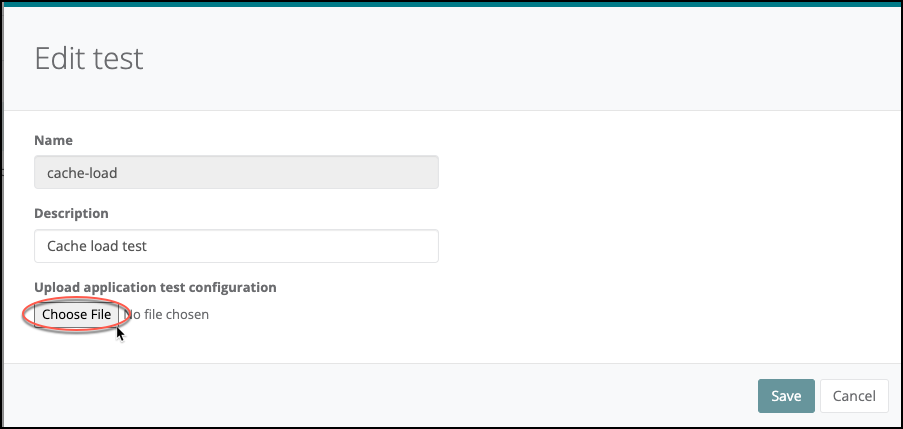
When you edit tests, you can modify the test description and replace the test by uploading a different file. You cannot modify the test name.
To edit a test
Select the test and click the Edit test icon for it.
In the Edit test dialog box, to modify the test description, enter a new description or update an existing one.
To replace the test, click Choose File and upload a new file.
Click Save when you are finished editing the test.
Delete test
To delete a test
- Select the test and click the Delete test icon for it.
- Click Ok.
The test will no longer display in the list.
Run tests
Each time that you run a test, you can configure how it will run by specifying the test parameters. The configuration consists of the following two required settings.
- Duration: Length of test (in seconds)
- Virtual Users: Number of virtual users that the test uses to simulate site visitors. The number of users represents your normal customer load plus a buffer.
To run a test
In the left panel of the Application testing page, select the test to run.
Click the Run test icon for it.
In the Run test dialog box:a. Enter how long the test will run in the Duration field.b. Enter the number of simulated users in the Virtual users field.
Note:To use the previous configuration, enter the same parameters.
Click Run.
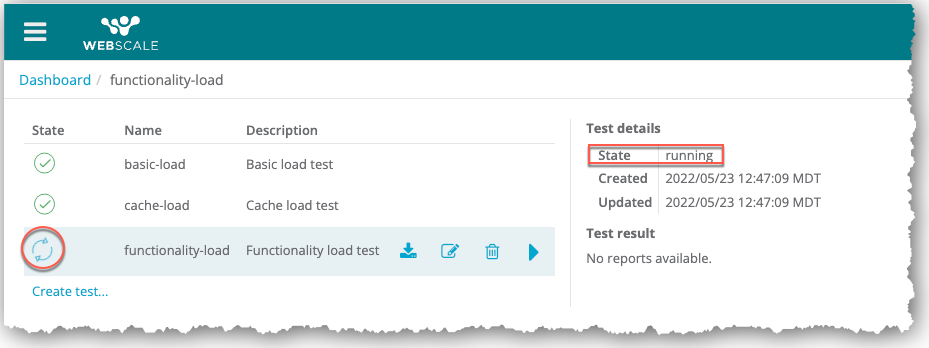
The Run test dialog box closes. The state icon in the left panel and State in the Test details section of the right panel indicate that the test is running.
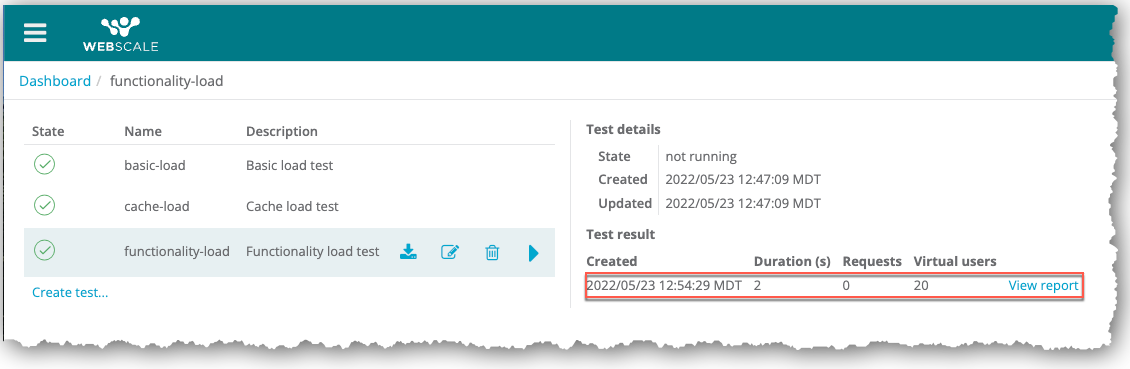
When the test has completed, an entry for the results displays in the Test results section of the right panel and the state indicates that the test is not running.
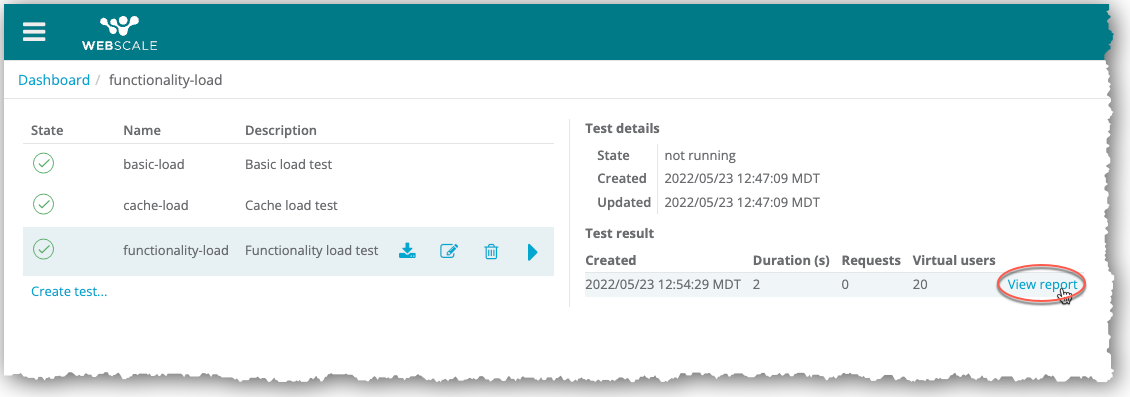
To view the test results, click the View report link for the new test results report.
The test results page with the report for the designated test results displays. You can also access this page through the Reports page and view all test results and reports through this page.
Test results
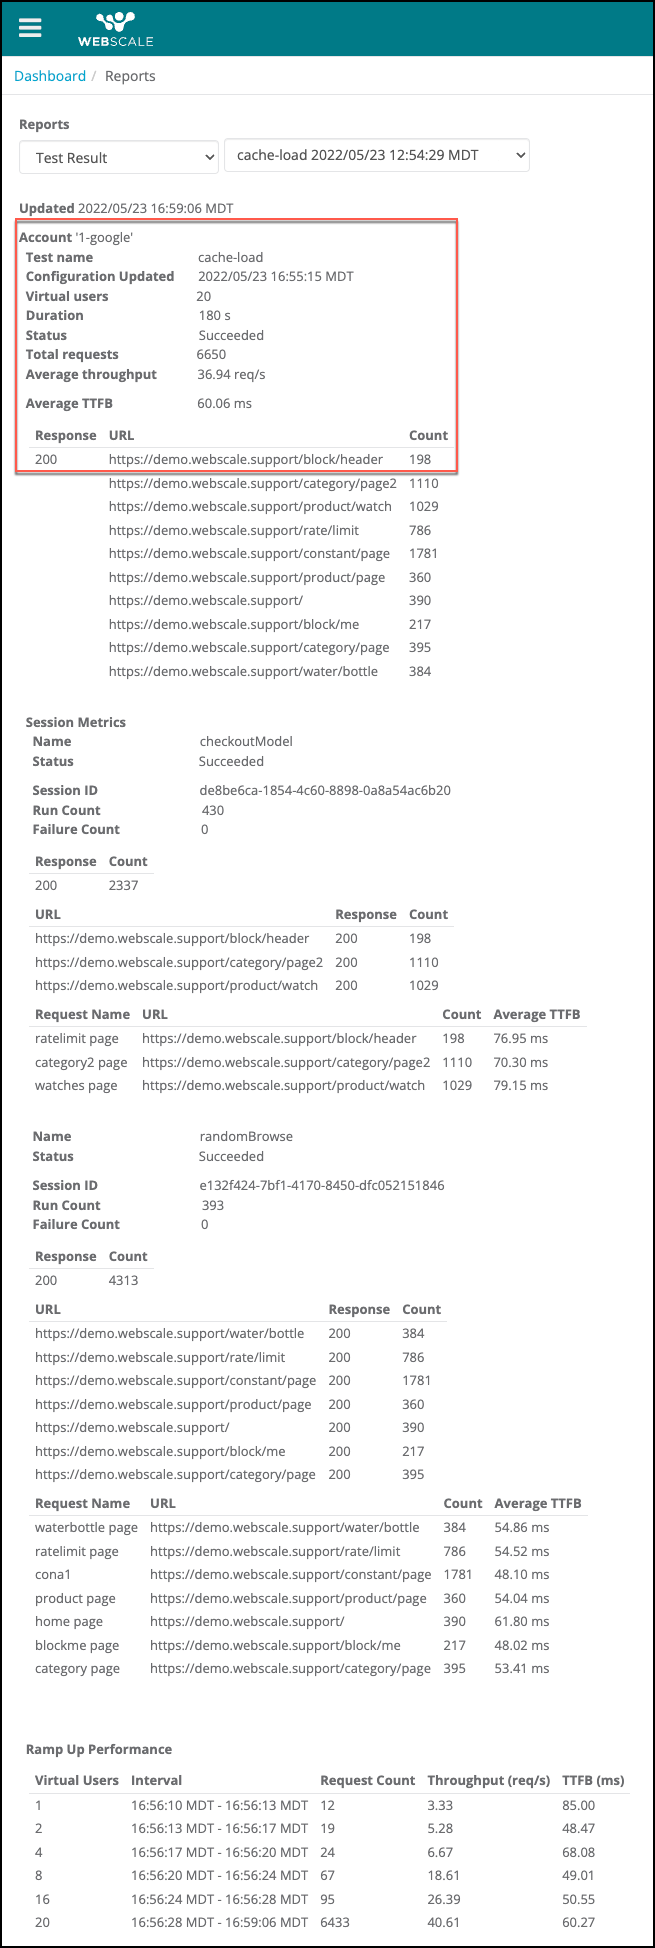
All test reports capture the following information.
- Request count: Number of requests sent during test
- Average throughput: Total number of requests sent during test divided by the duration of the test (in seconds)
- Average TTFB (time-to-first-byte): Average interval between when a request is sent and the first byte of the response is received
- Responses: Types of responses received during test. Responses are grouped by status code and request URL. Additionally, a count for each group is displayed.
This data is captured at each of the following test steps as well as for the entire test.
- Ramp-up
- Each virtual user session
Note:A virtual user session fails if at least 30% of the response codes are in the 400/500 range.
Further reading
Have questions not answered here? Contact Support to get more help.Last modified on June 3, 2026
