Editing the Allowlist
Add your local IP address to the Allowlist to ensure you always have access to the backend of your application. You should also add some IP addresses to the Blocklist to prevent them from accessing your application. You can find those instructions on Editing the Blocklist.
To follow these instructions, log into Webscale Control Panel and click the three vertical dots menu of the application box.
On the menu that appears, click Edit.
Add an address set
Click Allowlist on the menu.
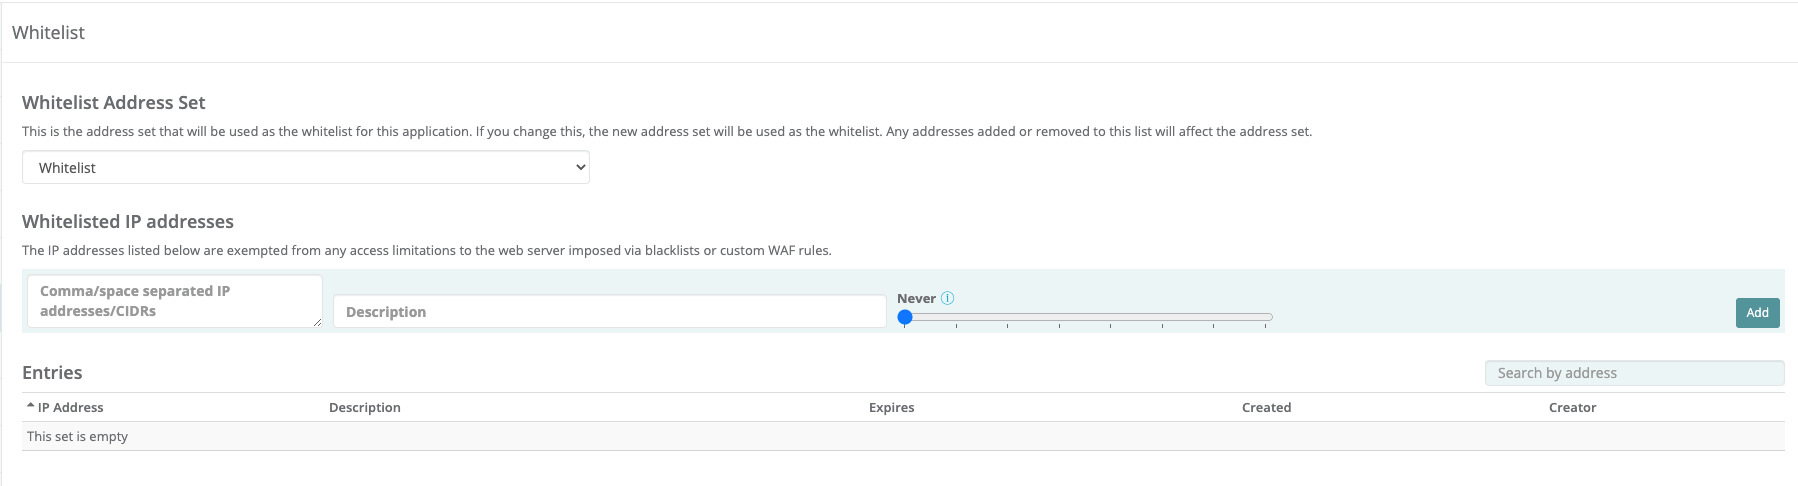
Under the Allowlist Address Set section, click the drop-down menu and select an address set.
Note:
The IP addresses in the address set will not be reflected on this page.Add an IP address
Click Allowlist on the menu.
Under Allowlist IP address, click the Comma/space-separated IP addresses/CIDRS text area and enter your IP addresses or ranges separated by commas or spaces. In the Description text area, enter a description so you can remember why you created this entry. Next to this field is a slider to select the duration of the allowlist. To create a allowlist entry that never expires, leave it as-is. When finished, click the Done button to add the entry.
Note:
If a combined or manual address set is selected above, addresses added here will be added to the manual address set that is referenced.If you do not know your local IP address, you can find it using a tool such as whatsmyip.org.
Warning
If you choose “Never” on the expiration slider, the IP address will remain on the list forever. We recommend choosing an expiration date instead of choosing “Never”.After the Allowlist IP address area is the Entries area. This shows a list of currently allowed addresses, containing the following information:
- IP address
- Label
- Expiration date
- Created date
- Creator
There are also two buttons: an edit button, and an X button that removes the IP address.
Add an IP address from Traffic Viewer
You can add IP addresses to the allowlist from Traffic Viewer. While in Traffic Viewer, hover over the Request Address, Peer Address, Server Address or Proxy Address column, then click the small arrow that appears to display the popup menu. You can also right-click on any of the columns to bring up the pop-up menu. Once the menu is displayed, you can select Add to allow list “Whitelist”.
Add an IP address from the CSP Logs Viewer
You can add IP addresses to the allowlist from the CSP Logs Viewer. While in the CSP Logs Viewer, hover over the Request Address or Peer Address column, then click the small arrow that appears to display the pop-up menu. You can also right-click on any of the columns to bring up the pop-up menu. Once the menu is displayed, you can select Add to allow list “Whitelist”.
Add an IP address from the Pageviews Logs Viewer
You can add IP addresses to the allowlist from the Pageviews Logs Viewer. While in the Pageviews Logs Viewer, hover over the Request Address or Peer Address column, then click the small arrow that appears to display the popup menu. You can also right-click on any of the columns to bring up the popup menu. Once the menu is displayed, you can select Add to allow list “Whitelist”.
When you add an entry to the allowlist from either the Traffic Viewer, the CSP Logs Viewer or the Pageviews Logs Viewer, the entry will expire after 1 week by default. Note that the Add to allow list “Whitelist” item will only appear if the Allowlist is using either a Manual address set or a Combined address set that includes a manual set. If the option does not appear and you believe it should, you may have to reload the page.
Edit an IP Address
To edit an IP address, click the edit button. Make any changes as explained above, and click the Update button. To cancel without making changes, click the Cancel button.
Remove an IP Address
To remove the IP address, click the X button.
Warning
Be careful, this action is final.Further reading
Have questions not answered here? Please Contact Support to get more help.
Feedback
Was this page helpful?
Glad to hear it! Have any more feedback? Please share it here.
Sorry to hear that. Have any more feedback? Please share it here.