Configuring Rate Limiting
Rate limiting enables you to control access to a page on your website, using Web Controls. For rate limiting, the configuration of Web Controls creates varying experiences for site visitors depending upon criteria that you specify.
Web Controls enable you to use pre-defined security and performance rule sets. Rule sets minimize the need to discover, define, and maintain a large number of individual rules. Instead, you can create rule sets that match individual request or response conditions and execute a set of actions predefined in the Webscale Control Panel. Based on the conditions, Web Controls automatically execute a set of pre-defined actions after all conditions are met. Through Web Controls, you can create complex sequences of actions.
Web Controls define the criteria for rate limiting and actions that occur in response. At a minimum, a Web Control that manages rate limiting includes the rate limiting condition, conditions that set the threshold that trigger rate limiting, and resulting actions.
Rate limiting is one way that you can combine multiple Web Controls that act according to specific request conditions.
The following example is intended to teach you about rate limiting. It demonstrates one of several ways that you can use it.
Rate limiting example
This example explains one way to rate limit checkout attempts based on user behavior, using address sets and Web Controls. It also includes testing the Web Controls to make sure that they are correctly rate limiting.
Scenario: Your application rate limits IP addresses if a site visitor attempts to make five or more requests to the checkout page within one minute.
Review Using Traffic Viewer to understand the normal request rate for your application’s checkout page and adjust the Web Controls accordingly. (Through Traffic Viewer, you can view checkout traffic for your application over an extended amount of time. This information enables you to extrapolate trends.)
If you are unsure what rate you might want to choose, you can contact Support for assistance.
Address sets
An address set is a list of IP addresses that Webscale manages and uses in features. There are several types of address sets. For this example, a manual and dynamic address set specify the site visitors to which rating limiting applies.
A dynamic address set consists of a set of IP addresses that Webscale manages and can automatically change over time. A manual address set is a set of static IP addresses that requires you to manually add and delete addresses.
For information on address set types, see Address set types in Working with Address Sets .
Address sets for the example
For this example, add addresses to the manual address set that should not be rate limited, such as your web developer’s IP address. The dynamic address set contains the IP addresses of potential bad actors that you want to rate limit.
Before you start creating the request Web Controls for the example, create the following address sets.
- Dynamic address set named “Rate Limited Addresses”
- Manual address set named “Rate Limited Address Exceptions.”
For information on creating address sets, see Create address sets .
Web Controls
When conditions for a request Web Control are met, Webscale applies the specified actions to the request. Webscale runs the same procedure for subsequent Web Controls in the request Web Controls list. If you want to specify a final action, you can only choose one, which runs last. You can re-order the Web Controls in the list to change the progression.
The Web controls page enables you to create Web Controls. For more information on creating Web Controls, see Creating Web Controls .
Create Web Controls for rate limiting
After you create the address sets, you can configure the Web Controls that will use them. For this example, you will create the following two request Web Controls. They will work together in the specified order to rate limit checkout attempts. They must display together in the list of request Web Controls with the Capture Rate Limited Addresses Web Control above the Block Rate Limited Addresses Web Control.
Capture Rate Limited Addresses : Automatically adds IP addresses to the Rate Limited Addresses address set for site visitors that exceed the rate limit of checkout attempts.
Block Rate Limited Addresses : Rate limits any IP addresses added to the Rate Limited Addresses address set.
Allows the IP addresses for all other address sets, including the Rate Limited Address Exceptions address set, to access the checkout page even if they meet the rate limit.
After you create the Web Controls, you will test them.
The allowlist for the account is automatically excluded from any configured rate limit conditions.
Access request Web Controls
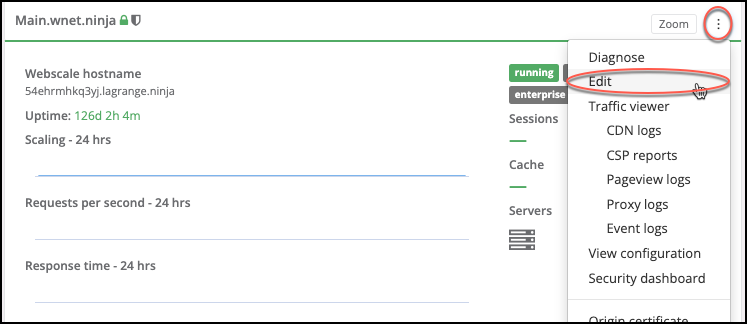
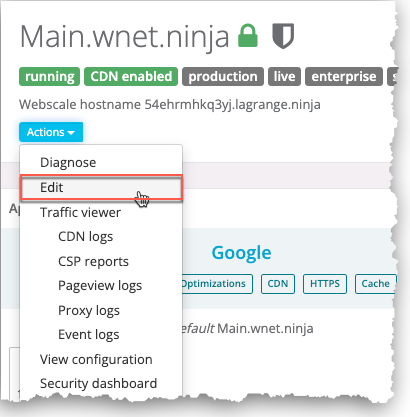
Click the three vertical dots menu icon on the upper-right corner of the application box and select Edit.
-or-
On your application page, click the Actions menu icon and select Edit.
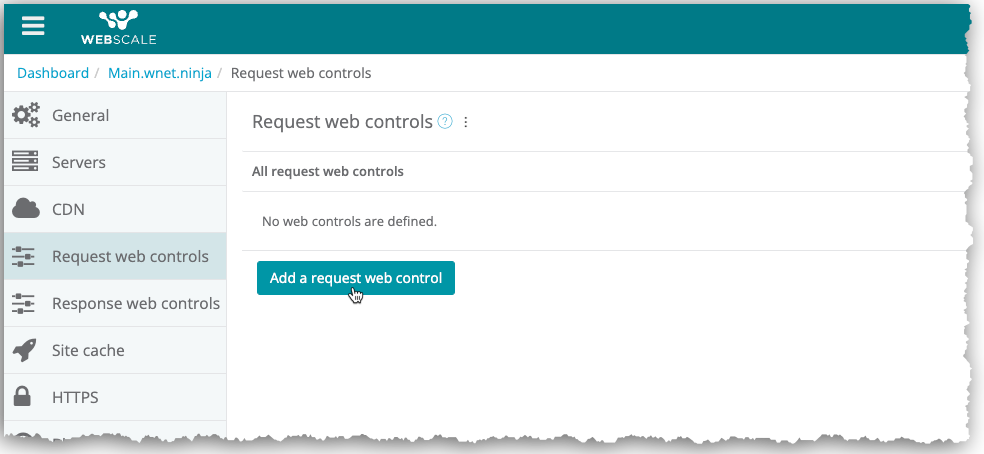
On the sidebar menu, select Request web controls. The Request web controls page displays.
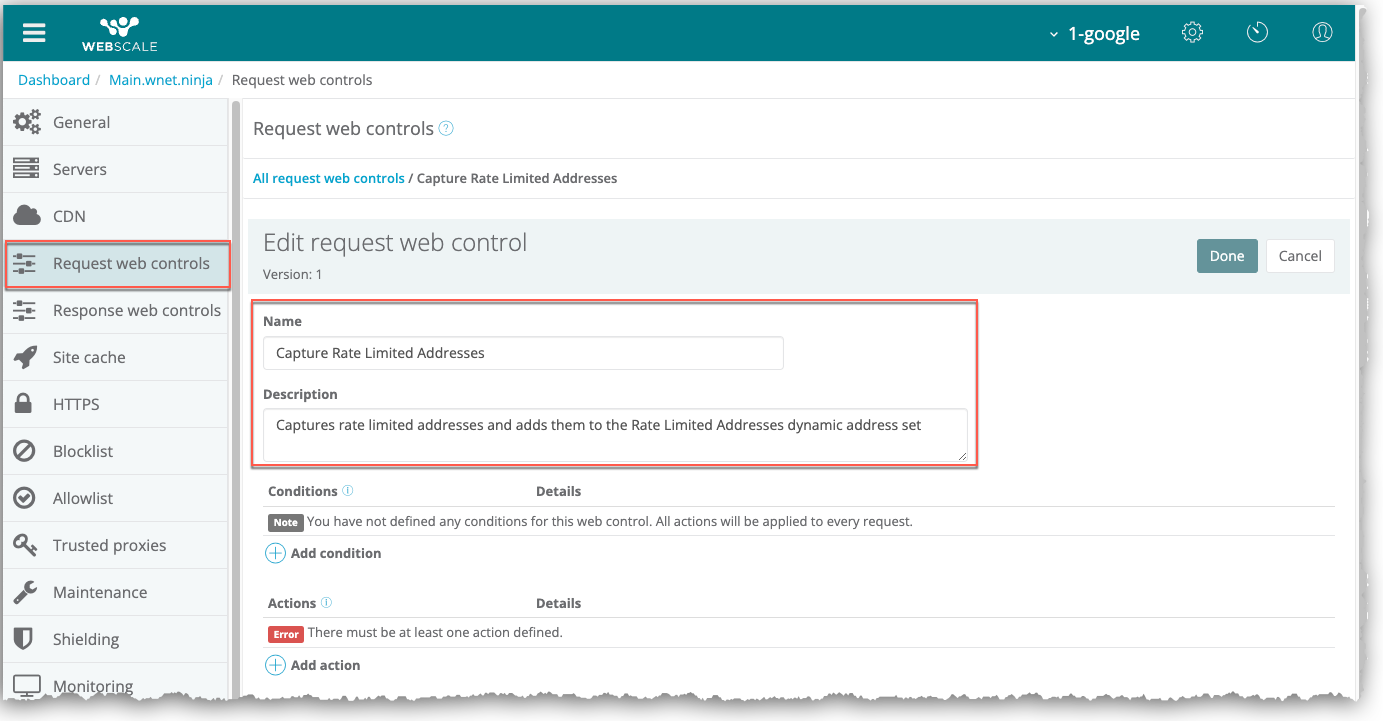
Create a Web Control that captures rate limited addresses
When you create the Capture Rate Limited Addresses Web Control that defines rate limited checkout access, you will configure three applicable conditions and one action. If all three conditions are met, the action will execute.
The first condition, URL Matches, specifies the Checkout page as the object of the threshold. The second condition, Rate limit, sets the rate limiting threshold. The third action, IP address not in the set, specifies that rate limiting applies only to IP addresses that are not in the Rate Limited Addresses address set.
The action, Add address to set, adds IP addresses that meet all conditions to the Rate Limited Addresses address set of bad actors. The IP addresses that do not meet the conditions and are not in the Rate Limited Addresses set, including the IP addresses in the Rate Limited Address Exceptions address set, are permitted to exceed the rate limit threshold.
To create a Web Control that captures rate limited addresses
On the Request web controls page, click Add a request web control.The sections for configuring request Web Controls display under the Edit request web control heading.
Enter “Capture Rate Limited Addresses” as the Web Control name. Optionally, add a description.
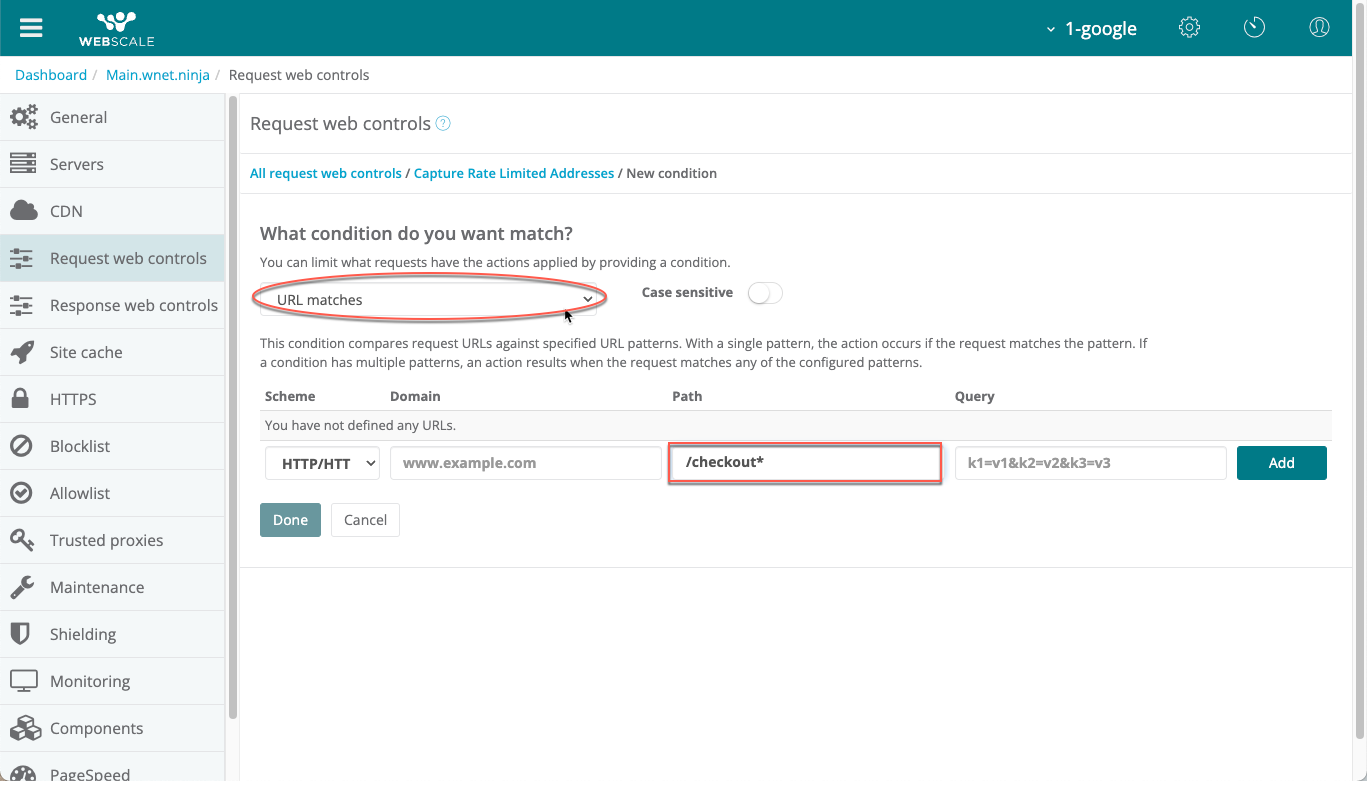
To add the first condition:a. Click Add a condition.b. In the condition drop-down menu, select URL matches. A section with the HTTP/HTTPS drop-down menu for the scheme and Domain, Path, and Query fields displays.c. Select a protocol in the HTTP/HTTPS drop-down menu. Enter
/checkout*as the path. Optionally, you can enter a domain and query.If you leave the Domain, Path, and Query fields empty, they will default to wildcards. Since the URL matches to everything, the condition does not fulfill its function of helping identifying the object of the threshold.
d. Click Add, then Done.
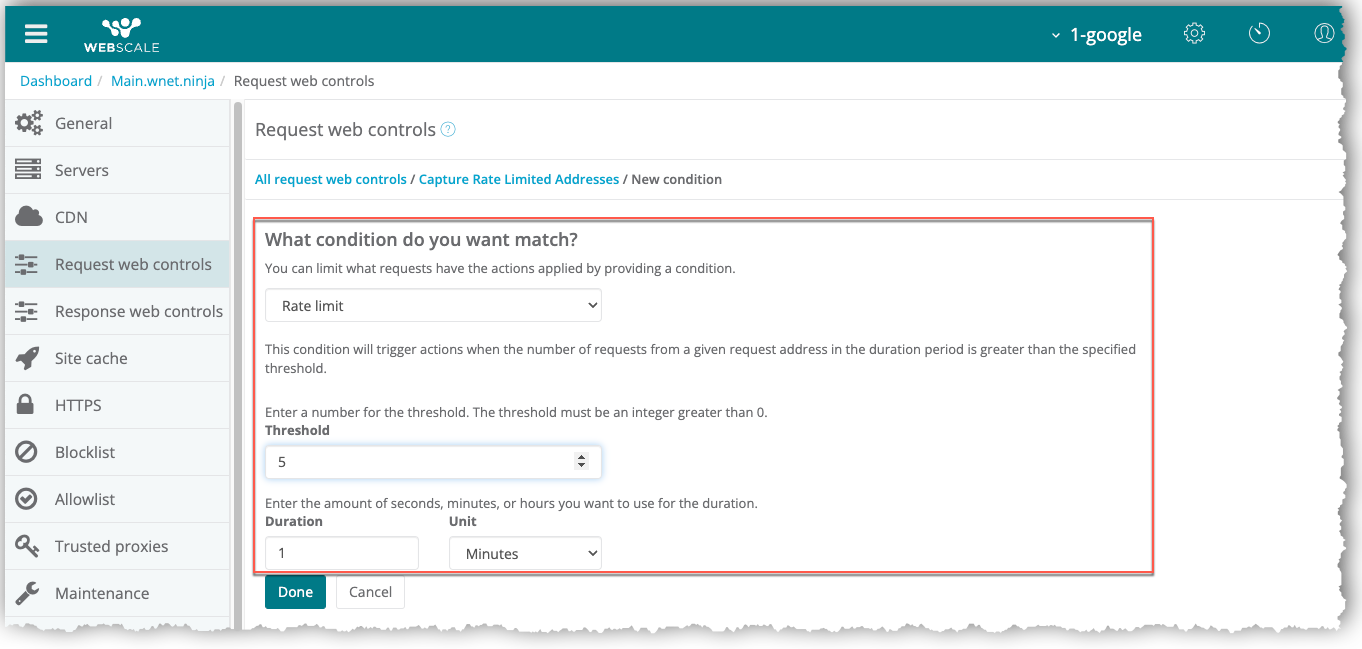
To add the second condition:a. Click Add a condition under the first condition.b. In the condition drop-down menu, select Rate limit.c. Enter
5as the threshold and1as the duration.d. In the Unit drop-down menu, select Minutes.e. Click Done.
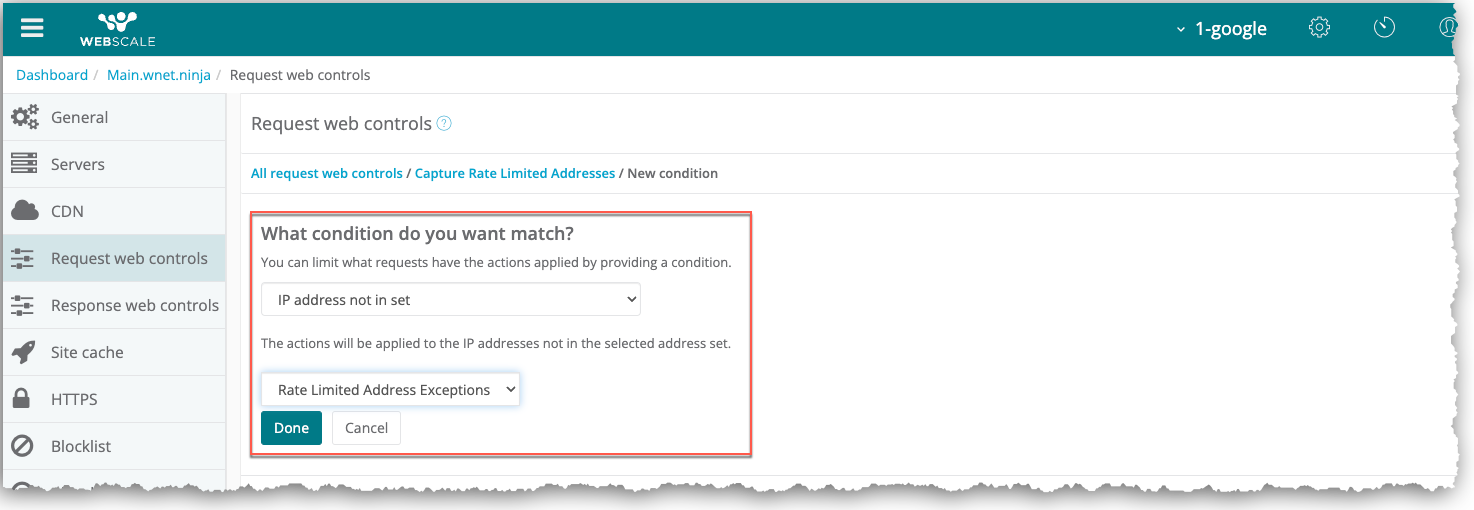
To add the third condition:a. Click Add a condition under the second condition.b. In the condition drop-down menu, select IP address not in set.c. In the address set drop-down menu, select Rate Limited Address Exceptions.d. Click Done.
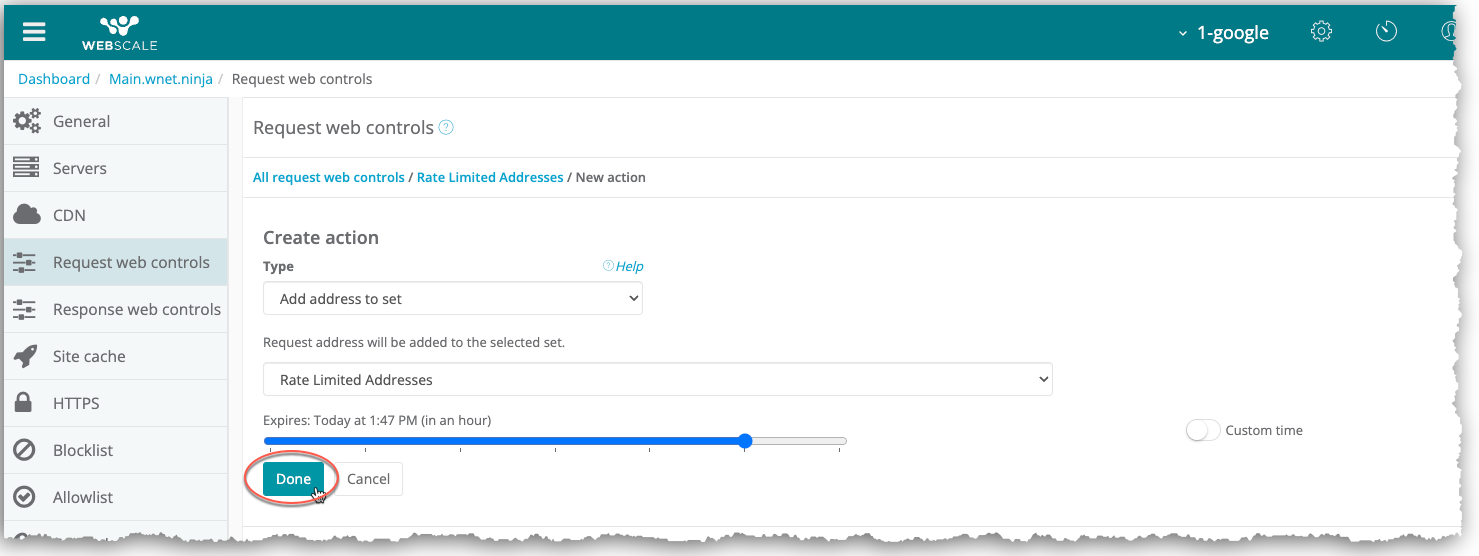
To add the action:a. Click Add action.b. In the Type drop-down menu, select Add address to set.c. In the address set drop-down menu, select the Rate Limited Addresses.d. Add an expiration date. You can use the slider. Or, if you would like to set a specific time, the Custom time toggle will enable you to to specify the time in seconds. For this example, use one hour as the expiration date.e. Click Done.
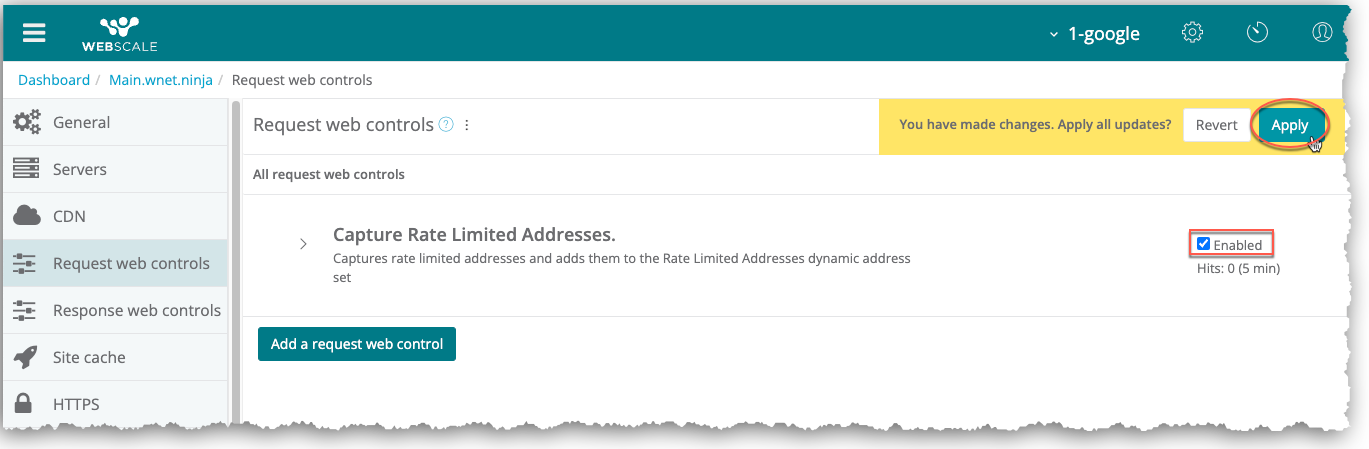
To the right of the Edit request web control heading, click Done.
Select the Enabled checkbox.
Click Apply.
Create a request Web Control that blocks rate limited addresses
When you create the Web Control that blocks rate limited addresses, define two applicable conditions and one action that defines when Webscale prevents access to the checkout page.
The first condition, Block Rate Limit Addresses, specifies that Webscale will apply action to IP addresses in the Rate Limited Addresses address set. The second condition, URL matches, defines that if the IP address matches the specified path, it is subject to the action. If an IP address meets the two conditions, it will be blocked from the checkout page and Webscale will serve a 403 error code.
To create a request Web Control that blocks rate limited addresses
- On the Web Controls page, click Add a request web control.The sections for configuring request Web Controls display under the Edit request web control heading.
- Enter “Block Rate Limit Addresses” as the Web Control name. Optionally, add a description.
- To add the first condition:a. Click Add a condition.b. In the condition drop-down menu, select IP address in set.c. In the address set drop-down menu, select Rate Limited Addresses.d. Click Done.
- To add the second condition:a. Click Add a condition under the first condition.b. In the condition drop-down menu, select URL matches. A section with the HTTP/HTTPS drop-down menu for the scheme and Domain, Path, and Query fields displays.c. Select a protocol in the HTTP/HTTPS drop-down menu. Enter
/checkout*as the path. Optionally, you can enter a domain and query.d. Click Add, then Done. - To add the action:a. Click Add action.b. In the Type drop-down menu, select Deny request under Final actions.c. Click Done.
- To the right of the Edit request web control heading, click Done.
- Select the Enabled checkbox.
- Click Apply.
Testing
To successfully test the Block Rate Limit Addresses Web Control, make sure the IP address at your current location is not in the Rate Limited Address Exceptions address set. If it is in the list, the rate limiting will not occur.
Test rate limit checkout attempts based on the example request Web Controls
For this testing, the request will have https://example.com/checkout.php as the domain and /checkout* as the path. The following scenario will take place.
You can also review Traffic Viewer
to see if the request Web Controls executed as expected. Enter delivery_status>-1 and status_code>403 into the Traffic Viewer filter.
To test the example request Web Controls
The request does not match the criteria specified for the Allow Rate Limit Exceptions Web Control. Webscale ignores the final action of
Discontinuefor this Web Control since it does not match.The Allow Rate Limit Checkout Access Web Control next processes the request.
The request matches the for the Allow Rate Limit Checkout Access Web Control conditions of
5as the threshold and1as the duration. It runs the Add address to set, which adds the request IP address to the address set specified for the Web Control.The Block Rate Limit Addresses request Web Control processes the request last.
Since the request has https://example.com/checkout.php as the domain and
checkoutas the path, it matches the conditions for the Block Rate Limit Addresses Web Control. If the user exceeds five or more attempts to checkout, according to the action for this Web Control, a403error will occur andForbiddenwill display in the web browser.
Summary
For this scenario, you used address sets and request Web Controls to rate limit the checkout page of a website. This can help reduce load on the checkout page of your application.
Reducing load restricts activity to legitimate and productive activity without permanently blocking traffic that may not be harmful. Using multiple Web Controls in this manner allows for great flexibility and powerful control over your web applications.
Further reading
- Web Controls
- Working with Address Sets
- Security How-Tos
- How to Enforce a Content Security Policy
- Building Filters in Traffic Viewer
- Using Traffic Viewer
- CIDR (Classless Inter-Domain Routing) Definition
Last modified on June 3, 2026