Using URL Maps to Redirect URLs
The URL mapping feature enables you to redirect requests from one URL (from) to another URL (to). A comma-separated values (CSV) file specifies the from and to URLs. If desired, you can bulk import matching pairs of URLs.
One example of when you might use URL mapping is when you revise your website. This can lead to orphaned URLs. When site visitors use an orphaned URL, a web page with a 404 error code displays rather than a viewable page. A URL map enables you to avoid this potential problem.
Or, another reason to use this feature might be to redirect from one viewable web page to another one.
Note:
URL maps are available to all applications for your account. Different applications can use the same URL map.URL mapping
Each URL map incorporates a URL map file that specifies the from and to URLs. Web Controls redirect requests in conjunction with URL maps. When the URL of a request matches a from URL, the Web Control sends it to the web page with the to URL. Through Web Controls, you can configure additional mapping criteria.
The URL maps tab enable you to create, edit, and delete URL maps.

URL map files
A URL map file is a CSV file that specifies from and to pairs of URLs. The file should have two values on each line, separated by a comma to ensure that your URL map successfully redirects orphaned URLs. See the following example of a line for a URL map file.
http://www.example.com/<old_page> , http://www.example.com/<new_page>
After you are done adding URLs to the file, save it with the .csv file extension.
Create URL Maps
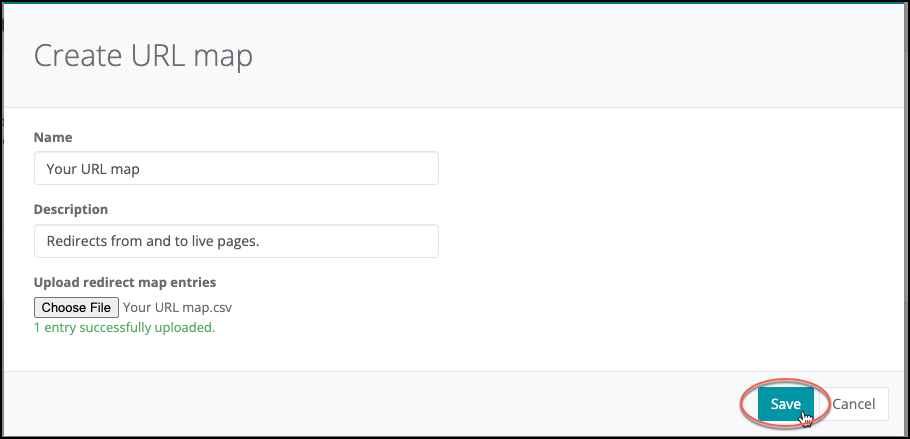
When you create a URL map, enter a name and upload the URL map file. Optionally, you can add a description.
Webscale parses the map file data before it creates the URL map. If the map file data is formatted incorrectly or invalid, you cannot create the URL map.
To create a URL map
-
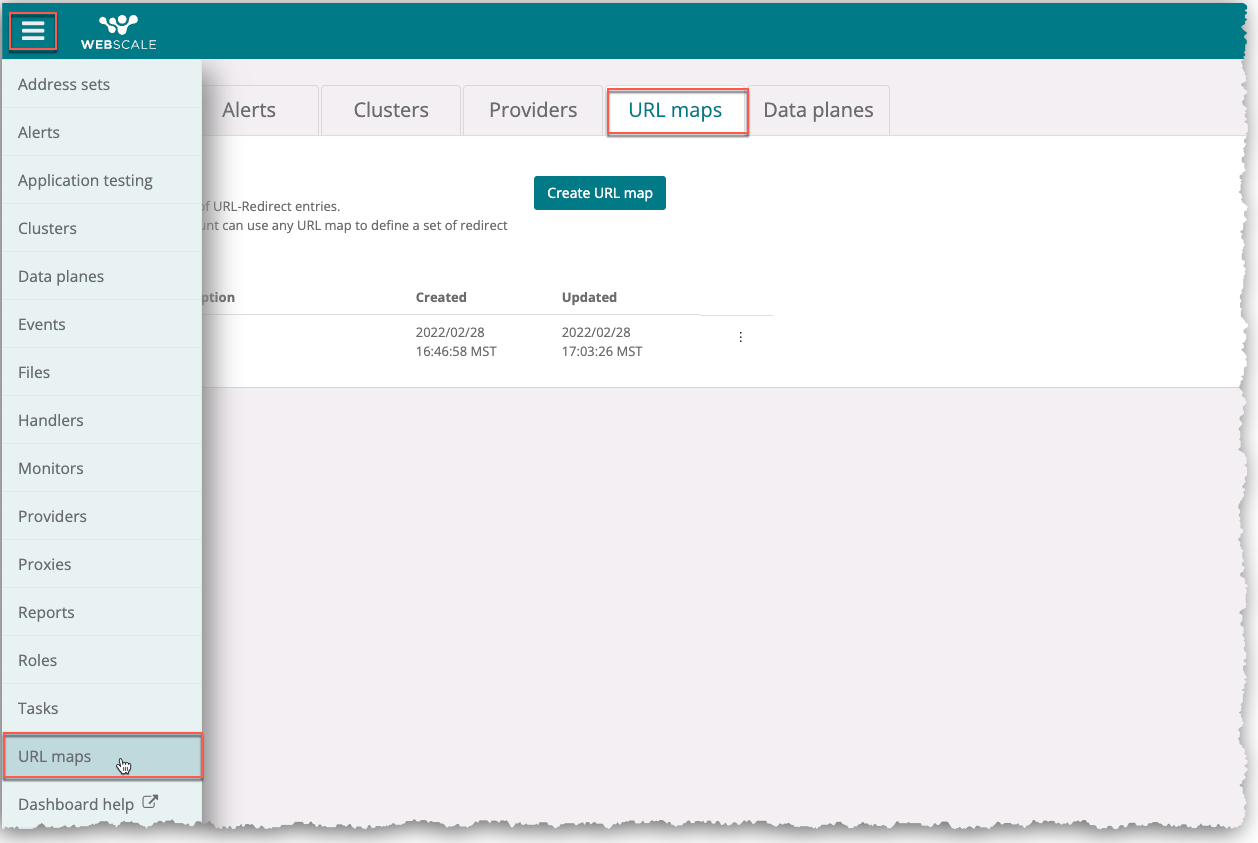
On the Webscale Control Panel page, click the menu icon on the upper left of the screen.
-
Select URL maps on the sidebar menu.
-
On the URL maps tab, click Create URL map.
-
Enter a URL name and, optionally, a description.
-
Click Choose File to upload a URL map file.
-
Select a file on your computer and click Open.
-
Click Save. The URL map information displays on the URL maps tab.
Edit URL maps
When you edit a URL map, you can perform the following operations.
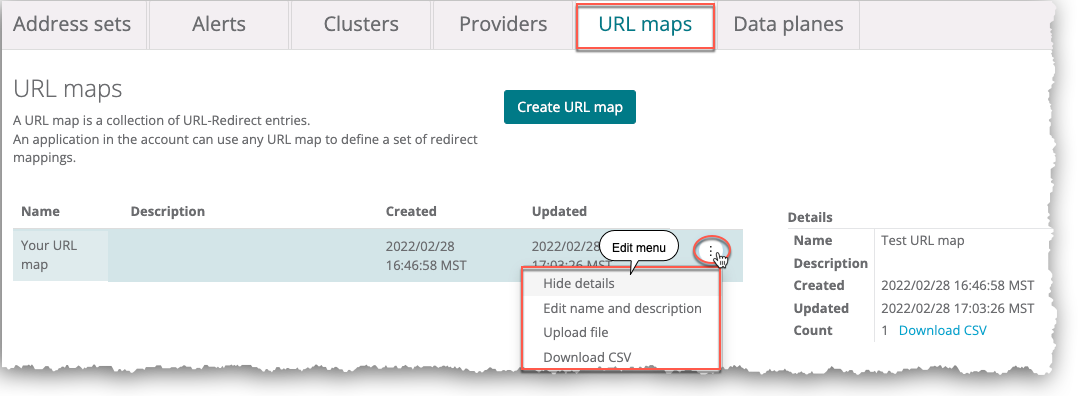
- Hide details
- Edit name and description
- Upload map file
- Download map file
- Delete map
When you select a URL map, detailed information displays for it in the Details section. Through the edit menu, you can hide the details or view them again if they are hidden. (You can also show hidden details by selecting the URL map.)
You can also replace a URL map file by uploading a different one or downloading the existing map file.
To edit a URL map
- On the URL maps tab, select the URL map that you want to edit.
- Click the three vertical dots menu icon to the right of the Updated column. The edit menu displays.
- On the edit menu:
- Hide the URL map details by selecting Hide details. To view hidden details, select View details.
- Edit the map name and description by selecting Edit name and description.
- Replace the map file with a new one by selecting Download map file and uploading a new file.
- For each editing operation, except for hiding and viewing details, click Apply to save the changes.
Delete URL Maps
You can also use the edit menu to delete URL maps.
To delete a URL maps
- On the URL maps tab, select the URL map that you want to delete.
- Click the three vertical dots menu icon to the right of the Updated column. The edit menu displays.
- On the edit menu, select Delete map.
- In the confirmation box, click Ok.
Web Controls
Web Controls consist of configured rule sets that minimize the need to define and maintain multiple individual rules. Instead, you can create rule sets that match individual request conditions.
Based on the conditions, Web Controls automatically execute a set of pre-defined actions. Web Controls also enable you to create complex sequences of actions. When one or more specified conditions are met, Webscale applies all configured actions to the request.
For URL mapping, optional conditions can specify when Webscale redirects URLs. The Redirect using map action is mandatory and enables the Web Control to re-direct URLs. When you select this action type, you must select a HTTP status code, URL map, and if Webscale will preserve request or query parameters for the request or from URL.
Settings for the Redirect using map action
When you select the Redirect using map action type, you must configure the following settings.
- HTTP status
- URL map
- Preserve query
The HTTP status setting defines the HTTP status code that all redirected requests for the URL map return.
The URL map setting specifies the URL map that the Web Control will use.
If the query preserving feature is enabled through the Preserve query toggle, the final redirected URLs (otherwise known as the output URLs) will include request query parameters for each pair in the map. Query parameters follow the differing paths for the from and to URLs.
If disabled, Webscale discards the request query parameter.
URL mapping and query parameters
The following table illustrates how URL mapping works when the Preserve query setting is enabled and disabled.
| Request URL | URL map from | URL map to | Preserve query parameter | Output URL |
|---|---|---|---|---|
| example.com/ex?a=b | example.com/ex | example.com/ab?y=z | True | example.com/ab?y=z |
| example.com/ex?a=b | example.com/ex | example.com/ab | True | example.com/ab?a=b |
| example.com/ex?a=b | example.com/ex?a=b | example.com/ab?y=z | True | example.com/ab?y=z |
| example.com/ex?a=b | example.com/ex?a=b | example.com/ab | True | example.com/ab |
| example.com/ex?a=b | example.com/ex | example.com/ab?y=z | False | example.com/ab?y=z |
| example.com/ex?a=b | example.com/ex | example.com/ab | False | example.com/ab |
| example.com/ex?a=b | example.com/ex?a=b | example.com/ab?y=z | False | example.com/ab?y=z |
| example.com/ex?a=b | example.com/ex?a=b | example.com/ab | False | example.com/ab |
Create Web Controls to redirect URLs
The Web controls page enables you to create Web Controls. For more information on creating Web Controls, see Creating Web Controls.
To create a Web Control to redirect URLs
-
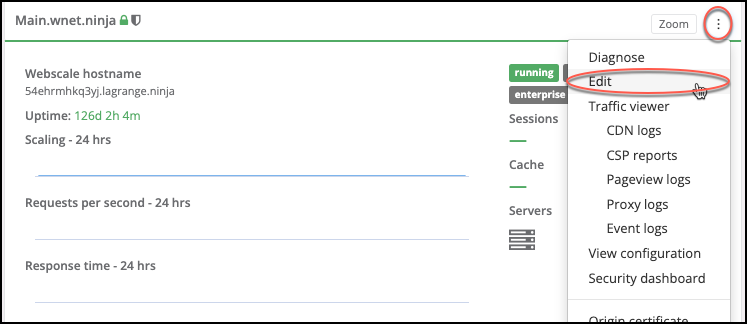
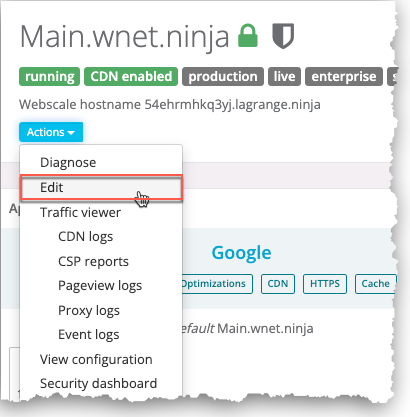
Click the three vertical dots menu icon on the upper right corner of the application box and select Edit.
-or-
On your application page, click the Actions menu icon and select Edit.
-
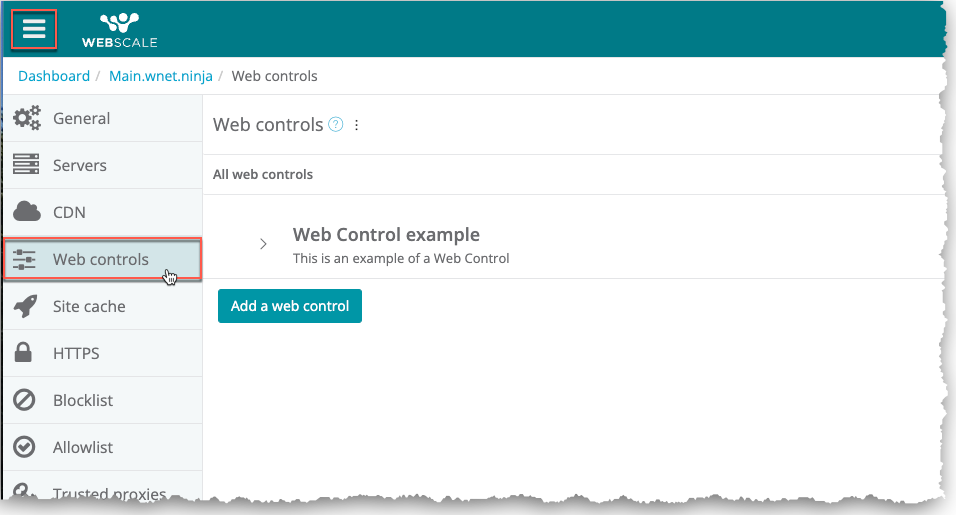
On the sidebar menu, select Web Controls. The Web controls page displays.
-
On the Web controls page, click Add a web control. The sections for configuring Web Controls display under the Edit web control heading.
-
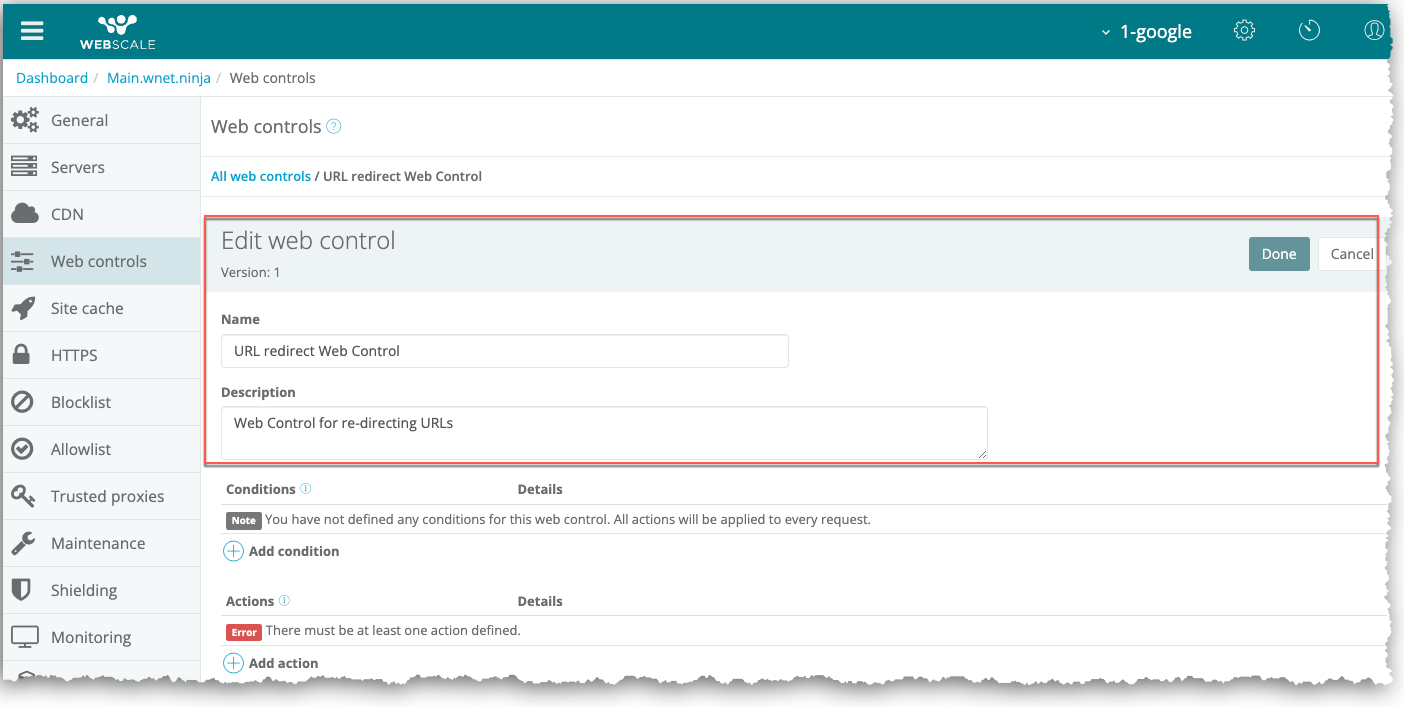
Enter a name and optional description for the Web Control.
-
Optionally, to add a condition: a. Click Add a condition. b. In the condition drop-down menu, select a condition and define the settings for the condition. You can select additional conditions. c. Click Done.
-
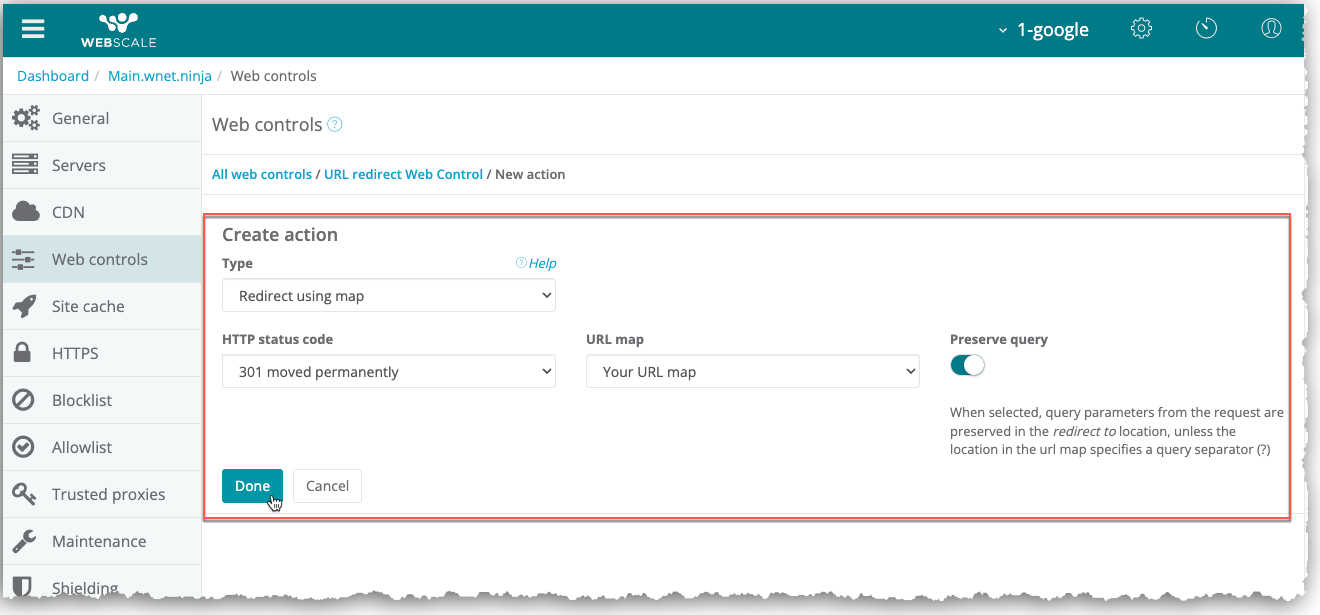
To add the redirect select_url_maps action: a. Click Add action. b. In the Type drop-down menu, select Redirect using map under Final actions. The Create action section displays. c. In the HTTP status code drop-down menu, specify a status code for responses to the from URLs in the URL map. d. Select a URL map in the URL map drop-down menu. e. Click the Preserve query toggle to enable or disable preserving queries in the mapping. f. Click Done. You can select additional actions.
-
To the right of the Edit web control header, click Done.
-
Click Apply.
Further Reading
Have questions not answered here? Please Contact Support to get more help.
Feedback
Was this page helpful?
Glad to hear it! Have any more feedback? Please share it here.
Sorry to hear that. Have any more feedback? Please share it here.