Kubernetes Clusters
A Kubernetes targeted cluster is a container based cluster that scales horizontally in response to increasing or decreasing traffic. The cluster is composed of up to two instances defined by blueprints: a web-server instance and optionally, a cron instance. The web-server instance consists of Pods managed by a Kubernetes Horizontal Pod Autoscaler and routable through a Service in the Kubernetes cluster. Users can specify scaling conditions, an init job, init container, and other container specific parameters when setting up their web-server blueprint. The optional cron instance consists only of a single Pod and any ConfigMaps necessary for successful cron execution.
Prerequisites
The Kubernetes cluster itself is not created through the Webscale Control Panel. It must be created independently and prior to enabling Kubernetes in your provider. Additionally, the cluster must have the following:
- A metrics server must be installed. See Installing the Kubernetes Metrics Server for details steps on deploying.
- A Container Runtime Interface (CNI) plugin installed to support NetworkPolicy objects. See below for an example.
- The provider user must have access to the EKS cluster.
- The Kubernetes cluster nodes must have the port range
30000-32767open to the internet.
To grant EKS access to the provider user you will have to create a ClusterRole with the required permissions and create an EKS IAM identity mapping from the provider user to the Group created in the ClusterRoleBinding. Follow these steps to grant the Webscale provider access to the Kubernetes cluster:
- Create the ClusterRole and the ClusterRoleBinding. First, save the following contents to a file named
ws-admin.yml.
---
apiVersion: rbac.authorization.k8s.io/v1
kind: ClusterRole
metadata:
  name: ws-admin
rules:
- apiGroups:
  - '*'
  resources:
  - "serviceaccounts"
  - "namespaces"
  - "nodes"
  - "rolebindings"
  - "roles"
  - "secrets"
  verbs:
  - "create"
  - "delete"
  - "get"
  - "update"
  - "patch"
  - "list"
  - "escalate"
  - "bind"
---
apiVersion: rbac.authorization.k8s.io/v1
kind: ClusterRoleBinding
metadata:
  name: ws-admin
roleRef:
  apiGroup: rbac.authorization.k8s.io
  kind: ClusterRole
  name: ws-admin
subjects:
- kind: Group
  name: ws-admin
  apiGroup: rbac.authorization.k8s.io
- Apply the following resources to the Kubernetes cluster. Authenticate to the cluster and run:
kubectl apply -f ./ws-admin.yml
- Create the IAM identity mapping with the new group created:
eksctl create iamidentitymapping \
    --cluster <eks-cluster-name> \
    --region <eks-region> \
    --arn <provider-arn> \
    --group ws-admin \
    --username webscale-provider
For example:
eksctl create iamidentitymapping \
    --cluster my-eks-cluster \
    --region us-east-1 \
    --arn arn:aws:iam::111111111111:user/provider-user \
    --group ws-admin \
    --username webscale-provider
To target a Kubernetes cluster you will need to enable Kubernetes for the provider. This is configured in the Providers tab. Select the “Use for Kubernetes” checkbox when creating or editing your provider and then enter the name of the preexisting Kubernetes cluster. This will result in a Kubernetes service being created for that provider.
You must also have a Docker registry service enabled either through the Docker Registry provider or with the “Use for ECR” checkbox in an AWS provider. This is configured in the Providers tab. See documentation on Working with Providers for more information.
Managed deployments must be enabled in your account in order to create Kubernetes targeted clusters. See documentation on Managed Deployments for more information.
Webscale currently only supports Amazon Elastic Kubernetes Service (EKS) and Stratus Kubernetes clusters. If you would like to request support for a different type of Kubernetes cluster, please let us know by contacting support . As a result, the “Use for Kubernetes” checkbox will only be visible for AWS providers and Stratus providers are configurable if you have an application configured in the Stratus cloud.
Installing the Calico Network Plugin on EKS
These two documents will walk you through the process of installing the Calico Network Policy plugin on an EKS cluster.
Installing the Calico network policy engine add-on Installing Calico
Follow the steps defined in the AWS documentation to install Calico correctly. It is worth noting that the Calico EKS specific installation does not work correctly and Calico should be installed using Helm.
You do not have to remove the default Amazon VPC CNI add on as long as you follow the steps in the AWS documentation.
Creating a Kubernetes targeted cluster
To create a cluster, click the Clusters tab and then click Add cluster. If you have enabled Kubernetes for at least one of your Providers, you will now be prompted to select a cluster type. For Kubernetes targeted clusters, select “kubernetes”.
This will then display the cluster editor:
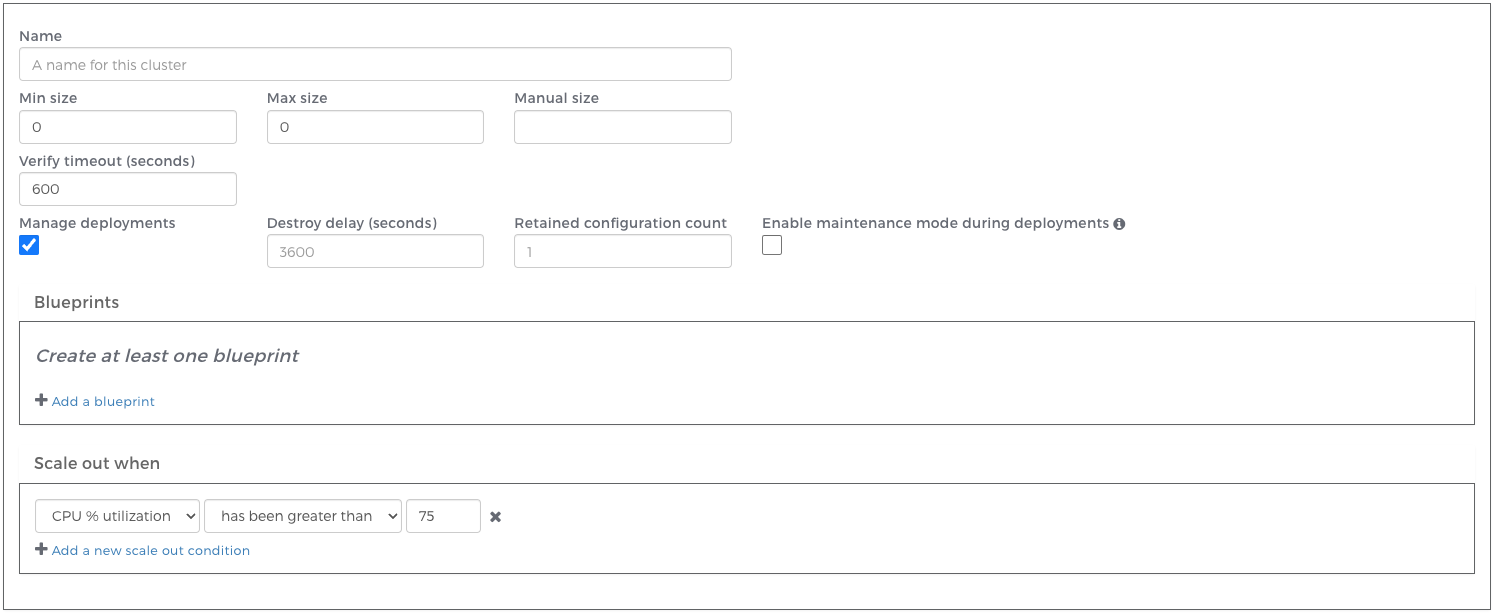
Here you will define the properties of your Webscale cluster:
| Property | Description |
|---|---|
| Name | Name of the Webscale cluster. |
| Min size | Minimum number of web-server pods. |
| Max size | Maximum number of web-server pods. |
| Manual size | A specified number of web-server pods (overrides minimum and maximum). |
| Verify timeout | The amount of time to attempt to verify the cluster before marking the configuration as failed. |
| Manage deployments | See Managed Deployments . Required for Kubernetes targeted clusters. |
| Destroy delay | The amount of time to keep previous cluster resources running after a new cluster has been successfully deployed. |
| Retained configuration count | The number of previous cluster configurations to store. Clusters in “Failed” or “Retained” states are included in this count. |
| Enable maintenance mode during deployments | When checked, any applications with the cluster assigned to them will enter maintenance mode during deployments. In the event of a deployment failure, the application(s) will remain in maintenance mode. |
| Blueprint | Kubernetes instance blueprint definition. See below . |
| Scale out when | Predefined conditions that determine when the cluster should scale out. |
Once you have specified the properties of your cluster, click Save. If you have specified a minimum size greater than zero, a Kubernetes instance will begin to be created. Progress can be monitored in the Task monitor or the Clusters page.
Defining a Kubernetes blueprint
Your Kubernetes cluster blueprint specifies configuration details for the Kubernetes Replica Set, Horizontal Pod Autoscaler (HPA), and Service. You must provide a web-server blueprint when creating Kubernetes clusters. You may optionally provide a cron blueprint as well to manage your application’s crons. You may not provide multiple blueprints of the same type.
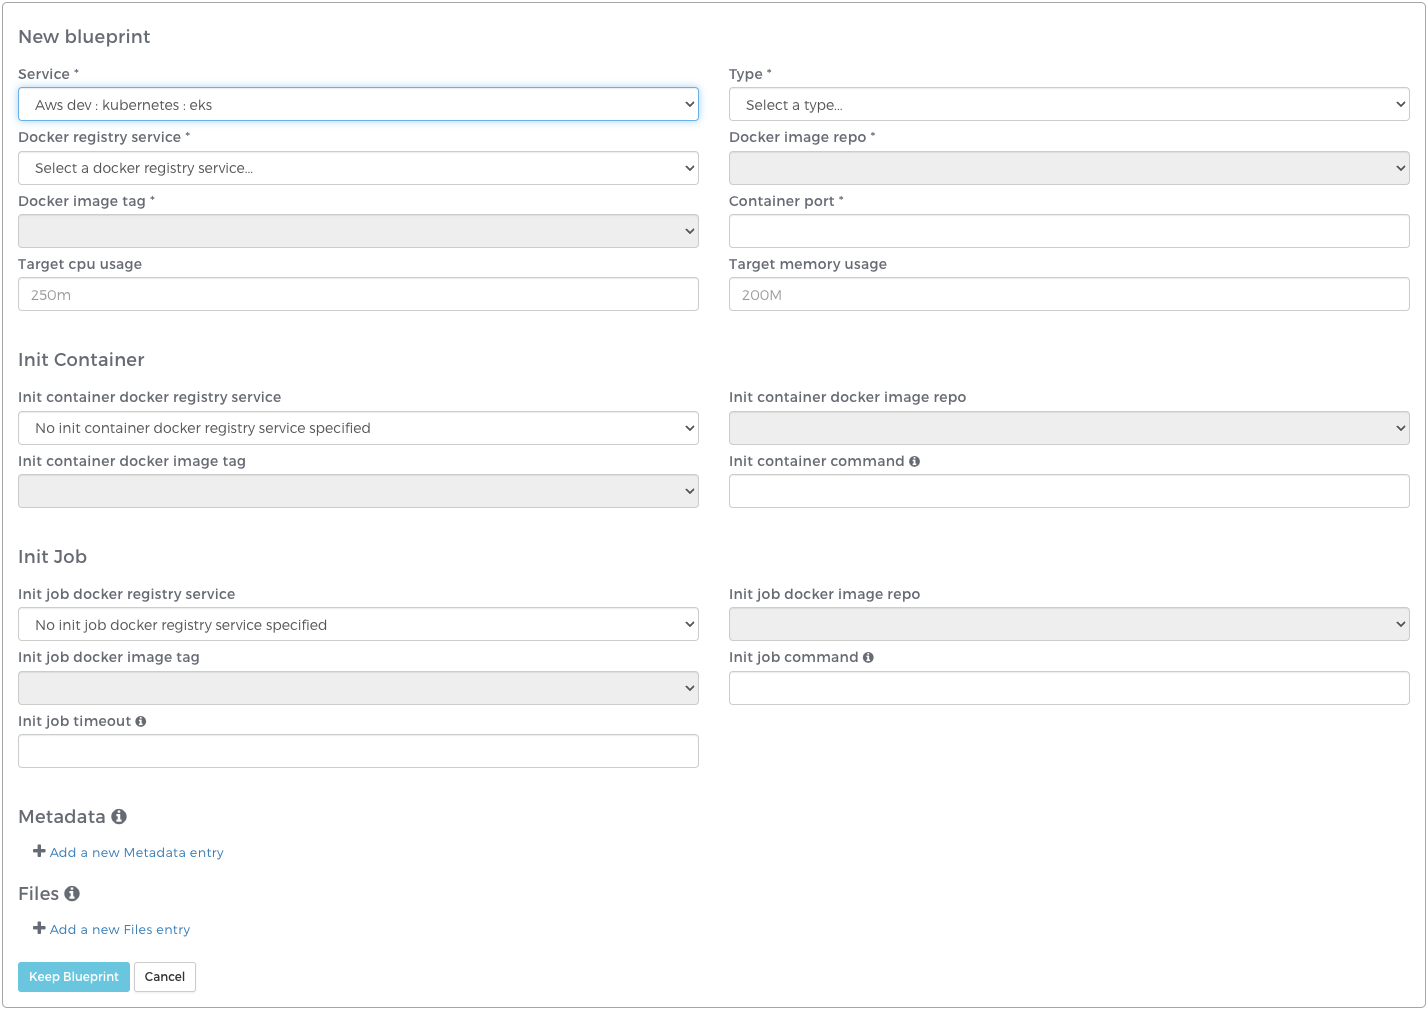
Blueprint
| Property | Description |
|---|---|
| Service | Webscale service used to create the cluster resources. Required. |
| Type | Define the type of resources specified by the blueprint. This affects scaling and configuration options. See Defining a cron blueprint . Required. |
| Application | The Webscale application the cluster will target. Only required if a Stratus service is being used. |
| Docker registry service | The Docker registry service to be used to specify the container image. Required. |
| Docker image repo | The Docker image repository where the container image is stored. Repositories are configured in the Providers tab either in the Docker Registry Provider or AWS Provider. Required. |
| Docker image tag | The Docker image tag to be used in the Kubernetes instance. This image must be a functioning webserver that can accept HTTP/S traffic on a given port. Required. |
| Container port | The container port to expose. Required. |
| Target cpu usage | The required CPU usage for a single instance of your container. Accepted units: millicores (m) or cores. Ex: “1000m” or “1” |
| Target memory usage | The required memory for a single instance of your container. Accepted units: K, Ki, M, Mi, G, Gi, T, Ti, P, Pi, E, or Ei. Ex: “2000M” or “2Gi” |
Init Container
The Init Container section of a Kubernetes blueprint defines the container image and command to be run as a Kubernetes Init Container. Init Containers run before a Pod is started on every Pod creation (including scale out events). This entire section is optional and the required fields shown below are only required if you are defining an Init Container. See the Kubernetes Init Containers documentation for more information about how Init Containers work.
| Property | Description |
|---|---|
| Init container docker registry service | The Docker registry service used to specify the Init Container image. Required. |
| Init container docker image repo | The Docker image repository where the Init Container image is stored. Required. |
| Init container docker image tag | The Docker image tag to be used for the Init Container. This image must contain an executable script that will run the Init Container logic. Required. |
| Init container command | The absolute path to the executable script within the container image. This command will be run when the Init Container starts up and must exit successfully in order for the main container to start. Required. |
Init Job
The Init Job section of a Kubernetes web-server blueprint defines the container image and command to be run as a Kubernetes Job before the Init Container and main container start. The Init Job is only executed once on a new Webscale cluster deployment and will not be executed as new Pods scale out. This entire section is optional and the required fields shown below are only required if you are specifying an Init Job. Init Jobs can only be specified on web-server blueprints. See the Kubernetes Jobs documentation for more information about how Jobs work.
| Property | Description |
|---|---|
| Init job docker registry service | The Docker registry service used to specify the Init Job image. Required. |
| Init job docker image repo | The Docker image repository where the Init Job image is stored. Required. |
| Init job docker image tag | The Docker image tag to be used for the Init Job. This image must contain an executable script that will run the Init Job logic. Required. |
| Init job command | The absolute path to the executable script within the container image. This command will be run when the Init Job starts up and must exit successfully in order for the main container or Init Container (if specified) to start. Required. |
| Init job timeout | The time in seconds to wait for the Init Job success. Once this timeout has been exceeded the Webscale cluster will fail verification and newly created resources will be destroyed. Required. |
Volume Mounts
You have the option to specify volume mounts when using a Stratus service. When creating a volume mount you specify a source and target path. These paths must both be absolute paths where the source path is the absolute path from within the volume. In the Stratus service case, the volume is the Stratus environment’s webroot volume. The target is the absolute path within the container where the directory or file specified in the source path should be mounted.
Common use cases for Volume Mounts include mounting media contents and var directories into the container.
Metadata

You have the option to specify key/value pairs that are made available in the container(s) created using that blueprint. Specify your key/value pair in the cluster blueprint editor and these will be made available as environment variables in all containers created from that blueprint.
Files

You have the option to specify Webscale files that are made available in the container(s) created using that blueprint.
Upload a file via Webscale Files as type “Microsite” and it will become available for selection in the cluster blueprint editor. In the cluster editor, select a previously uploaded file, choose the path within that compressed file, and then specify the location on the container where you would like to mount the file.
When the cluster scales, the specified file will be mounted at the specified location on every container created in the cluster.
The combination of these files can not exceed 1MB due to Kubernetes object restrictions. If the combination of these files exceeds 1MB, the cluster will fail to verify.
Files must be uploaded to your Webscale account prior to blueprint creation via the Files tab. See Working with Files for more information on uploading Webscale files.
Defining a cron blueprint
In order to manage crons on your application, you may provide a second blueprint in your cluster configuration with a type of “cron”. The same blueprint options exist as with your web-server blueprint, with the exception of the Init Job, which is disabled for cron blueprints.
The cron instance will contain a single cron pod with the specified target CPU and memory limits provided. Scaling conditions (including min and max size) apply only to the web-server pods in your cluster and will be ignored for your cron instance.
At the beginning of a deployment, if a cron instance is running for the cluster, it will be destroyed. It will be relaunched (with the new configuration given, or the existing one if no changes have been made) upon successful verification of your web-server instance. If there is a problem destroying or creating your cron instance, the deployment will be marked as failed and a new deployment or manual intervention may be required. Check your Task logs for information on where the deployment may have failed.
Further reading
Last modified on June 3, 2026