Managed Deployments
Managed deployments allow for new cluster configurations to be deployed systematically and efficiently following the blue-green release model. Deployment configurations are grouped in the UI in reverse chronological order so users can easily see their deployment configuration history as well as the state of their current deployment.
Enabling Managed Deployments
Note:
Managed deployments are an optional feature that must be enabled per account through an entitlement. Contact Webscale Support if you do not have access to this feature and would like it.When creating a cluster, users have the option to select a Manage deployments checkbox which will enable the feature for the cluster being created. All future deployments will be handled automatically when a relevant configuration change is made to the cluster. Configurations for managed clusters will display in a hierarchical view in the UI (See below.)
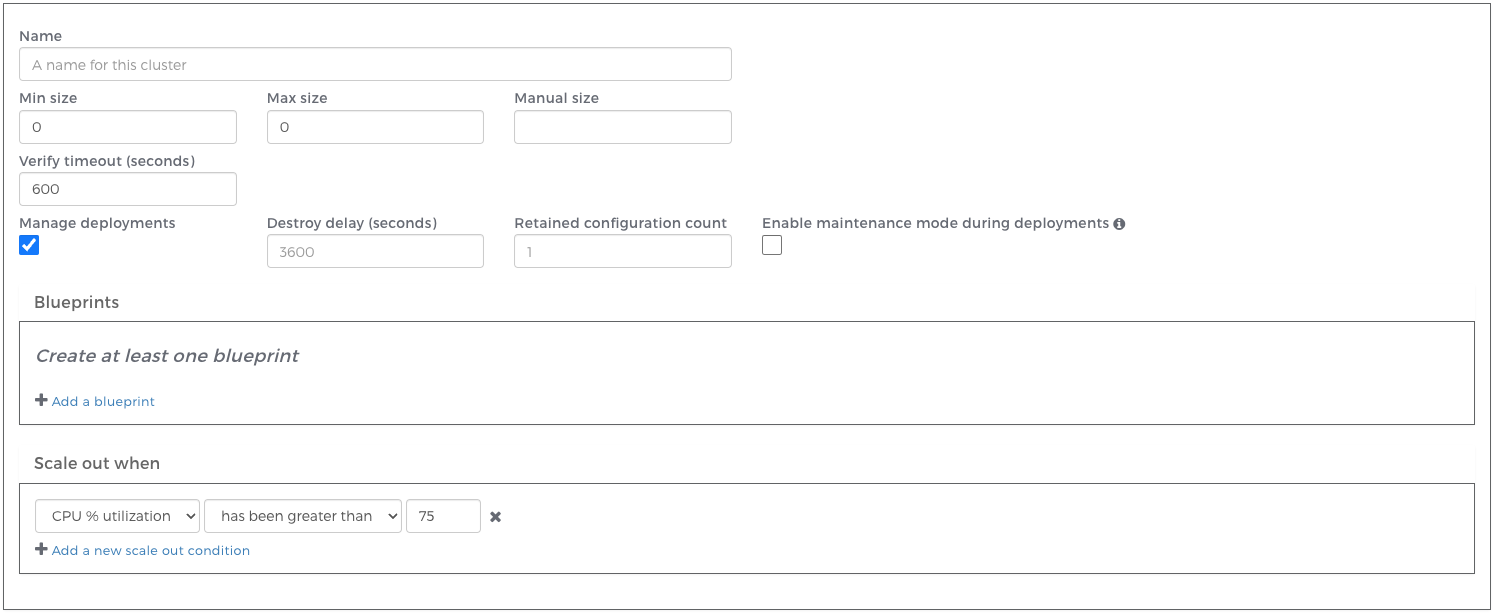
After enabling “Manage deployments” you will have the option to define additional properties for your cluster:
Destroy delay: The amount of time to keep resources running after a new cluster has been successfully deployed. The keeping of resources running can save time in the case where a rollback to a previous configuration is necessary. Additional costs will be incurred due to maintaining resources in the Cloud for the duration of the destroy delay. Clusters being kept due to destroy delay will report a state of “keeping”.
Retained configuration count: The number of previous cluster configurations to store. These configurations can be viewed and redeployed by clicking “Redeploy” in the Cluster Viewer. This count includes configurations in the “retained” or “failed” state, but does not include cluster configurations in the “running” or “keeping” state. When this count is exceeded, cluster configurations will be deleted from oldest to newest until the count is no longer exceeded.
Enable maintenance mode during deployments: When checked, any applications with the cluster assigned to them will enter maintenance mode during deployments. In the event of a deployment failure, the application(s) will remain in maintenance mode. A subsequent successful deployment will cause the application(s) to exit maintenance mode. It can also be disabled manually, see Managing Maintenance Mode.
You can only enable or disable managed deployments during cluster creation. In order to migrate from an unmanaged cluster to a managed one, or vice versa, you must create a new cluster.
How to execute a new deployment
To execute a new deployment, simply change the configuration of your cluster. When you save that configuration, a blue-green deployment will begin.
Note:
Changes to destroy delay or retained configuration count do not result in a new deployment but will affect any previously created cluster configurations.In a blue-green deployment, first a new cluster will be created with the new configuration. Once those resources have been created and verified, routing for any applications assigned to that managed cluster will automatically change from the old (‘blue’) cluster to the new (‘green’) one.
Automated Deployments
If you want to automate your deployments to have a full CI/CD pipeline you can simply add Webscale API requests at the end of your build process. For example, if you wanted to update the docker image reference in your kubernetes managed cluster you could execute the following GET and PATCH requests after your docker image was successfully pushed to an image repository. The following solution relies on jq being available in your build environment.
#!/bin/bash

ACCESS_KEY=<my-access-key>
CLUSTER_ID=<managed-cluster-id>
NEW_DOCKER_IMAGE_URI=<updated-docker-image-uri>

# Fetch existing cluster blueprint and update docker_image_uri.
BLUEPRINT=$(
  {
    curl -s https://api.webscale.com/v2/clusters/$CLUSTER_ID \
      -H "Authorization: Bearer $ACCESS_KEY" |
    jq .server_blueprints |
    jq -c ".[0].docker_image_uri = \"$NEW_DOCKER_IMAGE_URI\""
  }
)

# Patch the cluster with the updated blueprint.
curl -X PATCH "https://api.webscale.com/v2/clusters/$CLUSTER_ID" \
  -H "Authorization: Bearer $ACCESS_KEY" -H "Content-Type: application/json" \
  --data "{ \"server_blueprints\": $BLUEPRINT }"
This will only change the docker_image_uri value in the cluster server_blueprint while keeping all other cluster configuration values the same. The managed cluster deployment process will trigger on the PATCH with the new docker_image_uri. Once the new deployment is verified the applications using the cluster will be updated to route to the new instance running the updated docker image.
If there are other updates you require to make during a deployment or you are unsure how to retrieve an access key, refer to the API documentation.
Rollback and Redeploy
The old (‘blue’) cluster resources will be kept running for the duration of the destroy delay, and can easily be rolled back to by clicking “Rollback” in the UI for that cluster configuration. At the end of the destroy delay, the resources will be destroyed.
You can always redeploy an older cluster configuration, just by clicking the “Redeploy” button in the UI. The only difference between this and “Rollback” is that a “Redeploy” will create a new cluster configuration and will require acquiring new resources in the Cloud.
Understanding cluster states
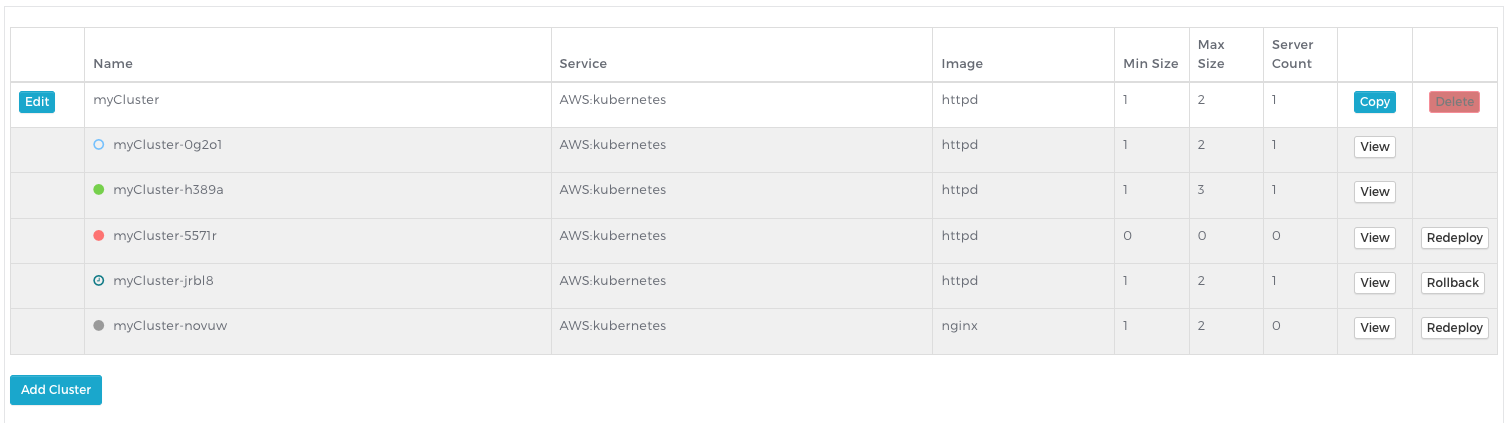
In the above screenshot, the account contains a managed cluster with five configurations in various states:
- myCluster-0g2o1 was recently deployed and resources are still be created or verified.
- myCluster-h389a is currently the active cluster serving traffic. It is in the “running” state.
- myCluster-5571r is reporting a state of “failed”. Something went wrong in creating or verifying this configuration.
- myCluster-jrbl8 is in the “keeping” state. It can easily be rolled back to by clicking Rollback.
- myCluster-novuw is in the “retaining” state. The configuration can easily be redeployed by clicking Redeploy.
| Icon | State | Description |
|---|---|---|
| Creating | Cloud resources are being allocated. | |
| Verifying | A cluster has been created and we are verifying that it responds to requests as expected. | |
| Running | Cluster is currently up and running. | |
| Keeping | Cluster is not the active cluster, but the Cloud resources are still running. This state indicates that the cluster has been scheduled to destroy after the destroy delay expires. | |
| Destroying | Cloud resources are in the process of being destroyed. | |
| Retaining | Cloud resources have been destroyed, but we are holding onto the configuration in case the user wants to view or redeploy it. | |
| Failed | Creation or verification did not succeed. |


Deployment Lifecycle
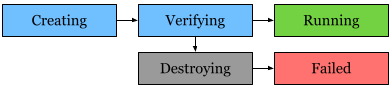
When a new deployment is initiated, resources in the Cloud will be created. Once this is complete, verification on the new cluster will begin. When the cluster successfully responds, the cluster will move into the “running” state. Verification will attempt to retry for the duration of the verify timeout specified in the cluster configuration. If, at the end of this period, the cluster has still not responded successfully, all cluster resources will be destroyed and the cluster will either be marked as “failed” or it will reattempt creation.
Retirement Lifecycle

After a new cluster has successfully verified, entered the “running” state, and routing has been switched to it, the previous cluster will be retired. All Cloud resources will be kept running for the duration of the destroy delay specified in the managed cluster’s configuration. During this time, the cluster can be quickly reinstated as the active cluster by clicking Rollback in the Webscale Portal. Once the destroy delay has expired, cluster resources will be destroyed and the configuration will be marked as “retained”.
The number of retained configurations can be specified by the user in the cluster configuration. Note that failed configurations are also included in this count.
Further reading
Have questions not answered here? Please Contact Support to get more help.
Feedback
Was this page helpful?
Glad to hear it! Have any more feedback? Please share it here.
Sorry to hear that. Have any more feedback? Please share it here.