Completing CloudEDGE CDN Configuration
After you fulfill the configuration pre-requisites, complete the final steps for configuring CloudEDGE CDN (also known as Webscale CDN).
The final steps consist of the following tasks.
- Enable Webscale CDN
- Bypass the CDN admin domain, if needed
- Set up caching policies
- Configure accelerators
- Validate the configuration
If you decide to roll back Webscale CDN, doing so is a simple process.
Enable Webscale CDN
You can enable Webscale CDN through the CDN page for the application. The CDN delivery options determine how Webscale will use CDN.
After you confirm changes to the Webscale CDN delivery, the following changes occur.
- A “Configure CDN” task will be generated. You may follow the task to track the progress of a newly created CDN as it is being configured on an application.
- All traffic for the application first passes through the CDN provider
- When using CloudFront, the application has a Cloudfront distribution
- When using Section, the application has a Section project
- The CDN origin will become origin-<application ID>.cloudmaestro.com, which resolves to Webscale proxy addresses
- All requests will reflect the application alias and not the cloudmaestro domains
By default, CDN is disabled. Without CDN, PageSpeed is disabled and the CDN provider is unavailable.
The other CDN delivery method is to have PageSpeed rewrite to CDN. With this legacy option, Pagespeed rewrites to CDN and uses the cloudmaestro domain to deliver content to customers.
To enable Webscale CDN
-
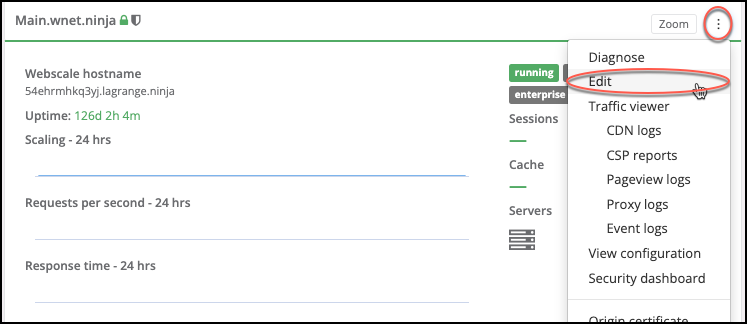
Click the three vertical dots menu icon on the upper-right corner of the application box and select Edit.
-or-
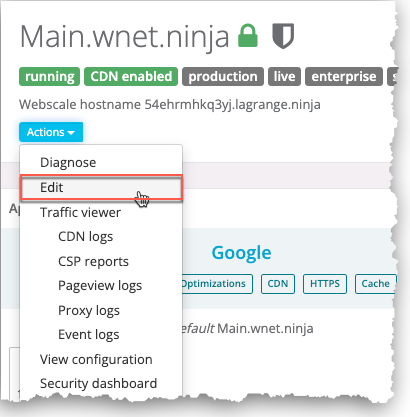
On your application page, click the Actions menu icon and select Edit.
-
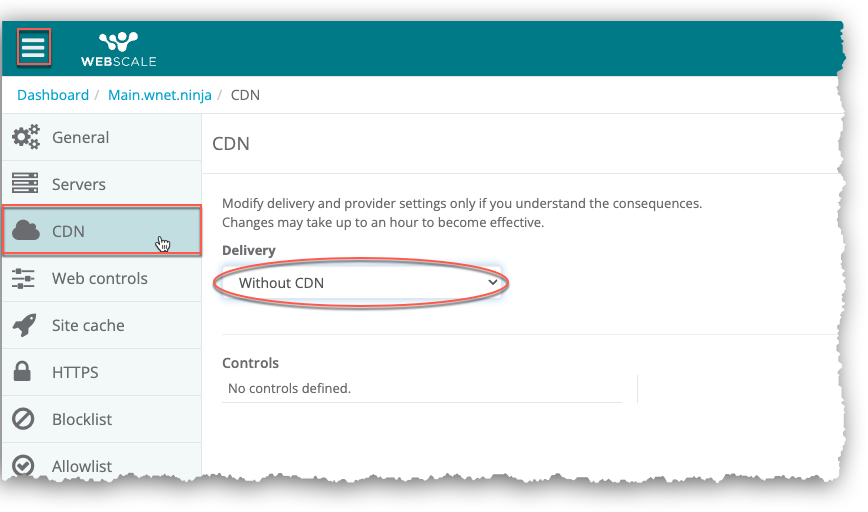
On the sidebar menu, click CDN.
The CDN page displays with the default delivery option of Without CDN selected.
-
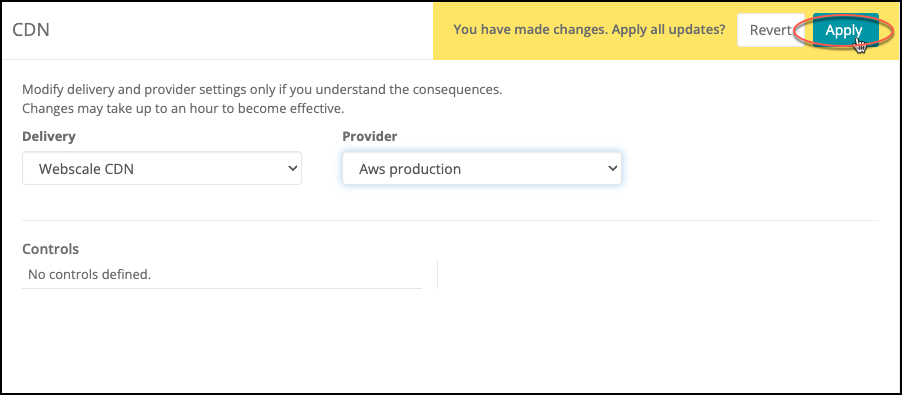
In the Delivery drop-down menu, select Webscale CDN. The Provider drop-down menu displays. It lists all of the providers enabled for Webscale CDN.
-
Select the CDN provider you want to use with Webscale CDN for this application.
-
Click Apply to enable Webscale CDN.
Bypass the CDN admin domain
If you need to bypass the CDN admin domain to prevent requests from timing out, you can complete the bypass process after enabling Webscale CDN.
Doing so points all admin traffic to origin-<application ID>.cloudmaestro.com, which is your Webscale hostname.
There are different bypass procedures for new and existing customers.
To bypass the CDN admin domain for new customers
- While working on fulfilling configuration pre-requisites, create an admin sub-domain. For more information, see Create an admin subdomain in CDN Configuration Pre-requisites.
- Enable Webscale CDN.
- Through your application, add an alias for the admin sub-domain. For more information about adding an alias, see Application aliases.
- Point the admin sub-domain to origin-<application ID>.cloudmaestro.com using DNS.
To bypass the CDN admin domain for existing customers
- While fulfilling configuration pre-requisites, create an admin sub-domain.
- Enable Webscale CDN.
- After origin-<application ID>.cloudmaestro.com resolves to your proxy IP address, point your admin sub-domain to it.
- Through your application, add an alias for the admin sub-domain.
Configure accelerators
Note:
CDN Accelerators are only available for Section CDN Providers.Subscriptions for CDN accelerators may be set up to optimize edge delivery performance. Contact Support to enable accelerators for your application.
CDN Accelerators are a game-changer for websites that demand fast, personalized content delivery. Accelerators enhance user experiences and help you stay competitive in today’s fast-paced digital landscape.
Magento Varnish
Magento Varnish is a specialized CDN accelerator designed to enhance the performance and caching capabilities of your Magento e-commerce website. This accelerator is specifically tailored to work seamlessly with Magento applications, ensuring that your online store delivers fast and reliable content to your customers.
The Magento Varnish accelerator is designed to work in tandem with a Webscale varnish magento module to make integration easy.
HTML Streaming
HTML Streaming is a cutting-edge CDN accelerator that offers lightning-fast response times and advanced caching techniques. This feature is designed to optimize the delivery of HTML content, making it ideal for websites where delivering dynamic, personalized, or frequently changing content quickly is essential.
The HTML streaming accelerator offers Edge-Side Includes (ESI) support. ESI is a powerful tool that pairs with Webscale CDN allowing you to cache parts of your web pages separately. HTML Streaming fully supports ESI, enabling you to cache and serve specific components of your web pages independently. This means you can cache reusable elements while keeping dynamic sections up to date.
HTML Streaming employs intelligent caching strategies to serve cached content when possible and fetch dynamic content when necessary. It helps reduce server load and ensures that your visitors experience fast load times for both cached and dynamic elements.
Custom VCL
Custom VCL (Varnish Configuration Language) is a powerful feature that provides users with complete control over how requests and responses are handled at the CDN’s edge servers. It allows you to tailor Webscale CDN’s behavior to suit your specific needs and customize the caching, routing, and processing of content. Custom VCL may be uploaded using the File browser
For more information on Files, check out working with files.
Set up caching policies
By default, Webscale CDN does not cache pages and resources. Every application is different, so ensure you tailor CDN controls to your specific caching needs. After enabling Webscale CDN, create necessary CDN controls to define basic caching policies. Doing so completes Webscale CDN configuration.
On the CDN page, add necessary CDN controls to complete Webscale CDN configuration. Generally, one CDN control is configured for caching media assets, and a second for static assets.
For information on Webscale CDN caching, see Configuring CDN Caching Policies.
Add CDN controls for media and static assets
Specify paths for caching media and static assets. When enabling Webscale CDN, create CDN controls with the following paths. Each path points to the asset location. Use wild cards when specifying paths. Save and apply the CDN controls after specifying the following settings.
- Use /media/* as the path for caching media assets.
- Use /static/* as the path for static assets.
Enter 86400 as the default TTL for both CDN controls. TTL, an acronym for Time to Live, specifies how long (in seconds) an asset will be cached before it needs to be fetched again.
Validate the configuration
After you complete the final steps, perform a validation check to ensure that Webscale CDN delivers all assets. Using developer tools, examine a static asset. Check the asset’s X-Cache header to verify that Hit from Cloudfront displays for it.
After you set up caching policies, Webscale CDN does not immediately start caching. The request with the static asset might initially be a miss from CloudFront. After you re-load the page, it should be a hit.
Rolling back the configuration
To roll back Webscale CDN, delete all CDN Controls on the CDN page. Doing so reinstates the default caching policy for Webscale CDN to not cache anything. Traffic still passes through Webscale CDN.
Further reading
-
Have questions not answered here? Please Contact Support to get more help.
Feedback
Was this page helpful?
Glad to hear it! Have any more feedback? Please share it here.
Sorry to hear that. Have any more feedback? Please share it here.