Using Image Manager
The Webscale Image Manager product is an image processing service that uses a JavaScript library called Sharp to automatically manipulate images. The library filters change image compression, size, and format according to your specifications.
Image Manager offers a one-stop, automated image optimization and management solution to dynamically optimize delivery, significantly improve page load times, and reduce spending. Improvement in the size and bandwidth usage of delivered images can result in higher Core Web Vitals scores. The main objective of Image Manager is to replace web page images with smaller optimized versions for better website performance.
After Webscale support deploys Image Manager , it runs automatically, using default request Web Controls and cache settings. You can change these settings so that Image Manager processes images differently. For example, you might want users to be able to view the details of site images better. You can raise image quality by decreasing compression, which increases file size and resolution, through a Web Control filter setting. However, larger files lead to slower page load times.
Through Web Controls, you can ensure the ongoing high performance, availability, and security of your websites through customized conditions and actions that Webscale applies to your website traffic. Web Controls consist of configured rule sets that minimize the need to define and maintain multiple individual rules. Instead, you can create rule sets that match individual request and response conditions. When a request meets specified conditions, Web Controls execute a set of pre-defined actions. Web Controls enable you to create complex sequences of actions that run automatically.
IMPORTANT:
We strongly recommend that the only Web Controls settings that you modify are the ones for the image processing filters. All other conditions and actions are configured correctly for Image Manager . Do not add new conditions and actions for the Web Controls.Topics
- Overview
- AWS Lambda
- Default Web Controls
- Cache processed images
- Change image processing settings
- Filters overview
Overview
A browser generates a request for an image. If the request meets all of the conditions for a Web Control for Image Manager , the following process takes place.
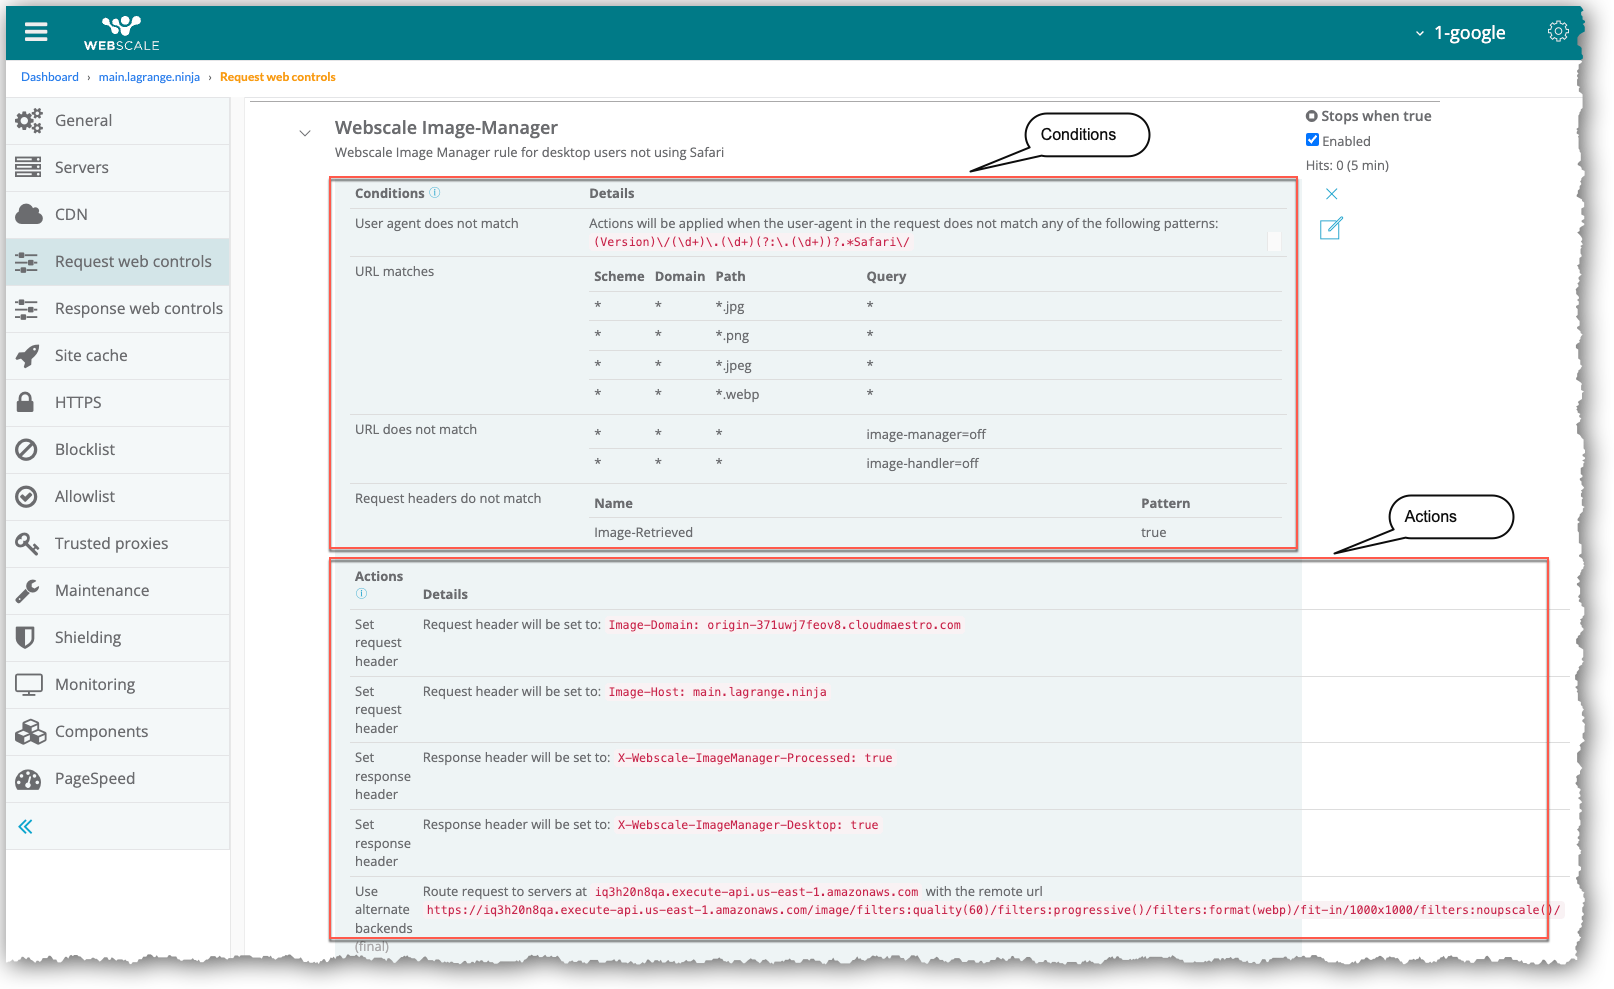
- The Use alternate backends action for an Image Manager Web Control calls the AWS API Gateway endpoint and specifies the filters and their settings. -and- Set request header and Set response header actions modify the request and response headers to give configuration values to Image Manager . They also provide information about if Image Manager processed the request and the Web Control for it.
- The AWS API Gateway triggers the AWS Lambda service, which makes the Lambda run.
- Image Manager makes a request inside the Lambda to get the original image from your backend application or Site Cache, depending on which one contains the image.
- Webscale serves the image from the appropriate cache.
- Through the Sharp JavaScript library, Image Manager applies the filters to the image.
- Webscale caches the processed image and sends it to the web browser that created the request.
You can change how Image Manager processes images by modifying the Use alternate backends action, which specifies the image filters and their settings.
You might need a new Web Control to meet your organization’s needs. For example, you might want Image Manager to process banner images and apply specific optimization settings. Or, you might deploy Image Manager on a locked-down staging site that only allows access based on specific IP addresses for testing. An additional Web Control could enable Image Manager Lambdas to access your backend application.
To add a Web Control for Image Manager , contact support.
Note:
The Image Manager installation process automatically creates three default request Web Controls. They are crucial for Image Manager to run. Do not delete them. For more information on the Web Controls, see Default Web Controls.AWS Lambda
AWS Lambda is a serverless, event-driven service. It enables Webscale to run code for virtually any type of application or backend service.
Lambdas are simple functions that you can invoke to run your code. Each Lambda is used just once. It has code to process the events that you pass into the function or that other AWS services send to the function. For more information on AWS Lambda, see the AWS documentation for What Is AWS Lambda?.
A trigger is a resource or configuration that invokes an AWS Lambda function. Triggers include AWS services that you can configure to invoke a function.
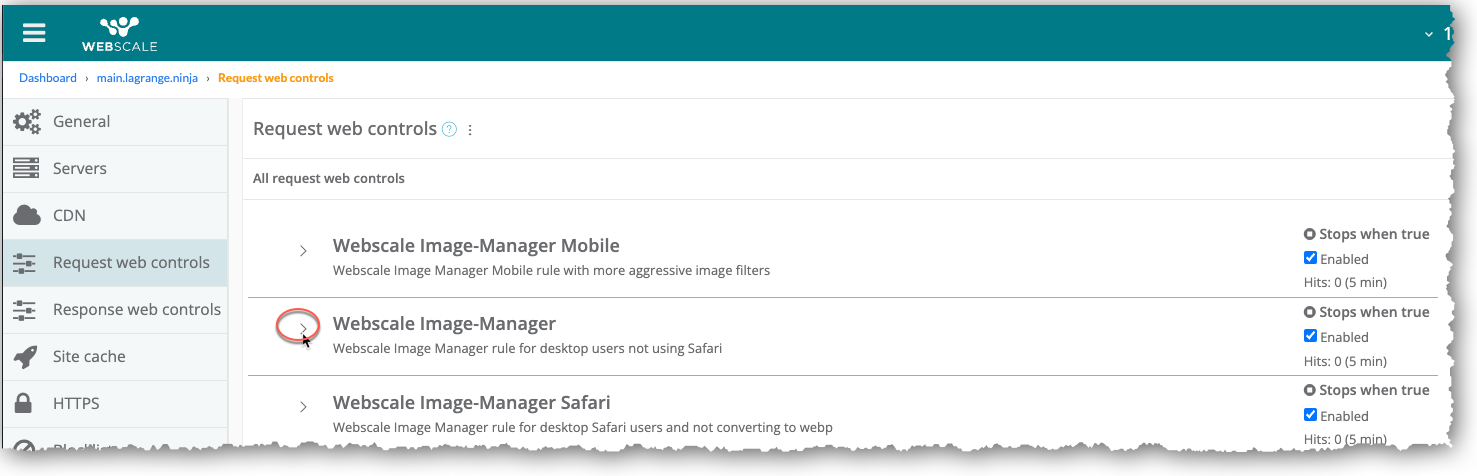
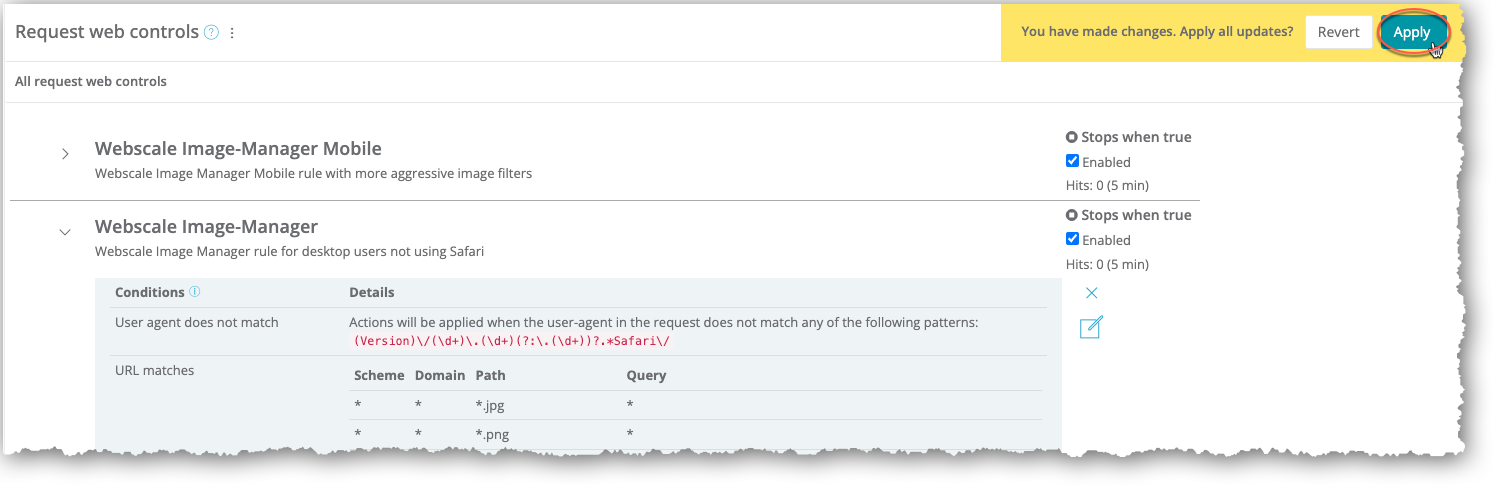
Default Web Controls
Webscale automatically creates three request Web Controls during Image Manager installation. These standard Web Controls have default conditions, actions, and filters with specific settings. Their names correspond to each of the following user types.
-
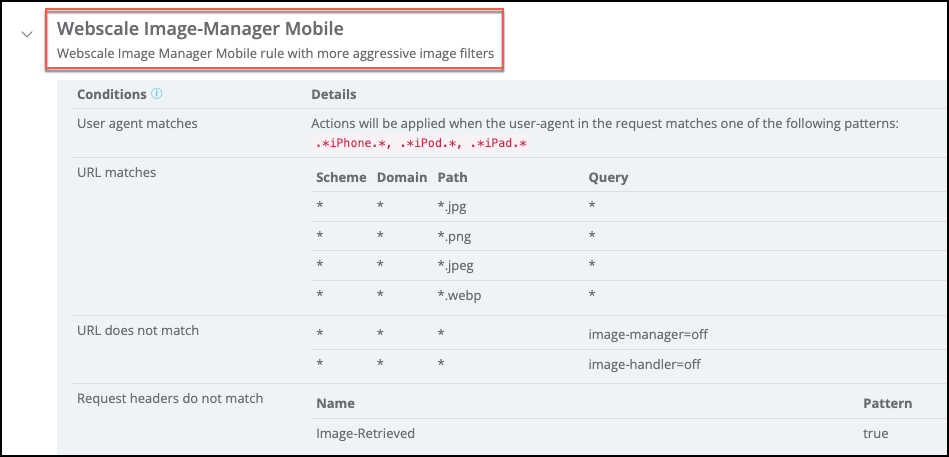
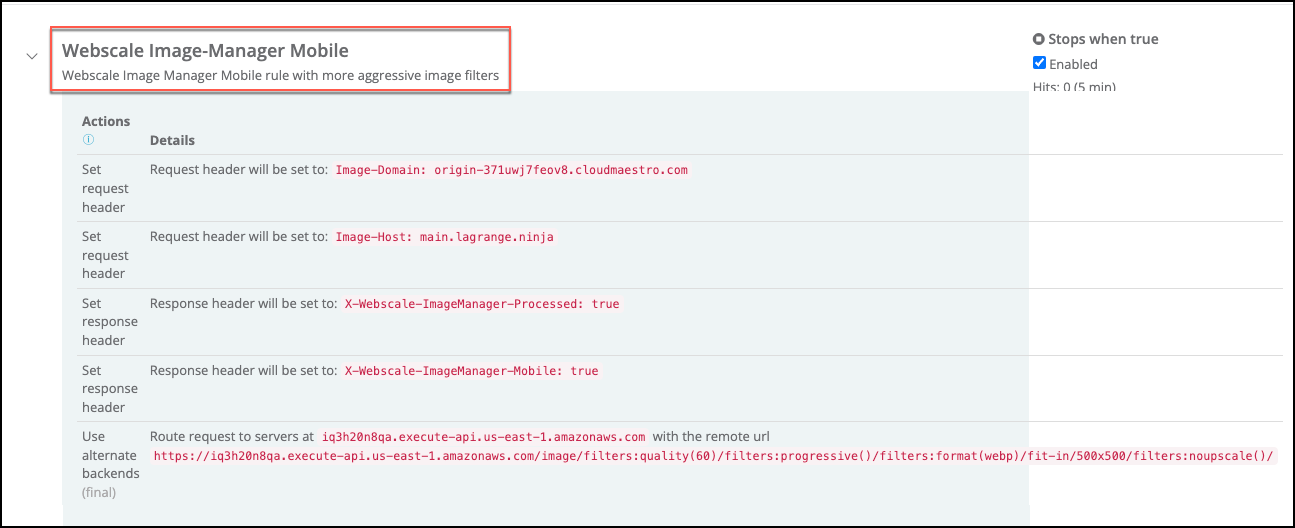
Webscale Image-Manager Mobile: Mobile users
-
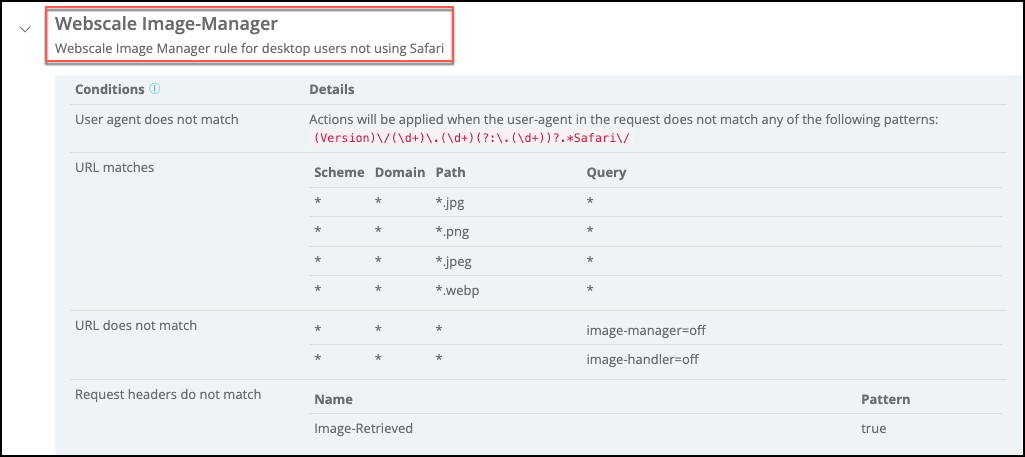
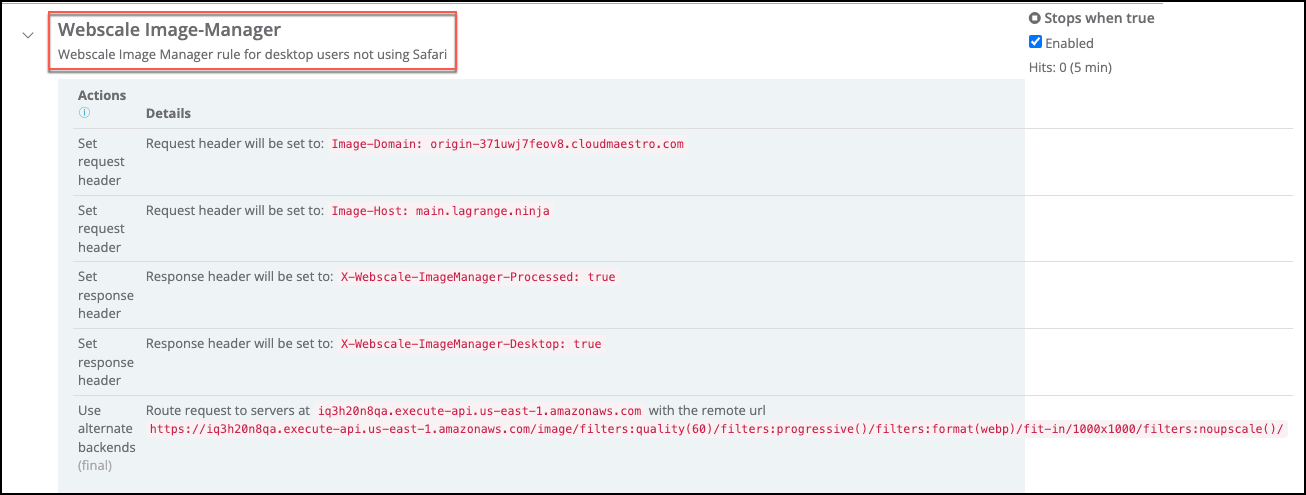
Webscale Image-Manager: Desktop users with other browsers or newer versions of the Safari browser (2014 and higher)
-
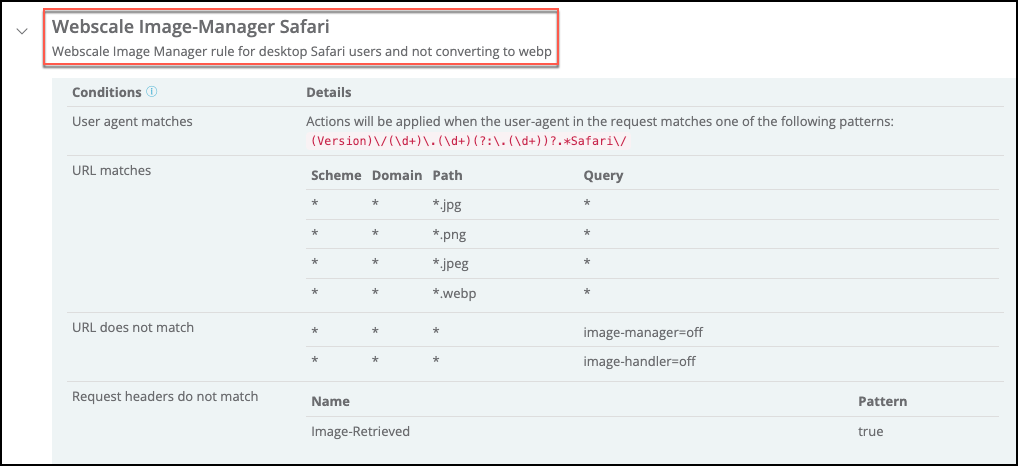
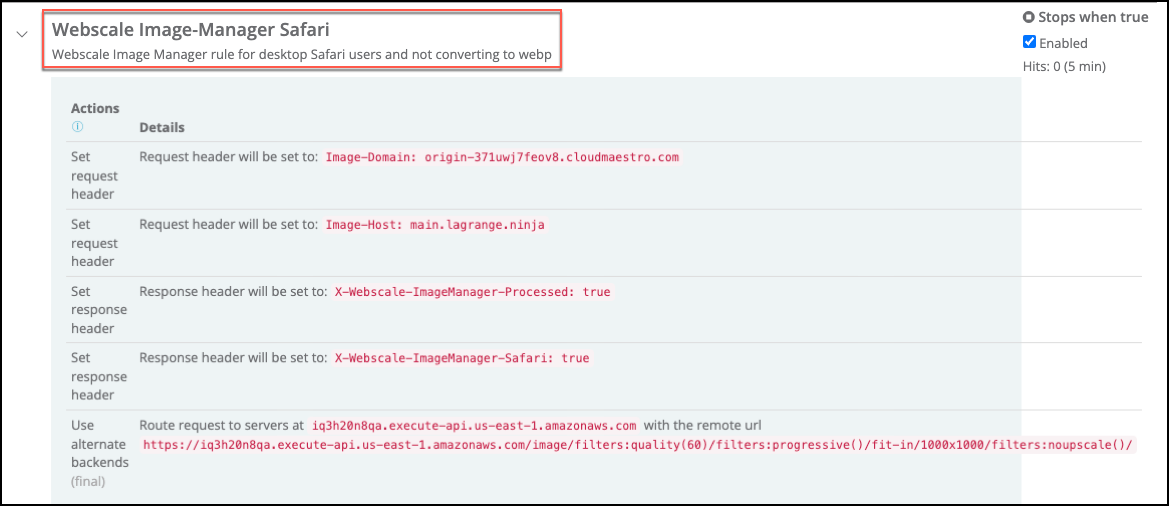
Webscale Image-Manager Safari: Desktop users with a version of the Safari browser that does not support WebP-formatted images (2013 and older)
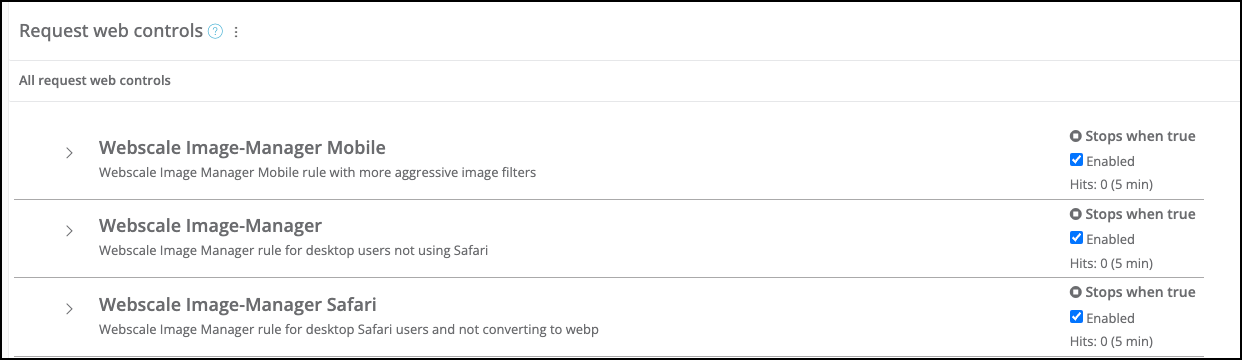
The three standard Web Controls cover the different image processing needs for each type of user. For instance, small images render faster on mobile device screens and decrease data transfer while larger ones can display better for desktop users.
For requests that meet the conditions for the Webscale Image-Manager Mobile and Webscale Image-Manager Web Controls, Image Manager converts all images to the WebP (WebP) file format.
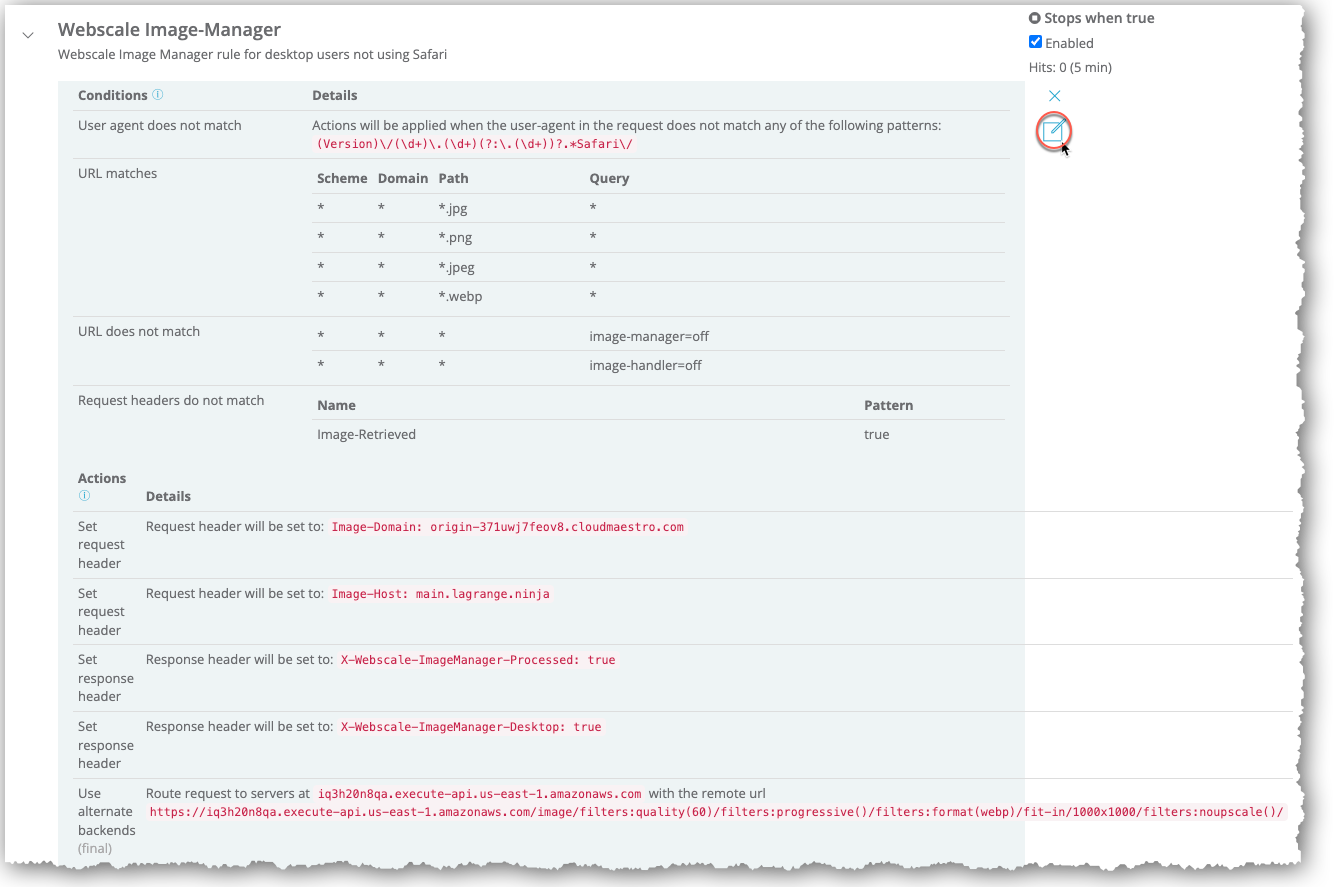
However, not all versions of the Safari browser support WebP-formatted images. The Webscale Image-Manager Safari Web Control pertains to requests from versions of the Safari browser that do not support WebP-formatted images.
For requests that meet the conditions for the Webscale Image-Manager Safari Web Control, Image Manager does not convert the images to the WebP file format. All images retain their file formats unless the requests are for JPEG (JPEG) or Portable Network Graphics (PNG) images. Then, Image Manager converts them to progressive JPEG or PNG images. For more information on the Progressive and other default filters, see Filters.
Note:
In the Request web controls page, the default Web Controls are grouped together and list in the order presented in the above screenshot. Keep them grouped in this order.Note:
If there are CORS, blocking, PageSpeed, or general Web Controls, move the Image Manager Web Controls below them in the list of Web Controls if they are not already.Conditions
The following table presents the default conditions for the standard Web Controls. For more information on conditions, see Creating Web Controls.
| Type | Setting details | Webscale Image-Manager Mobile | Webscale Image-Manager | Webscale Image-Manager Safari |
|---|---|---|---|---|
| Request header value does not match | Actions will be applied when the header Image-Retrieved does not match the pattern of true |
Yes |
Yes |
Yes |
| User agent matches | Actions will be applied when the user-agent in the request matches one of the following patterns: .*iPhone.*, .*iPod.*, .*Android.* |
Yes |
||
| URL matches | *.jpg, *.jpeg, *.png, *.webp as supported paths |
Yes |
Yes |
Yes |
| URL does not match | /* as the path and image-handler=off as the query |
Yes |
Yes |
Yes |
| Request headers match | webp-accepted as the name and true as the pattern |
Yes |
||
| Request headers match | webp-accepted as the name and false as the pattern |
Yes |
Actions
The following table presents the default actions for the standard Web Controls. For more information on actions, see Creating Web Controls.
| Type | Setting detail | Webscale Image-Manager Mobile | Webscale Image-Manager | Webscale Image-Manager Safari |
|---|---|---|---|---|
| Set request header | Request header will be set to: Image-Domain: origin-<your application ID>.cloudmaestro.com |
Yes |
Yes |
Yes |
| Set request header | Request header will be set to: Image-Host: <your default application hostname> |
Yes |
Yes |
Yes |
| Set response header | Response header will be set to: X-Webscale-ImageManager-Processed: true |
Yes |
Yes |
Yes |
| Set response header | Response header will be set to: X-Webscale-ImageManager-< Mobile, Desktop, Safari>: true |
Yes |
Yes |
Yes |
| Use alternate backends | Route request to servers at <your AWS API Gateway endpoint> with the remote URL <the domain for your AWS API Gateway endpoint>/image/filters: <filter name and settings> followed by <filter name and settings> for any subsequent filter with a backslash after the last filter |
Yes |
Yes |
Yes |
Filters
Each standard Web Control includes multiple default filters, which are presented as part of the string for the remote URL of the Use alternate backends action.
Information for the default filters for Image Manager follows. Each entry includes the filter name, usage in parentheses, and a description.
- Format (format): Specifies reformatting images to the supported WebP, JPEG, Graphics Interchange Format (GIF), or PNG file formats
- No upscale (noupscale): Specifies that Image Manager will only resize images to a smaller size than the original and not enlargen them while using upscaling to maintain quality
- Progressive (progressive): Specifies reformatting images to progressive JPEG and PNG file formats. Progressive images load immediately at a low resolution that progressively increases.
- Quality (quality): Specifies the image quality level (on a scale of one to 100) that corresponds to the amount of compression for JPEG images. For the best quality images, which are uncompressed, the level is “100” whereas the level is “1” for minimum quality and maximum compression. For quality levels of “80” to “85,” images usually decrease by 30 to 40 percent with little noticeable decrease in quality.
- Resize (fit-in): Specifies resizing images to defined dimensions.
Note:
Image sizes are in pixels.The following table presents the default filters and their values. For more information on Image Manager filters and syntax, see Filters overview.


| Filters | Webscale Image-Manager Mobile | Webscale Image-Manager | Webscale Image-Manager Safari |
|---|---|---|---|
/filters:quality(60)/filters:progressive()/filters:format(webp)/fit-in/500x500/filters:noupscale()/ |
Yes |
||
/filters:quality(60)/filters:progressive()/filters:format(webp)/fit-in/1000x1000/filters:noupscale()/ |
Yes |
||
/filters:quality(60)/filters:progressive()/fit-in/1000x1000/filters:noupscale()/ |
Yes |
Cache processed images
After Image Manages retrieves the images from your backend application and processes them, Webscale caches them. If Webscale CDN is enabled, a CDN control determines the CDN cache location for the processed images. If not, Site Cache settings specify the cache location.
Webscale support configures caching for Image Manager images as part of deployment if you do not already have a CDN control and Site Cache rule with this location.
Note:
Instead of the backend application, Site Cache might contain the original image. If so, Site Cache will serve it.CDN caching policies
If Webscale CDN is enabled, Webscale support creates a CDN control for caching JPEG, PNG, and WebP images with /media/* as the path if the CDN control does not already exist.
For more information on caching policies and working with CDN controls, see Configuring CloudEDGE CDN Caching Policies.
Site cache settings
For your application servers, configuring Image Manager includes creating a Site Cache rule that defines caching for media images and prevents caching the origin request that retrieves the image from your backend application.
For the rule, Webscale support adds the following conditions in the Create conditions dialog box part of deploying Image Manager .
- For the URL matches condition, /media/* is the path for caching JPEG, PNG, and WebP images in the Path field
- For the Request headers do not match condition, Image-Retrieved is the header with true as the pattern
Ensure that the Browser, Hostname, and Query cache key properties are enabled.
For more information on creating Site Cache rules, see Configuring and Flushing the Site Cache.
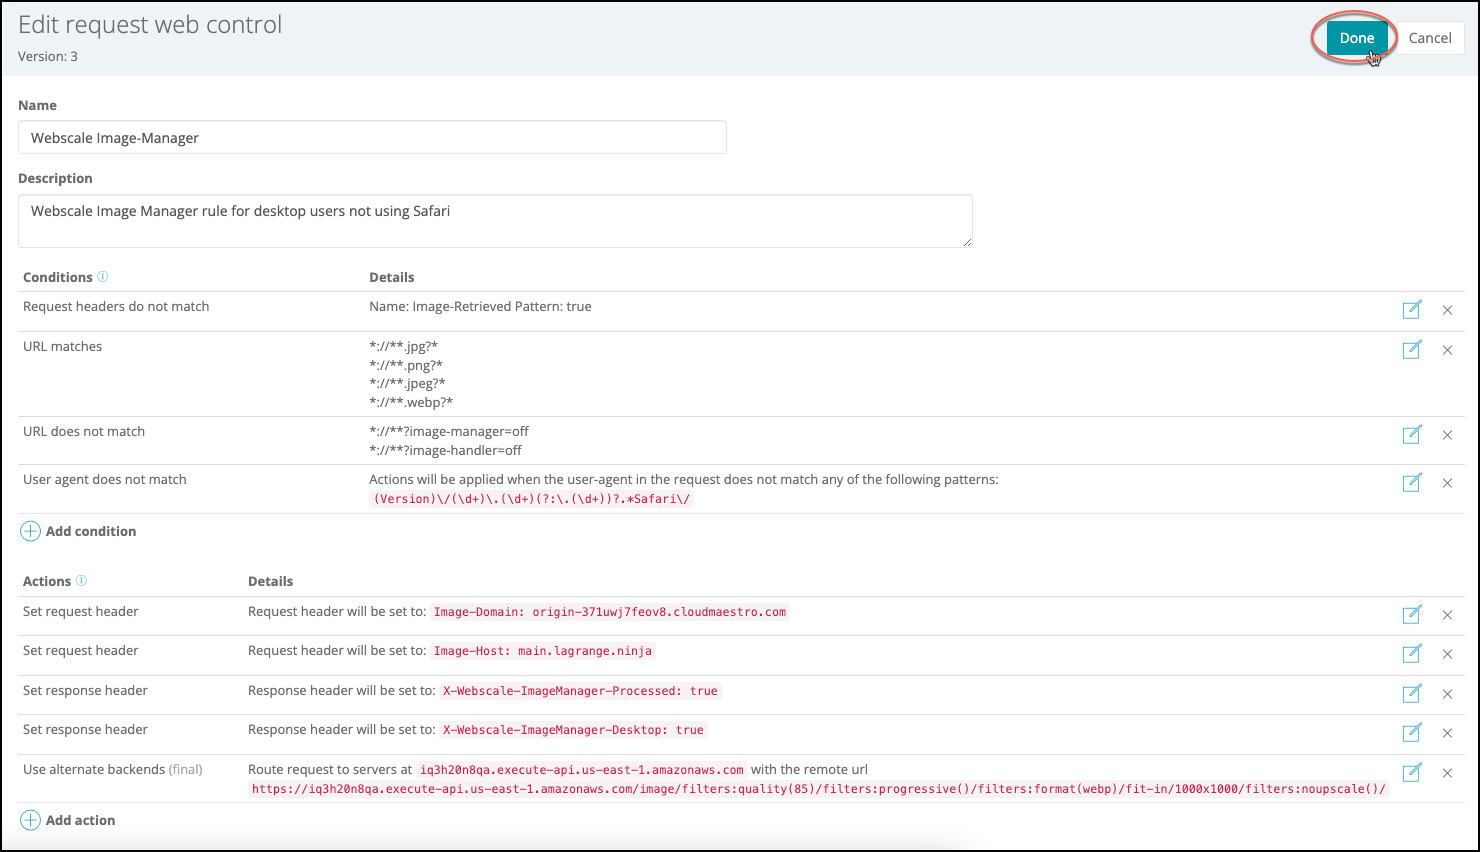
Change image processing settings
After Webscale installs Image Manager , you can change how it processes images by editing the Web Controls and modifying their filters and settings. For more information on filters, see Filters.
To edit filters for a Web Control
-
Access the Request web controls page, according to Access the Request web controls page in Creating Web Controls.
-
In the list of Web Controls on the Request web controls page, click the symbol for the Web Control to edit.
The conditions and actions for the Web Control display.
-
To the right of the conditions and actions, click the Edit icon for the Web Control.
-
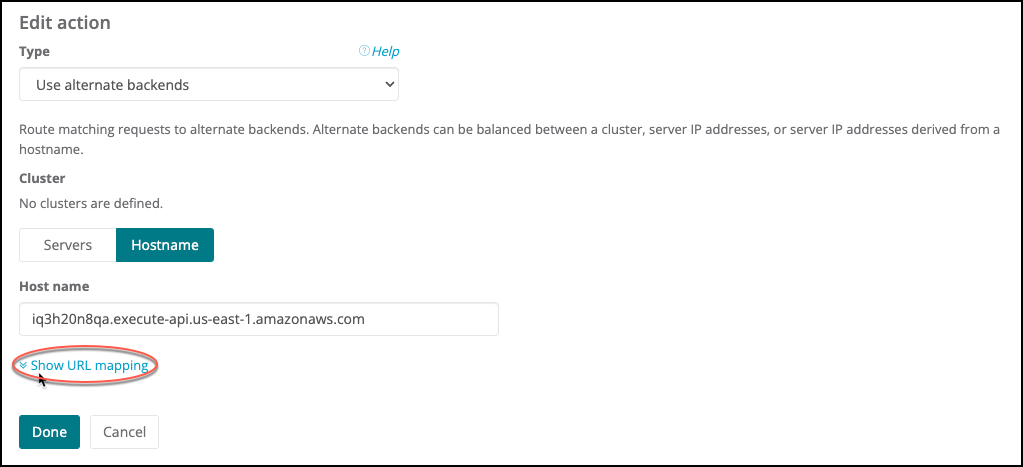
In the Actions section, click the the Edit icon for the Use alternate backends action.
-
Click the Show URL mapping link.
The URL mapping settings, including the Web Control filters, display.
-
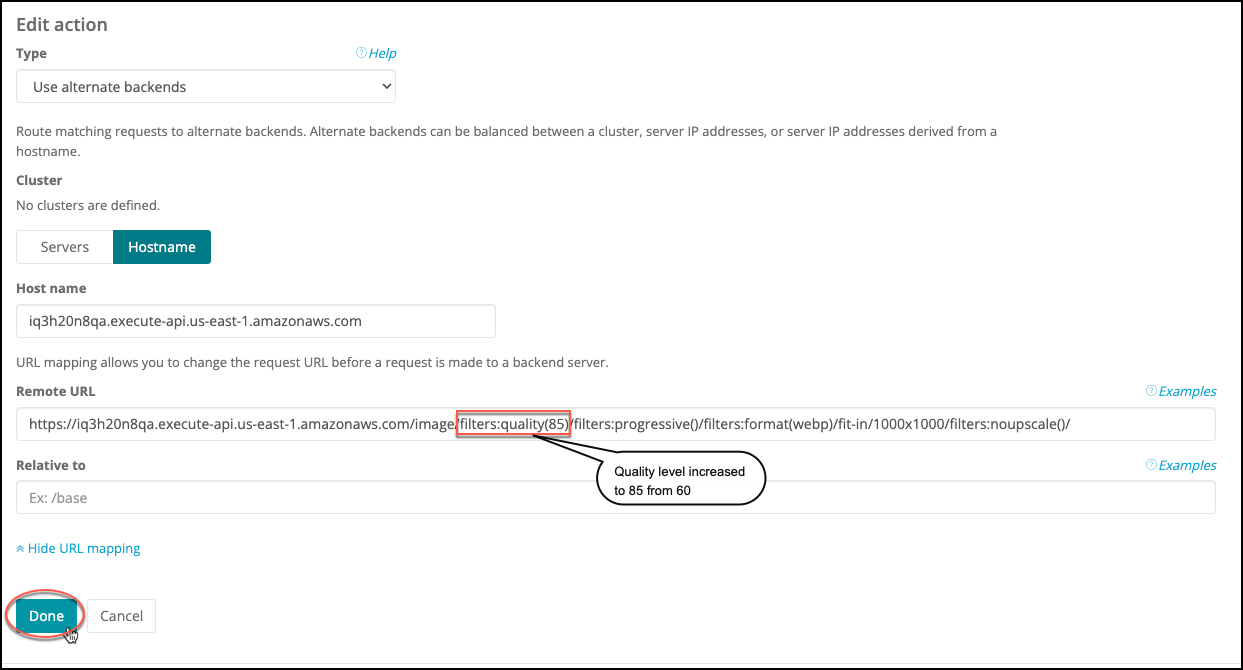
In the Remote URL field, modify the filters in the images path by performing any or all of the following operations.
- Append new filters to the filter string. Except for the Resize filter, each filter should start with
/filters:. The filter name and one or more values follow. The filter at the end of the string ends with a backslash. - Modify filter values. For example, you can increase image compression, which will also result in lower quality, by decreasing the numeric value for the Quality filter.
- Remove filters from the filter string.
- Append new filters to the filter string. Except for the Resize filter, each filter should start with
-
Click Done.
-
On the right side of the Edit request web control header, click Done.
-
Click Apply.


Filters overview
The Use alternate backends action for the Web Controls fulfills two important roles. It defines the image processing filters through the remote URL. It also identifies the route to the AWS API Gateway endpoint that triggers a Lambda for Image Manager .
Each filter starts with /filters: except for the Resize filter. All filters uses the syntax presented in the table of supported filters. The filter name and one or more values follow. Values can be numeric, boolean, or in text, such as the names of supported file formats.
For example, this action might include the Quality filter, which changes the compression and corresponding quality of JPEG images. A value of 60% of the maximum quality would be represented as: filters:quality(60).
When this action includes multiple filters, the filters are grouped and represented as a single string. While the filter order determines when Image Manager executes each filter, the processing order does not affect the results.
The last filter in the string ends with a backslash.
Detailed example
For the Webscale Image-Manager Safari Web Control, the Use alternate backends action settings, which include the default filters and values, are as follows.
Route request to servers at iq3h20n8qa.execute-api.us-east-1.amazonaws.com with the remote url https://iq3h20n8qa.execute-api.us-east-1.amazonaws.com/image/filters:quality(60)/filters:progressive()/fit-in/1920x1080/filters:noupscale()/
Action settings components

iq3h20n8qa.execute-api.us-east-1.amazonaws.comis the AWS API Gateway endpoint- The filters are located at the image subdomain of your endpoint domain
- The filters are presented as such:
/filters:quality(60)``/filters:progressive()/fit-in/1000x1080/filters:noupscale()/
Filter results
The processed images will have the following characteristics that correspond to specific filters and their values.

- Quality filter,
/filters:quality(60): Display at 60% of the quality of the original images with a smaller file size that corresponds to the amount of compression. - Progressive filter,
filters:progressive(): JPEG and PNG images load immediately at a low resolution that progressively increases after they are converted to progressive formats - Resize filter,
fit-in/1920x1080: Dimensions are 1920px by 1000px - No upscale filter,
/filters:noupscale()/: Resized if the requested dimensions are smaller than those of the original images
For general information about using Thumbor filters and detailed information about each filter, see Getting Started and Filters for the Thumbor documentation.
Supported filters
Image Manager supports a subset of the Thumbor filters and the custom Progressive filter.
The default Image Manager filters are the most commonly used filters. For more information about the default filters, see Filters.
Most often, users change filter values and not the filters. For example, the default value of the Resize filter (fit-in) for the Image Manager
Mobile Web Control specifies resizing images to 500 pixels by 500 pixels: /fit-in/500x500.
You would indicate that you want images that are 450 pixels by 450 pixels by changing the filter to: /fit-in/450x450.
| Filter Name | Syntax |
|---|---|
| Color fill | /filters:fill(color)/ |
| Convolution | /filters:convolution(1;2;1;2;4;2;1;2;1,3,false)/ |
| Equalize | /filters:equalize()/ |
| Format (jpeg, png, gif) | /filters:format(jpeg)/ |
| Grayscale | /filters:grayscale()/ |
| No upscale | /filters:no_upscale()/ |
Image format (heic, heif, jpeg, png, raw, tiff, webp) |
/filters:format(image_format) |
| Progressive | /filters:progressive() |
| Proportion | /filters:proportion(0.0-1.0)/ |
| Quality | /filters:quality(0-100)/ |
| Resize | /fit-in/800x1000/ |
| Crop | /10x10:100x100/ |
| RGB | /filters:rgb(20,-20,40)/ |
| Resize | /fit-in/(image_ dimensions) |
| Rotate | /filters:rotate(90)/ |
| Sharpen | /filters:sharpen(0.0-10.0, 0.0-2.0, true/false)/ |
| Stretch | /filters:stretch()/ |
| Strip Exif | /filters:strip_exif()/ |
| Strip ICC | /filters:strip_icc()/ |
| Upscale | /filters:upscale() |
| Watermark | /filters:watermark(bucket,key,x,y,alpha[,w_ratio[,h_ratio]]) |
Further Reading
- Configuring CloudEDGE CDN Caching Policies
- Configuring and Flushing the Site Cache
- Creating Web Controls
- Managing Web Controls
Have questions not answered here? Please Contact Support to get more help.
Feedback
Was this page helpful?
Glad to hear it! Have any more feedback? Please share it here.
Sorry to hear that. Have any more feedback? Please share it here.